Pages

.

Japanese Castella


I have to admit that I baked this cake out of curiosity, and not so much because I wanted to eat it. I have read so much about this popular Japanese cake that many talented and adventurous food bloggers have attempted to make. It's a simple cake, but takes a bit of practice and experience to perfect it. It's great that many of them have shared their tips and tricks in baking the perfect Castella, except that I didn't really take note of them! The entire process just sounded a little too daunting, plus it had to be baked in a special wooden box which I didn't have. I didn't think about the Castella again until I borrowed a book from the library and saw a recipe for Japanese Castella. Actually, I've borrowed this book many times before, but the name of the cake just didn't register in my mind until I discovered it on other food blogs. The recipe, of course, is just a recipe and doesn't tell you how difficult it is or what problems you might encounter. But when I saw that it just needs to be baked in a round springform tin (no special bakingware required), and I didn't need to use bread flour, I was delighted and set off to make my very first Castella, no holds barred (almost).


I have never eaten an actual Japanese Castella cake before, so I didn't have any expectations about it, except that I was crossing my fingers (as I always do with sponge cakes) that it will rise nicely in the oven. The recipe I used comes from a book by called Ultimate Cake by Barbara Maher. In the book, she explains that the Castella originated in Portuguese Madeira, and is reputed to have been brought to the southern Japanese island of Kyushu in the 16th century. The name is derived from Portuguese, Pão de Castela, which means "bread from Castile". The Castella is traditionally served in small slices on elegant plates with a cup of green tea. It has the distinctive colour contrast between the deep brown crust and the pale yellow interior.


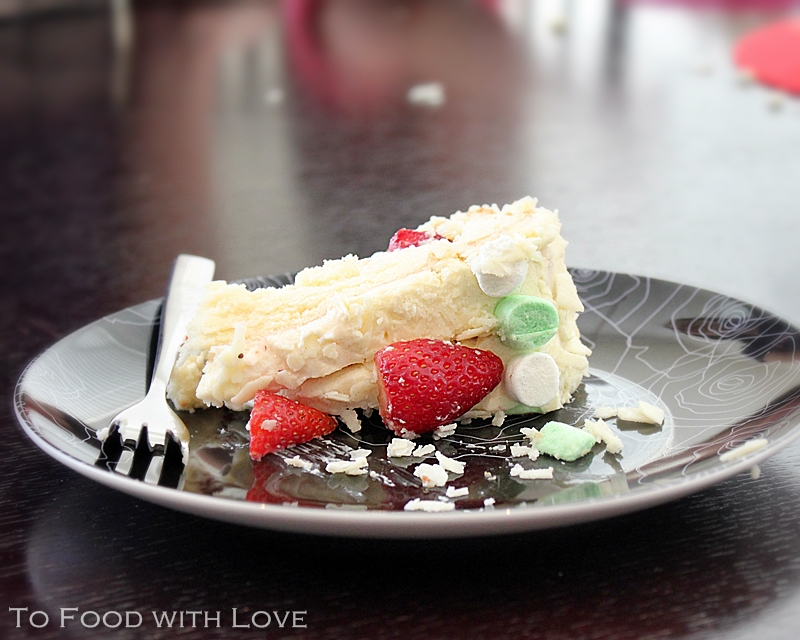
The recipe is easy to follow, just like that for a regular sponge or chiffon cake. The only difference is that it contains condensed milk and honey, and no fat. I was pretty happy that the cake turned out alright, and it rose to a level just above the rim of the cake tin. It shrank slightly upon cooling, but within acceptable limits. This cake is best enjoyed when it has fully cooled down, and probably after refrigeration. I think it tends to taste more moist that way, and has a better texture too, which is slightly springy (if that's how it's supposed to be!). It might be a little too sweet for some, although I think if eaten in small delicate bites with a cup of hot green tea, it would be quite a delightful treat for others. The use of honey in the cake is probably what distinguishes it from the Chinese steamed Egg Sponge Cake ("ji dan gao"). And what do I think of it? Well, it's pleasant to eat, though not in large amounts. A slice or two with green tea is good. In fact, I think the rest of the family enjoyed it more that I did! The kids' verdict: "I love this cake! It's so yummy! *nom nom nom*".

Update: This cake tastes much better after the first day, or even after the second day, refrigerated of course. Just this morning, I had a few slices with a cup of green tea, and was surprised at how soft and moist the cake was, unlike the first day when I tried it only a few hours after it came out of the oven. I'm so thrilled! I'd better get back to eating the cake before the G finishes everything! :)

Japanese Castella
Adapted from Ultimate Cake by Barbara Maher

Ingredients

6 egg yolks
100g (3 1/2 oz)caster sugar
2 tsp honey
Pinch of salt
75ml (5 tbsp) condensed milk
90g (3oz) plain flour, sifted
4 egg whites

Method

  1. Preheat oven to 160C (325F). Grease a 22cm (8 1/2 inch) springform tin or a medium loaf pan, and line the base and sides with non-stick baking/parchment paper.
  2. Using an electric mixer, whisk egg yolks and sugar to the ribbon stage, where it is thick, pale and doubled in volume. Then whisk in the honey, salt and condensed milk.
  3. Sift the flour over the egg yolk mixture and fold it in until well combined.
  4. In a large clean bowl, whisk the egg whites into soft peaks. Stir in 1/4 of the whisked egg whites into the egg yolk mixture to loosen the texture. Then, gently fold in the remaining egg white, taking care not to knock out the air.
  5. Pour the mixture into the prepared tin. Drop the tin on the table a few times to knock out any large air bubbles in the batter. Bake in the preheated oven on the middle rack for 45 minutes or until richly golden brown and a skewer inserted into the cake comes out clean.
  6. Remove cake from the oven and leave to rest in the tin for 5 minutes. Turn it upside-down onto a wire rack to cool. Then, carefully peel off the lining paper, wrap in cling wrap and store in an air-tight container. Refrigerate for at least 24 hours.
  7. To serve, trim off the side crusts of the cake and using a serrated knife, slice the cake into bite-sized pieces. Serve with hot Japanese green tea.
reade more... Résuméabuiyad

Apple and Blueberry Shortcake


Granny Smith Apples are currently in season (in Australia, that is) and I couldn't resist buying some in case I had sudden cravings for apple desserts. I love using apples for baking, and some of my favourites are Apple Crumble and Dutch Apple Cake, which I have made over and over again. My original intention with these lovely green apples was to make an Upside-down Apple Cake, which is absolutely decadent. However, the recipe makes quite a large cake and is best eaten on the same day. All I wanted was a slice or two, and not having to eat apple cake everyday for the rest of the week. It's just too sinful. Instead, I found a recipe for Apple and Blueberry Shortcake in Bills Food, a cookbook by Bill Granger (I was puzzled why it was spelt Bills and not Bill's, and G speculated that some people might take it to mean "Bill is Food" instead. Hmmm....).


This shortcake looks somewhat like an apple pie since it's essentially apple filling enclosed in pastry, except that it's not really pastry but perhaps more like cakey shortbread. I substituted the blueberries with a mixture of blue, red and blackberries (I bought a bag of frozen mixed berries) which is why the apples in the picture above are tinged with red from the raspberries. This shortcake makes a wonderful teatime treat, and is also a delicious way to end a meal on a sweet and fruity note.

Apple and Blueberry Shortcake
Adapted from Bills Food

Ingredients

4 large Granny Smith apples
Finely grated zest of 1 lemon
2 tbsp sugar
1/2 cup unsalted butter, room temperature
1/2 cup caster sugar
1 egg
1 1/2 cups plain flour
1 tsp baking powder
1 cup blueberries (or mixed berries if you like)
Demerara or raw sugar, for sprinkling
Whipped cream, to serve

Method

  1. Peel and core apples, then cut each one into 16 slices. Put them in a medium saucepan with zest, sugar and 2 tablespoons water, then cover and stew on low heat for 10 minutes or until just tender but not mushy. Stir or turn the apples occasionally to prevent the ones at the bottom of the pan from overcooking.
  2. Cream butter and sugar using an electric mixer until light and fluffy. Add egg and beat well. Sift in flour and baking powder and stir until combined. Turn onto a lightly floured surface and knead until smooth. Divide into two and refrigerate for 30 minutes.
  3. Preheat oven to 180C (350F). Roll each half of the dough into a 8 1/2 inch round. Grease and line the base of a round 9 inch springform tin. Press one round into the base. Spread the apples over the dough, leaving a small border around the edge. Sprinkle with berries. Place the other round of dough over the top and press the edges to seal. Brush the top with water and sprinkle with sugar.
  4. Bake for 35-40 minutes until golden brown. Cool in the tin for 20 minutes before removing. Serve warm with whipped cream.
reade more... Résuméabuiyad

Strawberries and Cream Sponge Cake with White Chocolate Flakes


Last weekend, we had a little celebration for Z's birthday at home. Upon special request, G made his "famous" Hainanese chicken rice (scroll down to the end to see photo) which we all enjoyed for lunch. For his birthday cake, I made a simple vanilla sponge filled with fresh strawberries and chantilly cream, and covered it with more cream and plenty of white chocolate flakes. Z said he loved the cake, mostly because of the marshmallows, and the strawberries too. The sponge itself turned out fine, thankfully. I actually made a "test" sponge the day before using a slightly different recipe and it turned out really "spongey" and rubbery - it reminded me of loofah! After that experience, I decided to play it safe and stick to a recipe I've used for making Swiss Roll. I simply couldn't afford to get Z's birthday cake wrong, although I was prepared to just buy one from the cake shop if I really needed to.


I adapted the recipe to make a larger cake, using a 9 inch round pan, and used 5 eggs instead of 4, and increased the quantities for the other ingredients proportionately. As it was baking in the oven, I stood by the oven door and peered through the glass, waiting to see if the cake rose. I wanted to be sure it wasn't going to turn out flat, dense and rubbery like the first one. What a relief (and joy!) it was to see it slowly rising and turning golden brown on top. Phew! With that out of the way, I started to think about how to make the chocolate flakes.


I wasn't quite sure what the best way to make chocolate flakes was. Somehow, using a grater didn't really work for me, so I skipped that idea. Instead, I decided to melt the white chocolate (which I did in a microwave in 30 second spurts) and spread it thinly across a large piece of non-stick baking paper (or parchment paper). The weather was quite cool, so I let it sit out on the table for 15 minutes or so until it set. Then, with an offset spatula, I slowly scraped the chocolate off the paper. I found that I could easily do this without a spatula by gently "crumpling" the paper and let the chocolate flakes fall off. I crushed the flakes into smaller pieces before letting them set in the fridge so that they firmed up into crisp little flakes. I was happy with how they turned out, and they tasted wonderful with the cake too, adding a bit of sweetness and texture to it. I also think it made the cake look quite pretty (besides helping to cover up the not-so-professional-looking frosting).


I was so busy cutting the cake on the day that I forgot to take proper pictures of it. The ones I posted above and below happen to be the last slice of cake, which looks like a mangled mess with strawberries barely clinging onto the frosting. Nevertheless, I was pleasantly surprised that the cake tasted quite good, although next time, I would probably slice the cake into three layers instead of two, and fill it with more cream and strawberries. And if raspberries are in season, I would definitely add those too!

Delicious poached chicken, with cucumbers, coriander and spring onions

A snapshot of our little chicken rice feast!
reade more... Résuméabuiyad

Wafu Hamburger with Potato Salad


Wa means Japanese and Fu means style. So this dish is a Japanese-style hamburger (or hamburg), which is really a grilled beef patty (or a giant meatball) topped with a Japanese-style sauce. It sounds so simple, and yet the combination of the moist and tender beef with the shimeji mushrooms (love the texture!) and dashi gravy is so delicious. The potato salad is a great side dish for this as it helps so soak up some of that mushroom gravy and makes the perfect mouthful when eaten together with the hamburger patty. This was a comforting and enjoyable meal for both G and I, although the kids weren't too excited about it when they spotted bits of onion in the meat. I guess I should dice up the onions a little finer next time and hope they don't notice them!

Wafu Hamburger with Shimeji Mushrooms
Adapted from Essentially Japanese by Hideo Dekura

Ingredients

Vegetable oil
1 brown onion, peeled and chopped
600g (1 1/4 lb) minced beef
1 tsp salt
Freshly ground black pepper
Pinch of nutmeg (optional)
1/2 cup fresh breadcrumbs or 1 piece white bread, soaked in 1/2 cup milk
1 egg yolk
Mushrooms to taste, such as shimeji, eringe or enoki
2 1/2 inch carrot, peeled and cut into matchsticks
1 cup dashi, warm*
1 tsp soy sauce
1 tsp tamari
2 tsp potato starch, mixed with 1/4 cup dashi*
1 spring onion, sliced
1 tsp ginger juice

Accompaniments:
Boiled egg
Cherry tomatoes
Lettuce leaves
Potato salad, to serve (click here for recipe)

* I used instant dashi granules (dashinomoto) instead: 1 cup dashi = 1/2 tsp dashinomoto + 1 cup water

Method

1. Heat a little oil in a frying pan and sautee onions until transparent. Set aside to cool.

2. Put beef in a bowl and season with salt, pepper and nutmeg. Mix with hands until well combined. Add the soaked breadcrumbs and milk to the beef and mix well. Stir through egg yolk and onions.

3. Divide the mixture into four oval shapes. Using your thumb, make a dent in the middle of each patty. Place patties under a broiler or grill for about 10 minutes or until cooked to your liking.

4. Combine the dashi with the tamari and soy. While the hamburgers are cooking, trim and clean the mushrooms. Stir fry them with the carrot for 1 minute, adding the dashi mixture as they cook. Simmer for 30 seconds. Add potato starch mixture and stir until thickened. Add spring onion and ginger juice.

5. Transfer the cooked hamburgers to serving plates and spoon the mushroom sauce on top. Serve with potato salad, boiled egg, lettuce and tomatoes.


Wafu Hamburger with shimeji mushrooms and Japanese potato salad


reade more... Résuméabuiyad

Almost Applebee's Oriental Chicken Salad


Even though I've only had Applebee's Oriental Chicken Salad once in my life (and many years ago), I will always remember it as being one of the tastiest salads I've had. I'm no salad lover, which is why the crunchy toasted almond flakes and crispy noodles really did it for me, not to mention the deep-fried chicken tenders scattered over the top of the salad which made it a complete and satisfying meal. The "oriental" dressing was fantastic, although at the time, I was more focused on enjoying my meal rather than trying to analyse and figure out the components of the dressing.

I googled it and was pleasantly surprised to see a few recipes (bordering around similar ingredients) for this salad. Apparently, I'm only one in thousands of other people who love Applebee's Oriental Chicken Salad, and so of course there are many out there who have attempted to recreate this dish at home. As I am thousands and thousands of miles away from the nearest Applebee's, it is quite impossible for me to sample this salad for the sake of replicating it in my kitchen. I could only hope that the copycat recipe I found on the Learntocookit.com was close to the real thing.

The salad component of it is pretty easy - romaine/cos lettuce, Napa/chinese cabbage, red cabbage and carrots. Then you have the deep-fried chicken tenders, which can easily be substituted with frozen chicken tenders that are either oven-baked or deep-fried. Then add some toasted almond flakes and crispy noodles (which I found in the Asian food aisle at the supermarket).

Then comes the dressing. I followed the recipe for the dressing and realised that it tasted just like the sauce used in Chili's Chicken Crispers with Honey Mustard sauce. Delicious as a dipping sauce, but as a salad dressing, it didn't taste very oriental to me. I think the only thing that's oriental about the salad is the crispy noodles! I decided to make a second batch of the dressing and added a touch of soy sauce and plum sauce, and used more sesame oil. I think that seemed to increase the depth of flavour and made it a little more tangy and not just sweet all the way. The combination of the salad with the chicken, dressing and crispy almonds and noodles is fantastic and I enjoyed it so much that I had it again for dinner the next day! I can't say that it tastes like Applebee's (because I had it so very long ago that I can't remember!), but it is a delicious chicken salad that I'll be making again!


Almost Applebee's Oriental Chicken Salad
Adapted from LearntoCookit.com

Ingredients

Ingredients

Dressing:

3 tbsp honey (use a neutral tasting honey)
1 1/2 tbsp rice wine vinegar
1 tsp soy sauce
1 tsp plum sauce
1/4 cup mayonnaise
1 tsp Maille Dijon mustard
1 tbsp sesame oil
2 tbsp chopped green onions

For the Salad:

1 egg beaten with 1 tbsp milk
1/4 cup flour
1 1/2 cup corn flake crumbs (finely crushed cornflakes)
1 tsp salt
1/4 tsp pepper
1 boneless, skinless chicken breast half (or use 4 chicken tenders)
4 cups vegetable oil (for deep frying)
3 cups chopped romaine/cos lettuce
1 cup red cabbage
1 cup Napa cabbage
1/2 carrot, julienned or shredded
2 tbsp toasted almond flakes
1/3 cup crispy chow mein noodles

Method

Place ingredients for the dressing in a small bowl and beat with a handwhisk until smooth and creamy. Chill in the fridge.

Place the egg and milk mixture in a shallow bowl. Place flour in another shallow bowl. Place cornflake crumbs on a plate.

Cut the chicken into strips and season with salt and pepper. Dip each strip first in the flour, then egg mixture followed by the cornflake crumbs.

Heat up oil in a wok and deep-fry the chicken for 2-3 minutes each side until golden brown and cooked. Drain on absorbent kitchen paper. Slice the chicken into strips.

Toss the romaine/cos lettuce, red cabbage, Napa cabbage and carrots in a large bowl and top with the almonds and crispy chow mein noodles. Arrange chicken strips over the salad and drizzle the dressing all over.

reade more... Résuméabuiyad

Best-loved Lemon Tart


My mum has been making this lemon tart since I was a little girl, and it is one of the best-loved desserts in our family. I would like to think that this is the best lemon tart I have ever eaten. I have never known any other version of lemon tart until I came to Australia and noticed that all the lemon tarts sold at cafes and patisseries were different from what I was used to. They were really lemon cream tarts I suppose, as the lemon filling typically contains cream. I have to say that mum's version wins hands down, as I prefer the tart and lemony jam-like filling which is perfectly balanced by the rich, buttery and slighly salty shortcrust pastry. Pure heaven!

It's really hard to stop at just one slice, and I can shamelessly admit to having two or three (or four) slices in one go. The kids love it too, especially the crisp and buttery edges of the tart shell. When I was a kid, I used to break off the edges of the tart as they were my favourite part, and now my kids do the same! I'm glad that they have the chance to enjoy eating the same things I did when I was their age. They will thank me for it when they are older!


I hope that you will try out this wonderful recipe for Lemon Tart, and love it as much as all three generations in our family have.

Lemon Tart Recipe

Ingredients

Pastry:
150g (5 oz) cold salted butter, diced into cubes
1 tsp baking powder
225g (7.5 oz) plain flour
1/2 tsp salt
1 egg yolk (cold) mixed with 1 tbsp ice-cold water
1 tbsp ice-cold water (extra)
1 tsp lemon juice
A little egg white for brushing

Filling:
Juice and finely grated rind of 1 lemon
45g butter, softened
180g  (6 oz) caster sugar
1 large egg

Method

1. Sift flour with baking powder and add salt. Combine with butter and rub with fingertips until the mixture is crumbly (like breadcrumbs). Drizzle over the egg-water mixture and lemon juice, mix and gently bring the dough together to form a ball. If the dough is not coming together, it's too dry. Slowly add 1 tbsp of ice-cold water or just enough for it to come together to form a smooth dough. Take care not to overwork / overknead the dough. Cover in clingwrap and rest in fridge for 30 minutes.

2. Grease the base and sides of a 9-inch / 23cm loose-bottomed tart tin and lightly dust with flour. Shake off excess flour.

3. Roll out the pastry between 2 sheets of baking paper into a circle about 4mm thick. Line the tart tin with the pastry. Cut off excess pastry and crimp the edges. Fill up any holes with the excess pastry. Prick the base of the pastry all over with a fork and rest it in the fridge for 30 minutes to prevent shrinkage while baking.

4. Preheat oven to 180C (350F). Blind bake the pastry by lining it with baking paper and filling it with rice/beans/weights. Bake for 15 minutes, then remove the baking paper and weights, and bake for another 10-15 minutes until the base just starts to turn colour. Remove from the oven and brush the inside of the pastry with a little egg white (to seal the pastry and prevent it from getting soggy after the filling is added). Return it to the oven for 1 minute, and then remove from the oven (unless you have prepared the filling by now, then simply pour the filling into the tart shell and bake).

5. While the pastry is baking, you can prepare the lemon filling. Using an electric mixer, cream butter and sugar, then beat in egg and rind until fluffy. Beat in the lemon juice. Pour into the baked tart shell and bake in the oven at 180C for about 15-20 minutes or until the filling starts to bubble and the top starts to caramelize or turn light brown. Remove from oven and leave to cool.

6. Carefully remove the tart from the tin and place on a serving plate. Using a sharp knife, cut into wedges and serve. Store any leftovers in an airtight container.

Note: You can use a food processor to make the pastry dough if you have one. That's what I used :)

Unbaked tart shell

reade more... Résuméabuiyad