Pages

.

Dark Ale Veal Osso Bucco


I love my Chasseur french oven. At a fraction of the price of a Le Creuset, this stylish enameled cast iron cookware comes in a variety of colours, looks great and has so far produced excellent results. I've only used it twice since I bought it a few weeks ago. The first time, I made Massaman curry lamb shanks with potatoes and they tasted fantastic served with steamed jasmine rice. This second time around, I opted to cook this delicious veal osso bucco slow-cooked in dark ale, and I tell ya, it was SO GOOD. Seriously (I'm salivating at the thought of it). I can't wait to make this again when my parents come and visit in a few months' time. The osso bucco was so melt-in-your-mouth tender, the onions were just lovely and the sauce served with the soft cheesy polenta was absolutely yummy.


The original recipe called for black ale, which Mr G could not find at the bottle shop. So I used White Rabbit dark ale instead, which seemed to have worked really well too. There is quite a substantial quantity of sauce in this stew, bordering on the soupy side. I was expecting a thicker gravy-like consistency, although it was still very tasty especially when mixed with the polenta. Next time, I will try using a black ale instead and perhaps reduce the amount of water used in the recipe. I might also consider adding more onions to produce a chunkier gravy. That's just about the only thing I love about winter, and that is being able to indulge in rich and hearty stews alongside some soft polenta or buttery mashed potatoes.

Dark Ale Veal Osso Bucco
(adapted from Seasons by Donna Hay)

Ingredients

6 x 200g (7 oz each) pieces veal osso bucco
Plain flour for dusting
2 tbsp olive oil
2 brown onions, thickly sliced into half inch thickness
2 cups black/dark ale
2 cups beef stock
1/2 cup water
3 bay leaves
A few sprigs of thyme (optional)
2 tbsp tomato paste
1 tbsp sugar
Salt and black pepper to taste
1/4 cup chopped parsley, for garnish

Method


  1. Preheat oven to 180C (350F). Dust the veal with flour and shake off excess.
  2. Heat the oil in a deep heavy based casserole or french/dutch oven. Fry the veal on high heat in batches about 3-4 minutes each side until browned. Remove and set aside. 
  3. Reduce heat to low and fry the onions until caramelized.
  4. Increase heat to high again, and gradually add the ale, scraping the bottom of the pan. Cook for 3-4 minutes until reduced by half. Add stock, water, bay leaves, thyme, tomato paste, sugar and stir to combine. Bring to a boil, cover with a lid and cook in oven for 1 1/2 hours or until veal is tender and falling off the bone.
  5. Place the casserole on the stove and bring to a boil on high heat, uncovered for 8-10 minutes until the sauce is reduced and slightly thickened. Season with salt and pepper. Serve with soft polenta or mashed potatoes. Garnish with chopped parsley.


reade more... Résuméabuiyad

English Breakfast Latte Ice Cream

Floating and melting island of ice-cream...
This ice cream was inspired by memories of how I used to spend my Saturday mornings back in Singapore when I was still young, single and carefree. What I'm trying to say is that instead of waking up in the morning to children's cries for milk, nappy change and brekkie, Saturday morning was absolute bliss with unlimited me-time, quiet time, any time. I pretty much had a standard routine where I would take a leisurely walk to the Coffee Bean & Tea Leaf about ten minutes away, grab a copy of the newspapers and order myself some breakfast. In terms of food, there wasn't much to choose from, and it was usually a toss up between bagels or muffins of some sort. After all, I was really only there for the English Breakfast Latte, and I would order the same thing every Saturday morning. The regular staff there kind of know how I like it, with "more tea" (i.e. more tea leaves). But when someone new takes my order of EBL with "more tea", I usually receive the puzzled look plus the occasional furrowed brow, followed by the question "Err...More tea...?". Yes, I tell them. More tea leaves. I like it stronger, I explain. (And no, I'm not asking for a large EBL for the price of a small).

Ever since I purchased an ice cream machine a few weeks ago, I have been making a list of all the different types of ice cream I would love to make. So far, I have only made Strawberry Ricotta ice-cream, and now that's finished (leaving more room in the freezer once again!), I could move on to making something else. I've always wanted to make an iced milk tea ice cream. When in Singapore, I would always order "teh peng" (which literally means iced tea), which is a concoction of black tea, sugar, condensed milk and sometimes evaporated milk, and plenty of ice of course. A good glass of "teh peng" has a nice and rich caramel-like flavour that is sweet enough that it doesn't get diluted by the ice as it melts, and just the right balance of richly brewed tea without any of the astringency and bitterness from the tannins.


And so, getting to the point now, I decided to make an iced-milk-tea ice cream using English Breakfast tea. This time, I made a custard base for the ice cream as I wanted to achieve a rich and creamy texture. In order to get the sweet vanilla flavours of the English Breakfast Latte, I added some Coffee-mate liquid French Vanilla, which I think also enhances the creaminess of the ice cream. As the French Vanilla creamer contains about 1 tsp sugar per tablespoon of creamer, if you choose to omit it, you may need add more sugar to the ice cream mixture. I was really happy with how it turned  out - luscious, velvety smooth and creamy ice cream tasting of rich caramel and tea. I also love the slightly "chewy" texture it had. I also discovered that it tastes really good if you sandwich it between some thinly sliced baguette, although I'm sure any kind of bread would work well too.

English Breakfast Latte Ice Cream

Ingredients

1 cup milk
1 cup cream
2 inch cinnamon stick
4 tsp English Breakfast tea leaves
1/4 cup French Vanilla Coffee-Mate (or substitute with 4 tsp sugar)
1/2 tsp vanilla extract
1/4 tsp salt (or to taste)
6 tbsp caster sugar (or to taste)
3 egg yolks

Method

Heat the milk and cream together with the cinnamon stick in a saucepan and bring to a boil. Turn off the heat and add the tea leaves. Cover and let it steep for 2-3 minutes. Add half the sugar and stir until dissolved. Add vanilla and salt.

In a bowl, whisk egg yolks with remaining sugar until pale and fluffy. Strain the tea mixture gradually into the eggs while constantly whisking the eggs. Pour the mixture back into the saucepan and stir over low heat until the mixture starts to thicken slightly, enough to coat the back of the spatula. Remove from the heat and let it cool. Chill in fridge for a few hours or overnight. Then churn in ice cream maker according to manufacturer's instructions.


reade more... Résuméabuiyad

Wonton Noodles (Wantan Mee)


I am pleased (and utterly thrilled!) to announce that I am doing a guest post for Rasa Malaysia today. Ever since I got that email from Bee a couple of weeks ago, I have been looking forward to this, plus I have also been feeding my family with loads of wonton noodles over the last two weekends. Thankfully (for all of us), my second attempt at perfecting the recipe was a success and I was really happy with how it turned out. I have to say my favourite part of the dish is the pickled green chillies because that's how I remember enjoying these noodles back in Malaysia. If you prefer to omit these chillies, try mixing the noodles through with Sriracha chilli sauce instead. Sriracha has a tangy zing and bite that lifts the flavours of the noodles and gives a subtle kick of heat to the dish. Do check out my Wonton Noodles guest post at Rasa Malaysia!

Wonton Noodles are known in Chinese dialect as "Wantan Mee", as the locals would call it. I'm guessing that most of you would be more familiar with the version you get at Hong Kong-style eateries where the noodles don't look as dark (in all fairness) as the one you see here. This version of " Wantan mee with black sauce" is typically found in KL and the northern part of West Malaysia. My favourite has to be the one from Pun Chun Noodle House in Bidor and there's just something about it (other than MSG) that makes it taste so insanely good. It's been years since I last had a meal there, and when I think of Wantan Mee, the Bidor version comes to mind immediately.


In Malaysia, the basic Wonton Noodles are usually egg noodles tossed in a sauce, topped with Char Siu (Bbq pork), wontons, choy sum and pickled green chillies. I should emphasize that the pickled green chillies are as essential to this dish as are the rest of the ingredients to achieve that authentic balance, and they are really easy to prepare too. In fact, if you just use store-bought Char Siu (or even wontons too), making this dish is really easy. Just make sure that you get good quality fresh egg noodles (not too thin) and your favourite brand of ready-made wonton skins.

Wonton Noodles (Wantan Mee)
(Serves 4)

Ingredients:

400g (14 oz) fresh wonton noodles (egg noodles)
1/2 bunch choy sum, washed and cut into 2 inch lengths
Vegetable oil

Toppings, to serve:
Approx 300g (10 oz) char siu pork, thinly sliced into bite-sized pieces
16-20 wontons (use pre-made frozen wontons, or see below for Wonton recipe)*
Pickled green chillies (see below for recipe)**
Ground white pepper
Sriracha chilli sauce, to serve (Recommended!)

A. Seasoning Sauce (per serving of noodles), mixed well:

1 tbsp thick dark soy sauce (Cheong Chan brand thick caramel)
1/2 tbsp soy sauce
1 tsp sesame oil
1/8 tsp salt (or to taste)
1/2 tsp sugar
Dash of Golden Mountain sauce (optional)

B. Mushroom Sauce:

5-6 Chinese dried black mushrooms, stems removed
1 cup warm water
2 cloves garlic, lightly crushed with the back of a knife
1 1/2 cups water
1 tsp chicken stock powder
1 1/2 tbsp oyster sauce
2 tsp soy sauce
1 tsp mushroom flavoured soy (optional)
Salt and pepper, to taste
1 tsp cornstarch dissolved in 2 tbsp water

C. Lard or Garlic oil:

4 cloves garlic, finely chopped (alternatively, use diced pork lard/fat)
3 tbsp vegetable oil

Method:

Prepare Mushroom Sauce (B):
Soak mushrooms in 1 cup warm water until softened. Squeeze out excess water from mushrooms, set aside, and reserve the soaking liquid for later. Slice the mushrooms if desired. Heat up 1/2 tbsp vegetable oil in a small saucepan. Fry the garlic and mushrooms for 1 minute. Then add the rest of the ingredients and reserved soaking liquid, except for the cornstarch solution. Bring to a boil. Cover and simmer for 20 minutes. Add cornstarch solution and stir until the sauce boils and thickens slightly. Taste and adjust seasoning if desired. Turn off the heat, cover the saucepan and set aside.

Prepare Lard or Garlic oil (C):
Heat the oil in a pan and fry the lard or garlic (whichever you prefer) over low-medium heat until it starts to turn lightly golden in colour and crisp. Transfer immediately to a heat proof bowl and set aside.

When ready to serve, follow the steps below:

1. Cook vegetables:
Bring a large pot of water to the boil. Add 1 tbsp vegetable oil and a pinch of salt and sugar. Blanch the choy sum stems first, followed by the leaves. Remove, drain and set aside.

2. Cook wontons:
Boil water in pot and cook the wontons in batches for about 1-2 minutes until cooked. Stir occasionally to prevent sticking to the bottom of the pot. Drain and set aside. Alternatively, add them to some prepared chicken broth and garnish with spring onions.

3. Prepare noodles:
In a shallow serving bowl, place 1 serve of the seasoning sauce (A) and lard/garlic oil (C).

With the same boiling water used for blanching the vegetables, bring it to a rolling boil, and cook 1 bundle (100g / 3oz) of noodles for about 30 seconds or until done to your liking. Use a large sieve to drain the noodles and run it under cold running tap water for 5 seconds, then dip the noodles in the boiling water again just to warm it up. Transfer the noodles into the serving bowl and toss them in the seasoning sauce. Add 6 tbsp of the mushroom sauce (B) and toss again. Add a dash of white pepper.

Garnish the noodles with choy sum, wontons and sliced char siu pork. Serve immediately wth pickled green chillies and a bowl of wonton soup. If you like it spicy, mix the noodles with some Sriracha chilli sauce. Enjoy!

^^^^^^^^^^^^^^^^^^^^^^^^^^^^^^^^^^^^^^^

Pickled green chillies Recipe **

5-6 long green chillies, sliced thinly
Boiling water
2/3 cup Chinese white rice vinegar
1/2 tsp salt
2-3 tbsp sugar

Method:

Combine vinegar, salt and sugar in a bowl and mix well to dissolve. Taste and adjust salt/sugar if desired. Place sliced chillies in another bowl and pour boiling water over them. Let it stand for 30 seconds, and then drain off the water. Pour the vinegar solution over the chillies, ensuring the chillies are completely covered. Refrigerate for at least 2 hours until chillies turn into an olive-green colour.


Wonton Recipe*

1 packet square wonton wrappers (about 40 sheets)
150g (5 oz) pork mince
150g (5 oz) prawn meat
1 tbsp egg white
1 tsp grated ginger
2 tsp soy sauce
1/2 tbsp oyster sauce
1/2 tsp chicken stock powder
1 tsp sesame oil
1/4 tsp salt
1/2 tsp sugar
1/8 tsp pepper

Method:

Combine all ingredients for pork mince (except wrappers) and mix well. Place a teaspoon of the mixture in the middle of each wonton wrapper, and then lightly moisten the edges of the wrapper with water. Seal the edges to form a triangle shape, then press the edges to thin out the dough. Bring the corners together and squeeze to form a "money bag". Repeat with the rest of the wrappers. Set aside on a plate until ready to cook.


reade more... Résuméabuiyad

Imperial Pork Ribs with Plum Sauce


Some of the recipes that I post are inspired by dishes that I've tried elsewhere, loved and attempted to replicate at home. I remember the exotic-tasting Muhammara sauce that came with the deep-fried kataifi prawns that I loved at Kazbah (and the Breakfast Tagine too!). Oh, and not forgetting the awesome chilli crab dip with potato wedges they used to serve at an Irish pub called Muddy Murphy's back in Singapore. And more recently, I found a great recipe for Japanese Hashed Beef that turned out even better than the one I had at Oiden Bowl Bar. In today's post, I am featuring this melt-in-your-mouth dish of braised pork ribs in a sweet and sour plum sauce. The first time I ordered this at Phoenix restaurant, I was expecting deep-fried pork ribs with peking sauce. When the food arrived, I actually thought they gave us the wrong order and was a little disappointed that it wasn't deep-fried. However, the moment I dug my fork into the meat, it was so tender and pulled apart so easily that I knew this was going to be good!

Although this dish appears to be rather simple, being just a large slab of pork rib on a bed of wilted spinach in gravy, every component in this dish works so well together especially with that delicious sweet and sour plum sauce. The pork had a good layer of fat on it which made it so melt in your mouth tender and buttery. I could just have this dish with a big bowl of rice and I'll be happy. I have to admit I just couldn't stop eating it!


Anyway, I tried to replicate this dish at home and I think it turned out quite well. G seemed to think that it tastes almost like the one from Phoenix, although I think I would have to order that again to make an honest comparison. In any case, I think my version has most of the key ingredients and it's just a matter of achieving the perfect balance of flavours that will make this a winning dish at the dinner table.

Imperial Pork Ribs with Plum Sauce

Ingredients

1kg (2 lb) pork ribs, cut into 4 inch slabs
6 cloves garlic, peeled
1-2 red chillies, stem removed
Vegetable oil for frying
1 bunch spinach, washed

Marinade:
2 tbsp shaoxing wine
2 tbs light soy sauce
1/2 tsp five-spice powder
1 tbsp cornflour

Sauce:
4-5 tbsp Lee Kum Kee brand plum sauce*
3 tbsp tomato sauce
1 1/2 tbsp worchestireshire sauce
1/2 tbsp sugar
1 tbsp light soy sauce
2 tbsp shaoxing wine
2 cups water
Salt and pepper to taste

Method

Combine pork with marinade and set aside for 1 hour. Heat up some oil in a  medium pot and fry the garlic until browned. Add chillies and pork and sear the pork all over. Add the sauce ingredients and bring to a boil. Cover and simmer for 2 hours until tender and gravy is thick. If the gravy has not reduced yet, remove the lid and let the gravy boil and reduce until slightly thickened.

To prepare the spinach, bring a large pot of water to a boil and add a pinch of salt, sugar and vegetable oil. Blanch the spinach  until it turns bright green. Remove and rinse under cold tap water to stop the cooking process. Squeeze out excess water. Then use a knife or pair of scissors and cut it into 2 inch sections. Arrange on a serving plate.

When the pork is ready, arrange the pork over the spinach. Use a sieve to strain the gravy to remove the bits of garlic and chilli so that you get a silky-smooth sauce. Pour the gravy over the pork and spinach. Serve hot with steamed jasmine rice.

* Note: Please use Lee Kum Kee brand plum sauce, which is sweet tasting compared to other brands which may be relatively sour.
reade more... Résuméabuiyad

Claypot Yee Mee


I made this simple braised yee mee for lunch today, something I haven't eaten in a long time. I had forgotten how good these noodles taste. I don't cook with my claypot much, so I figured I might as well put it to good use. You can find yee mee (these are crispy noodle "cakes") at Asian supermarkets and they are usually made in Malaysia. I suppose it's more a Malaysian dish than anything else. You don't really need a claypot for it although it would probably taste more authentic, apart from keeping the noodles hot. I've used chicken and mushrooms here, but you can omit the mushrooms and substitute the chicken with a mixture of seafood or pork.


Claypot Yee Mee

Ingredients

100g chicken breast fillet, thinly sliced
1/4 tsp bicarbonate of soda + 1/3 cup water

Marinade:
1 tsp soy sauce
1/2 tsp sesame oil
Pinch of sugar
Salt and pepper

1 clove garlic, chopped
2 chinese dried black mushrooms, stems removed
1 cup water + 1 cup warm water
3/4 tsp chicken stock powder
1 tbsp oyster sauce
1 tsp fish sauce
1/2 tsp mushroom soy sauce (optional)
1 tbsp soy sauce
1 tsp sesame oil
Salt and pepper to taste
Carrots
1 tbsp cornstarch + 2 tbsp water
1 egg

1 piece yee mee (crispy egg noodles)
Choy sum, blanched

Vegetable oil for frying

Method

Combine chicken with bicarbonate of soda solution, mix well and let it stand for 10 minutes. Drain off the solution and rinse the chicken with tap water to remove any excess. Combine with marinade and set aside for 15 minutes.

Soak mushrooms in 1 cup warm water for 30 minutes or until softened. Squeeze out excess water from mushrooms, set aside and reserve soaking liquid.

Heat up some oil in a pan and fry the garlic, followed by chicken. Add mushrooms and fry. Add remaining 1 cup water plus the mushroom soaking liquid, chicken stock powder, oyster sauce, fish sauce, mushroom soy, soy sauce and sesame oil. Bring to a boil, add carrots, cover and let it simmer for 15 minutes or until mushrooms are cooked. Add salt and pepper to taste. In the meantime, heat up your claypot.

When sauce is ready, stir in the cornstarch solution and bring to a boil again. Place noodles in the heated claypot and top with choy sum. Pour the boiling sauce over the noodles, then crack an egg in the centre. Cover with lid and simmer until the egg is cooked. Serve immediately!
reade more... Résuméabuiyad

Strawberry Ricotta Ice-cream Sandwich


I just bought my very first ice-cream maker, a very affordable Cuisinart in pink. Love it! It's actually a very simple contraption consisting of a freezer bowl which rotates on a spinning base, and there's a paddle that's inserted in the bowl which then churns the ice-cream as the bowl rotates. I've made ice-cream in the past, but using the manual method of freezing the mixture and stirring with a spoon every half hour so as to avoid ice crystals from forming. The kids and I had fun watching the mixture churn and slowly turning into ice-cream. Instant gratification.


My decision to make this delicious Strawberry Ricotta ice-cream was really because I had this tub of ricotta in the fridge that I was planning to use for ricotta cheesecake. I scrapped the cheesecake idea because firstly, I find it difficult baking any sort of cake with the kids running all over the house, in and out of the kitchen. Secondly, how many days and how many people would it take to finish a whole ricotta cheesecake, especially since it doesn't keep too long in the fridge. And so, here is the recipe for this light and creamy ricotta ice-cream with fresh strawberries. I was actually planning to add in some chocolate chips as well, but the freezer bowl only takes up to 1.5 litres and I think I might have exceeded the limit.


This ice-cream is fabulous sandwiched between these wafers that you see here. I got these ice-cream wafers from IGA supermarket, and they are fantastic. I personally prefer eating the ice-cream with the wafers rather than just the ice-cream itself, for a bit of textural contrast. Because it uses ricotta, the ice-cream will have the grainy texture that ricotta has, and so don't be expecting smooth and creamy ice-cream. But the ricotta and strawberries are delicious and makes an absolute treat with the wafers!

Strawberry Ricotta Ice-cream

Ingredients

1 1/4 cup thickened cream
1 cup sugar (or to taste)
1/2 tsp vanilla extract
500g (1 pound) ricotta cheese
1 punnet (250g / 1/2 pound) fresh strawberries, roughly chopped in a blender/food processor.

Method

Heat the cream in a saucepan over medium heat until it just comes to a simmer. It should be warm enough to dissolve the sugar. Add the sugar and stir until dissolved, then add the vanilla. Transfer to a bowl, cover and refrigerate for 3-4 hours until cold. Stir in the ricotta and mix well. Stir through the strawberries. Churn the mixture with an ice-cream machine according to manufacturer's instructions. Freeze until just firm. If the ice-cream is too hard, leave it out on the counter for a while to soften slightly before serving. Enjoy sandwiched between ice-cream wafers!


reade more... Résuméabuiyad

Fudgy Nama Chocolates


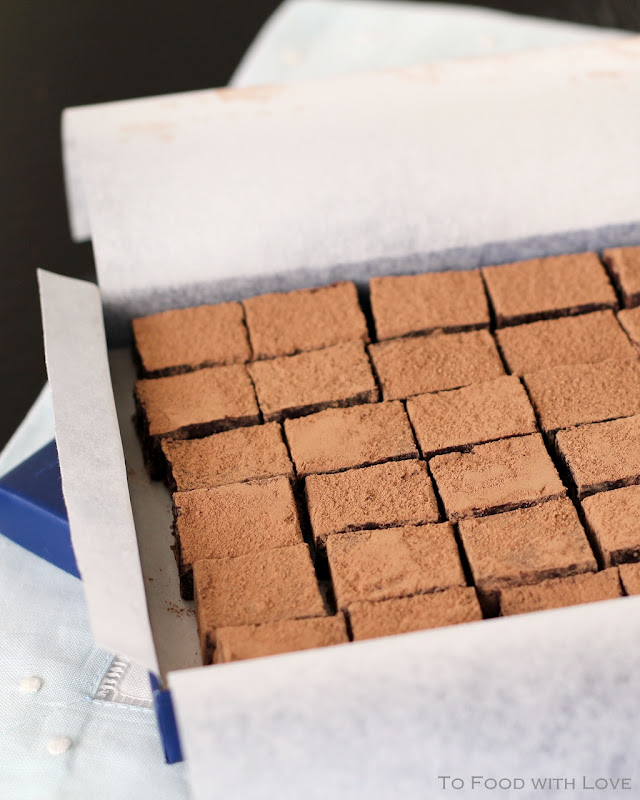
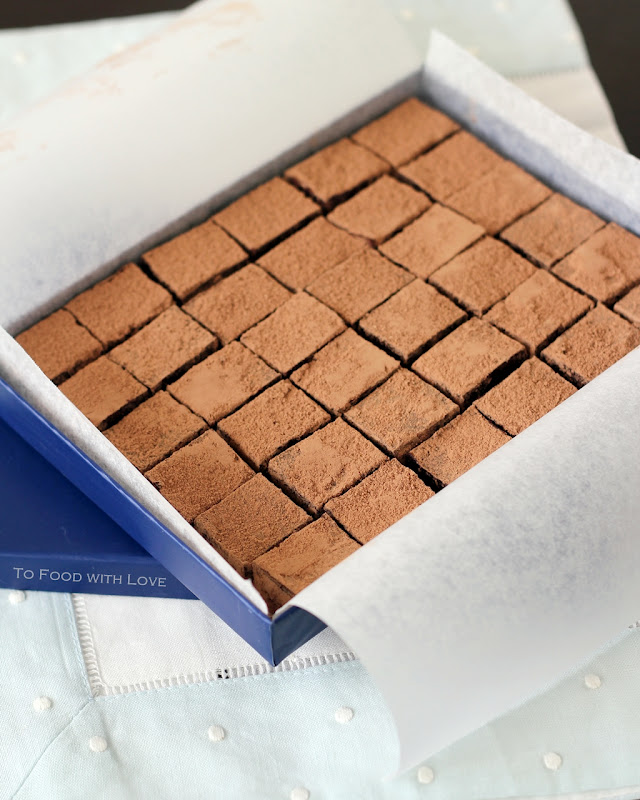
When Nami posted the recipe for Nama Chocolates on her website Just One Cookbook, I read it and thought "Wow, making homemade Royce chocolates looks pretty easy. Just make chocolate truffles and cut them into squares instead of shaping them into balls." Now, why didn't I think of that? Royce chocolates hail from Japan and they have opened quite a number of stores around Asia. So far, I have only come across the Royce chocolate store at Takashimaya in Singapore, where I would usually walk past the display counter hoping that the salesperson standing behind would be offering free tasting samples (in miniscule 1 centimetre cubes). It was such a treat at the time (a long time ago!) when I considered them a luxury item, what more with a name like that.


Thanks to Nami for this recipe, I have made these chocolates twice already and shared them with friends and colleagues (otherwise the kids would definitely OD on chocolate with a few ensuing trips to the dentist and doctor!). The first time I made them with dark chocolate containing 45% cocoa butter, and they turned out fudgy and delicious, although not firm enough to be cleanly sliced into pieces, and had a tendency to stick to the knife. The second time, I used dark chocolate with 70% cooca butter, and the chocolate turned out much firmer and much easier to yield a clean cut. It's also great if you like your chocolates to be not so sweet. However, I found that with the higher percentage of cocoa butter, the chocolate tends to split quite easily, and that's where you'll see the oil start to separate. I might have heated up the cream too much, or perhaps the saucepan I was using retained too much heat even after I turned it off  the dropped the chocolates in. The next time I make these, I might mix both the 70% and 45% chocolate, and pour the heated cream into the chocolates in a separate bowl instead.

Nama Chocolates
Adapted from Just One Cookbook

Ingredients

400g dark chocolate (between 45% - 70%, up to your preference)
200ml thickened cream
Liquer of your choice (or use vanilla extract if you like)
Cocoa  powder to dust

Method

  1. Break up or chop the chocolate into small pieces. Place them in a medium heatproof bowl.
  2. Line a 8 inch square baking tin with baking paper.
  3. Heat up cream in a saucepan until it almost reaches a boil. Turn off the heat when bubbles start appearing around the edges of the saucepan.
  4. Pour the cream onto the chocolates, making sure the chocolates are covered in the cream. Let it sit for about 2-3 minutes so that the chocolate starts to melt. Stir until smooth and well combined.
  5. Pour the chocolate mixture into the lined baking tin and smooth out the surface. Cover and refrigerate for a few hours until firm.
  6. Use a warm knife (dipped into hot water and wiped dry) and slice the chocolates into 1 inch squares/rectangles. Dust the top (and sides if you like) with cocoa powder. Serve chilled. Refrigerate leftovers, if any. Enjoy with friends and family!
reade more... Résuméabuiyad