Pages

.

Chinese Roast Pork (Siu Yuk)


There can never be too many recipes for chinese roast pork (or "siu yuk" as commonly known in Cantonese). Over the years, I have attempted various recipes and methods for achieving the perfect crackling - crispy and brittle enough that it doesn't break your teeth when you bite into it. It has always been a hit and miss for me. Either the skin doesn't fully crackle all over (leaving some parts soft and chewy), or the meat's dried out, or the crackling is burnt in some parts. But now, I have successfully made the almost-perfect roast pork, twice in a row. Woo-hoo! I must be doing something right there?


There's nothing particularly difficult about making roast pork (except the part where you have to prick a zillion holes in the skin). You just need the right ingredients, the right technique and the right tools. Someone gave us a pork-skin-pricking tool for Christmas two years ago, which you see below. Roast pork fanatics who make their own at home might have this tool, which is available in Malaysia and Singapore. I don't know what it's called, but it's made of wood with a bunch of super sharp needles at the end. If you don't have one, just use a sharp pointed knife to prick the skin, or simply score it (with a knife, of course) at 1/4 inch intervals. However, this special tool will yield the perfect crackling every time. If you have a metal meat tenderizer, that might actually work too!


This recipe has worked really well for me and my oven. Yes, my oven can be temperamental sometimes, especially when the heat doesn't distribute evenly. This time, I used fan-forced in first 50 minutes to achieve an evenly roasted golden crackling, and it worked! I then turned down the heat to let the pork continue cooking until tender. I also added a tray of water below the roasting rack to keep the meat from drying out in the oven. A brush of vinegar on the skin helps to attain a crispier crackling.

I found that it was not necessary to pour boiling water over the skin (to open up the pores). This step yielded a "harder" and crunchier skin. So my recipe only requires covering the raw pricked skin with plenty of salt, leave it to dry out in the fridge, and then brush off all the excess salt before roasting. The result was a much more brittle and crispy crackling. But then again, I bought the pork from a different shop, so maybe one pig was more thick-skinned than the other. I don't know, but it's still crackling, and crackling rocks!


Chinese Roast Pork (Siu Yuk)
Serves 8 | Prep 20 mins | Wait time 120 mins | Cook time 120 mins

Ingredients

1.3 kg (2.8 lbs) pork belly, skin on
1 tablespoon sea salt
1 tablespoon vinegar, for brushing

Marinade (mix well in a small bowl):
2 tsp five-spice powder
1 tablespoon sea salt (cooking salt)
1/4 tsp white pepper
1 tsp sugar
2 cubes red fermented beancurd
1 tsp vegetable oil

Method

  1. Rinse the pork under the tap and drip dry. Then, pat dry all over with a few paper towels.
  2. Place on a chopping board, and poke holes all over the skin, as many as you possibly can. Use the tip of a sharp knife, or ideally, "The Pork-Skin-Pricking-Tool".
  3. Turn the pork over skin side down. Rub the marinade all over the meat, including the sides of the pork.  Avoid getting any on the skin.
  4. Carefully turn the pork over onto a clean plate, skin side up. Check that the skin is dry, if not pat well with paper towel.  Rub 1 tablespoon salt all over the skin until evenly covered.  This will draw out the moisture.
  5. Place the pork in the fridge, uncovered, for 2-4 hours.
  6. When ready to roast the pork, preheat oven to 230C fan-forced. 
  7. Remove pork from the fridge. Use a paper towel to wipe off all the salt from the skin. Pat the skin dry. Place pork skin side up on a metal rack over a roasting tin. Fill the roasting tin with 1 inch of water. Place the roasting tin on the middle rack and roast for 30 minutes. Once the skin starts to crackle (about 30 minutes later), brush some vinegar over the skin and place the pork back in the oven. Continue to roast for 20 minutes until skin has fully crackled and is lightly golden. Watch it constantly to make sure the crackling doesn't burn!
  8. Once crackling is nicely coloured, turn the oven temperature down to 180C (switch the oven to conventional - I turned off the fan-forced mode at this stage). Continue to roast for a 60-80 minute so that the meat is tender.
  9. Remove from oven and let pork rest and cool down for 30 minutes before chopping into bite-sized pieces.  You will need a sharp cleaver for this. Enjoy while meat is warm and crackling is super crispy.
Note: This will be perfectly complemented by a sweet and sour chilli dipping sauce. Recipe below:

Vinegar Chilli Sauce

1 long red chilli, chopped
1/4 cup rice wine vinegar
1/2 tbsp sugar (or to taste)
Pinch of salt

To prepare the sauce, use a mortar and pestle to pound the chilli until fine, then add the rest of the ingredients and mix well. Add more sugar/salt if necessary. Transfer to a small bowl and use as a dipping sauce.
    reade more... Résuméabuiyad

    Oxtail braised in red wine with sweet and sour carrots (sans turnips)


    Here is another recipe from the "Gary Mehigan Favourites" cookbook. I thought I'd try it out as it was at the "top of his favourites list", although I had to make a few substitutions, particularly with the Barolo which costs a bomb (even more so as two bottles are needed for this). I used Cabernet Sauvignon instead. The recipe also called for baby turnips which I couldn't find (perhaps not in season?) and so I made do with just the baby carrots. They were delicious, cooked in butter and verjuice.  Quite a lot of preparation goes into cooking this as it also requires beef jus and beef stock. The oxtail turned out pretty well and could have done with another half hour in the oven so that they were meltingly tender all the way through. Tasty nonetheless, very savoury and complements the sweet and sour carrots which I love!


    reade more... Résuméabuiyad

    Not quite Bistecca Fiorentina


    Based on the recipe "Bistecca Fiorentina with shallots, garlic and mushrooms" from Gary Mehigan Favourites.  The only difference is, I couldn't get hold of aged T-bone steak, which is of course the main ingredient. Still, it tasted superb especially with the caramelized shallots, creamy roasted garlic and tasty mushrooms, all covered in a sweet tangy balsamic vinegar sauce.
    reade more... Résuméabuiyad

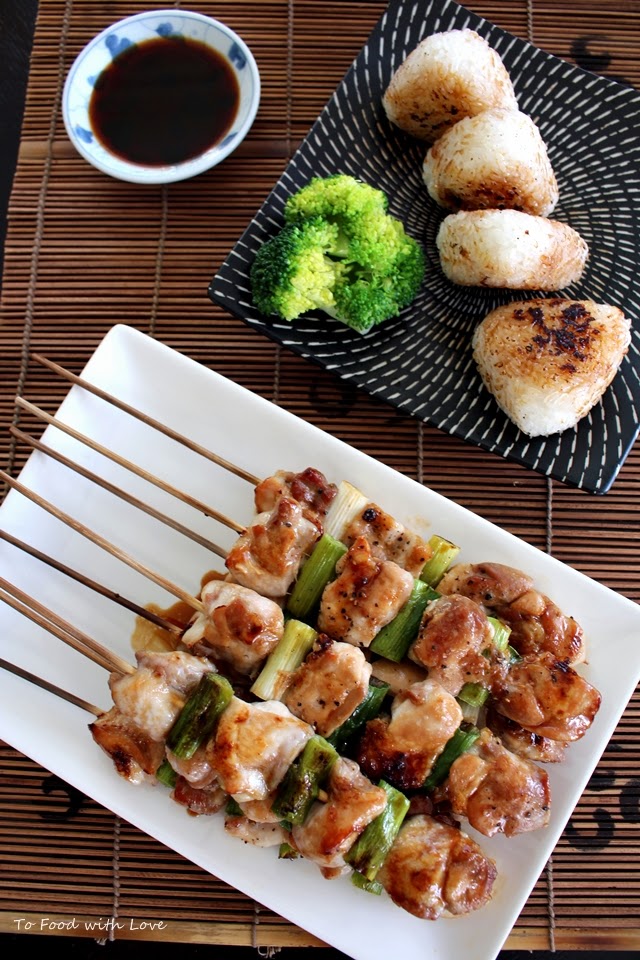
    Yakitori with Yaki Onigiri (Grilled chicken with grilled rice ball)

     
    Grilling chicken tends to dry out the meat easily, so these chicken skewers are best made with drumstick or thigh fillets, and never breast fillets.  If you want to add some chicken skin on the skewers, that's even better (but entirely optional). Yakitori ("grilled chicken") is typically Japanese grilled chicken on bamboo skewers, and could either be plainly seasoned with salt ("shio") or basted with "tare" sauce, which is what I've done here. The kids love it, and it's just something about food served on a stick that makes it so appealing.


    Yakitori (Grilled chicken skewers)
     
    Ingredients
     
    500g (1 pound) chicken thigh fillets, cut into 1 inch cubes
    Vegetable oil
    Salt and black pepper
    4-5 scallions, light green / white part only, cut into 1 inch stems
     
    Yakitori sauce:
    1/3 cup Kikkoman soy sauce
    1/3 cup mirin
    3 tbsp cooking sake
    2 tsp white sugar
    2 tsp brown sugar
     
    Equipment:
    10-12 bamboo sticks
    Barbecue grill or oven grill
    Basting brush
     
    Method
     
    Soak the bamboo sticks for at least 4 hours before using.
     
    Prepare the sauce by combining it in a saucepan, and then boil it over medium heat until it's reduced by less than half.  Leave to cool, and it should thicken slightly to a syrupy consistency.
     
    Skewer the chicken on the bamboo sticks alternating with a piece of scallion. Brush with vegetable oil and season lightly with salt and pepper.
     
    If using an oven, turn on the grill to high.  Place skewered chicken on a baking tray lined with foil, and grill for about 8 minutes each side (turning once) until lightly browned. Baste the chicken halfway through with some of the yakitori sauce. Continue to grill for 2-3 minutes until chicken is lightly charred. If the bamboo sticks start to brown/burn, you can place a piece of aluminium foil over the bamboo sticks to prevent it from burning. Alternatively, wrap the ends of each stick with foil.
     
    Serve the chicken skewers with white short-grain rice or yaki onigiri (Japanese grilled rice balls). 
     
    To make grilled onigiri, cook some sushi or short-grain rice (in a rice cooker). Shape the rice into triangular cakes and lightly compress them so that they don't fall apart. Grill the rice balls in a lightly greased non-stick pan for about 10 minutes until all sides are lightly browned.  Lower the heat and brush some yakitori sauce over the rice balls. Return the rice balls to the pan and briefly grill them again (only for a few seconds as they burn easily) on each side until lightly charred. 


    reade more... Résuméabuiyad

    Churros with maple glaze


    These are choux-pastry type churros, as opposed to the more traditional (I think?!) churros which uses flour and boiling water in making the dough. I tried the latter method a long time ago, and it didn't turn out as I had hoped. So I decided to stick to these ones instead, with a little twist by covering it in a maple syrup glaze. I also made a chocolate sauce (by melting some chocolate in hot milk) for the kids to dunk their churros into. Churros are also referred to as Spanish doughnuts, and are relatively easier and quicker to make compared to regular yeast doughnuts, simply because there's no need to proof the dough.They are also wonderfully light, fluffy and buttery, with a sweet and crunchy exterior that is accentuated by the ridges characteristic of this popular street food.


    Ingredients:

    200ml water
    80g butter 
    1 1/2 tbsp caster sugar 
    1/2 tsp salt 
    120g plain flour 
    1/2 tsp vanilla extract
    3 large eggs 
    Oil for deep-frying
    1/2 cup icing/caster sugar mixed with 1/2 tsp ground cinnamon, for dusting 

    Maple glaze:

    1 cup icing sugar, sifted
    3-4 tbsp maple syrup
    1/2 tsp sea salt
    1-2 tbsp water, milk or orange juice

    Method:

    Combine water, butter, sugar, salt, vanilla and water in saucepan and bring to boil. Add flour, stir quickly with wooden spoon to combine. Cook for 3 mins over medium heat, stirring constantly until the mixture forms a ball and comes away from the side of the pan. Take it off the heat and leave to cool for 5 minutes.  Add the vanilla extract. Then add eggs one at a time and stir briskly until well combined, thick and glossy. Transfer to a piping bag fitted with a 1cm-diameter fluted nozzle.


    Heat oil in large deep frying pan. Using a knife to cut the dough, pipe six 10cm lengths into the oil. Cook, turning with tongs halfway through cooking, for 2-3 minutes or until golden. Use a slotted spoon to transfer to a plate lined with paper towel. Dust churros with the cinnamon sugar mixture.


    Combine ingredients for the maple glaze and mix well until smooth. Drizzle over churros and serve warm 
    or at room temperature.


    reade more... Résuméabuiyad

    Beef Sliders on Brioche with Sticky BBQ sauce and Thousand Island Dressing


    Ever since I started baking brioche buns (see my Pulled Pork burger with Korean Slaw) and using them for mini beef burgers (a.k.a. sliders), there was no turning back. Given a choice, brioche wins over plain hamburger buns (particularly those that are sold by the dozen at the supermarket). Not all brioche buns are created equal. I have ordered brioche burgers before when dining out, and have come across really thick, heavy, dense and sweet buns that makes the mammoth of the burger a feat to eat (and enjoy). The recipe that I've used for these brioche buns is adapted from Taste.com.au magazine (August 2014 edition). Rich, melt-in-your-mouth and buttery with a hint of sweetness, these brioche buns make supremely delicious burgers. I've also tried buttermilk brioche buns and they are equally good, with the slightest tang from the buttermilk.


    These beef sliders are saucy, juicy and packed full of flavours. To make them even more awesome, I made a sweet and tangy barbecue sauce along with a "Thousand Island" dressing (inspired by In-N-Out Animal style). This special sauce with an all beef-patty, lettuce, cheese on a toasted sesame seed brioche bun was the perfect albeit-messy-to-eat-with-sauce-smothered-everywhere-but-oh-so-tasty burger. Read on to get the recipes.


    Beef sliders

    800g premium beef mince (Angus or Wagyu)
    1 medium brown onion, diced
    3 cloves garlic, chopped
    2 tsp worchestershire sauce
    1 tbsp dijon mustard
    1 1/2 tsp salt
    Freshly ground black pepper
    Vegetable oil for frying

    Barbecue sauce (adapted from Gordon Ramsay):
    1 large onion, finely diced
    4 cloves garlic, finely chopped
    3-4 tbsp brown sugar
    3/4 cup ketchup
    1 1/2 tbsp cider vinegar
    1 tbsp worchestershire sauce
    Salt and black pepper

    "Thousand Island" sauce:
    3/4 cup mayonnaise
    3-4 tbsp ketchup
    2 tsp worchestershire sauce
    2-3 tsp tabasco sauce
    Salt and black pepper

    To serve:
    Brioche buns (scroll down for recipe)
    Sliced tomatoes
    Lettuce leaves
    Cheddar cheese slices
    Barbecue sauce
    Thousand Island sauce

    Method

    1. For the barbecue sauce, heat oil in a frying pan, add onion and garlic with some seasoning and the sugar, and fry for 5 minutes until softened. Cook for 10-15 minutes until onion is caramelising, then add vinegar and let it cook out for a few minutes. Add Worcestershire sauce and tomato sauce, mix well and continue to cook for about 8 minutes until sauce has reduced to a dropping consistency. Taste and adjust seasoning. Remove from heat and set aside.
    2. For the Thousand Island sauce, mix all ingredients in a bowl. Taste and adjust seasoning. Set aside.
    3. To prepare the beef patties, first sauté the onions and garlic in 2 tbsp olive oil until softened (about 5 minutes). Transfer to a medium mixing bowl and let it cool a little. Add worchershire sauce, mustard, salt and pepper. Mix well. Add the beef mince and gently mix to combine.
    4. Lightly shape into 12 patties. Make a small indent in the centre of each patty to prevent shrinkage while cooking.
    5. Heat oil in a pan on medium-high heat, and fry each patty for 2-4 minutes, turning occasionally until cooked. Place a cheese slice on the patty and let it melt. Transfer to a plate.
    6. To assemble the burgers, halve the brioche buns and toast them in the pan until lightly browned. Spread some Thousand Island and barbecue sauce on the bottom half, and top with lettuce, tomato, beef patty, Thousand Island and barbecue sauce, and cover with the other half of the bun. Serve immediately with fries and onion rings if desired.


    Brioche Buns
    Adapted from Taste.com.au
    makes 12

    Ingredients

    2 teaspoons (1 sachet/7g) dried yeast
    1/3 cup (80ml) warm milk
    2 tbsp caster sugar
    2 cups (300g) strong plain bread flour (+ 1/4 cup extra)
    1/4 teaspoon salt
    3 eggs, lightly whisked
    120g butter, softened and cut into 2cm pieces
    1 egg yolk lightly whisked with 2 tsp milk
    1 tbsp sesame seeds

    Method

    1. Combine the yeast, milk and 1 tablespoon of caster sugar in a small bowl. Set aside for 5 minutes or until frothy.
    2. Combine the flour, salt and remaining sugar in a large bowl and make a well in the centre. Pour yeast mixture and eggs into the well and stir until just combined. Turn on to a lightly floured surface. Knead for 5 minutes or until smooth. Alternatively, use a stand mixer with dough hook attachment.
    3. Add 1-2 pieces of butter to the dough and knead until well incorporated. Gradually continue to add butter cubes, 2-3 at a time, and knead until well incorporated. With the extra 1/4 cup flour, sprinkle one tablespoon of flour at a time and continue kneading the dough until it's smooth and elastic (about 10 minutes). The dough should pull away cleanly from the sides of your mixing bowl. Transfer the dough to a large lightly greased bowl and cover with plastic wrap. Set aside in a warm, draught-free place for 1.5 hours or until dough doubles in size.
    4. Preheat oven to 190°C. Grease a baking tray with butter. Use your fist to knock back the dough and knead for 2-3 minutes or until smooth. Divide into 12 even portions. Roll each dough into a smooth ball and place on the tray, spacing them out about 2 inches apart. Set aside in a warm, draught-free place for 1 hour to rise and double in size.
    5. Brush each brioche with the egg yolk and milk mixture, and sprinkle with sesame seeds. Bake in preheated oven on the middle rack for 15 minutes or until golden brown and cooked through. Leave to cool slightly before slicing in half for your burgers.


    reade more... Résuméabuiyad

    King brown mushroom with XO sauce


    This has been the dish of the month for me. I've made these mushrooms at least five times since the start of August, and I've enjoyed it as a side dish, a light lunch and even added it to my instant noodles for a touch of "gourmet". I made a big batch of it which has lasted up till now (there's still some left in the fridge) and have been spooning it liberally on almost anything I can think of. Last night, I made some sushi for the kids and had leftover rice, which I mixed through with some XO sauce. Tasty! I also used the XO sauce in cooking Mapo tofu (instead of using hot bean paste) along with some diced chinese mushrooms. It's a wonderful condiment which I've also used to spruce up some boring fried rice from the Chinese takeaway.


    I never knew how to make XO sauce until I found it in Gary Mehigan's new book "Favourites", and it was the first recipe I bookmarked to try (among many others). I thought it was the perfect recipe to try, as I had some premium dried scallops that was long forgotten in the fridge, and the rest were just pantry ingredients that I had. A pretty simple recipe, though I added some extra dried chillies to "colour" the oil more. I added a drop of Cheong Chan caramel towards the end for a little extra flavour. Homemade XO sauce is definitely worth making, and it's probably best you use good quality dried scallops if you plan to do so. I highly recommend serving it on top of grilled king brown (or king oyster) mushrooms and grilled scallions (also from "Favourites") as it's the simplest and tastiest way to enjoy XO sauce.


    reade more... Résuméabuiyad

    Cream cheese cinnamon rolls with blueberries and white chocolate icing


    I've come across many recipes for cinnamon rolls, from yeast-free doughs to the fancier ones using buttermilk or cream cheese. The key to a good cinnamon roll (or scroll/bun) is to use good quality cinnamon and in the right proportion to the sugar filling. The addition of a syrup (like maple syrup) makes for a sticky cinnamon roll, and you can add nuts or fruits to that as well. In my "search" for cinnamon, I learnt that there are hundreds of types of cinnamon, but the main ones are Ceylon Cinnamon, Chinese Cassia Cinnamon, Saigon Cinnamon and Indonesian Korintje Cinnamon. In this recipe, I've used Indonesian cinnamon which has a strong aromatic flavour that is sweet and spicy, and perfect for cinnamon rolls. Make sure you check the label on your bottle of ground cinnamon to see where it's sourced from.


    In this recipe, which I have adapted from Saveur, I made a few changes and substitutions. I've made Anna Olson's Soft Blueberry Stick Buns a few years ago, and loved the addition of cream cheese in the dough which gave it a creamy and soft texture. I've also added potato flour to help retain the moisture in the rolls. These rolls are best served warm on the same day. Leftovers can be gently heated in the microwave before serving.

    Cream cheese cinnamon rolls with white chocolate icing
    Adapted from Saveur

    Ingredients

    FOR THE DOUGH:
    1 (¼-oz.) package active dry yeast
    ½ tsp. plus 2 tbsp sugar
    ½ cup milk, at room temperature
    2 tbsp. light brown sugar
    ½ tsp. vanilla extract
    1 egg
    1 egg yolk
    2 1/2 cups flour, sifted, plus more for kneading
    1/4 cup potato flour *
    ¾ tsp. fine salt
    8 tbsp. unsalted butter, at room temperature, plus more for the pan
    4 oz. cream cheese, at room temperature

    FOR THE FILLING:
    ½ cup sugar
    ¼ cup dark brown sugar
    1 tbsp. good quality ground cinnamon *
    ½ tsp. fine salt
    2 tbsp. maple syrup
    8 tbsp. unsalted butter, softened
    1/2 cup dried blueberrries (optional)

    FOR THE ICING:
    1/2 cup icing sugar (confectioners' sugar)
    1 tbsp milk (or substitute with plain milk or hot water)
    60g (2 oz) white chocolate, melted

    Method

    1. Make the dough: In the bowl of a standing mixer fitted with a hook, combine yeast, ½ tsp. of the sugar, and ¼ cup warm water heated to 46°C (115°F). Stir to combine and let sit until foamy, about 10 minutes. Add remaining sugar, milk, light brown sugar, vanilla, egg, and egg yolk. Beat on low speed until thoroughly combined, 1 minute. Turn mixer off and add the flour and salt. Mix on medium speed until the dough just comes together. Turn mixer speed to high and knead dough for 4 minutes. Gradually add the butter followed by cream cheese, and continue kneading until dough is smooth and pulls away from the side of the bowl, about 6-10 minutes. Sprinkle more flour into the bowl if necessary. Remove bowl from the mixer, place in a lightly greased bowl and cover with plastic wrap, and set aside in a warm place. Let the dough rise for 1 ½–2 hours, until it has doubled in size.

    2. Meanwhile, make the filling: Combine the sugar, dark brown sugar, cinnamon, salt and butter in a large bowl; stir to combine. Stir in the maple syrup. Set filling aside.

    3. Punch the dough down and turn it out onto a heavily floured surface. Gently knead the dough until it's no longer sticky, adding more flour as necessary, about 1 minute. Using a floured rolling pin, roll the dough into a 10" x 20" rectangle, with the short sides parallel to you.

    4. Spread the reserved filling over the dough, leaving a 1" border at the edge farthest away from you. Sprinkle with blueberries if used. Lightly press the filling into the dough. Using your hands, lift up the bottom edge of the dough and roll it forward into a tight cylinder. Place dough cylinder, seam side down, on a cutting board and, using a thin, sharp knife, trim off the ends; cut cylinder crosswise into 8 equal-size slices. Nestle the slices, cut sides up and evenly spaced from one another, into a buttered 9" x 13" light-colored metal baking pan. Cover pan with plastic wrap and set aside in a warm place to let rise for 2 hours. (Alternatively, the rolls may be refrigerated overnight.)

    5. Heat oven to 190°C (375°F). Uncover the rolls. (If refrigerated, let them sit at room temperature for 15 minutes.) Bake until golden brown and a toothpick inserted in the center of the rolls comes out clean, about 25-30 minutes.

    6. Make the icing: While the rolls are baking, whisk together the sugar and milk in a small bowl until smooth. Whisk in the melted chocolate.

    7. Transfer the pan of cinnamon rolls to a cooling rack; brush with remaining melted butter. Let cool for 5 minutes. Dip the tines of a fork into the icing and drizzle all over the rolls. Serve immediately.

    * Cook's notes:

    1. I have substituted some of the plain flour with potato flour which helps keep the bread moist
    2. Use good quality ground cinnamon. Indonesian cinnamon (Korintje) is ideal with its spicy sweet aroma.


    reade more... Résuméabuiyad

    Roast Chicken with Creamy Parsley and Fondant Potatoes


    I purchased Gary Mehigan's new book "Favourites" a couple of weeks ago during his book-signing at Costco. I love that he has put together his all-time favourite recipes in one book, because honestly, there are way too many recipes out there that I would love to try. I may be dreaming of cooking chilli crab one minute and baking kouign amann the next, and sometimes I just end up making more that I can fit leftovers in the fridge.

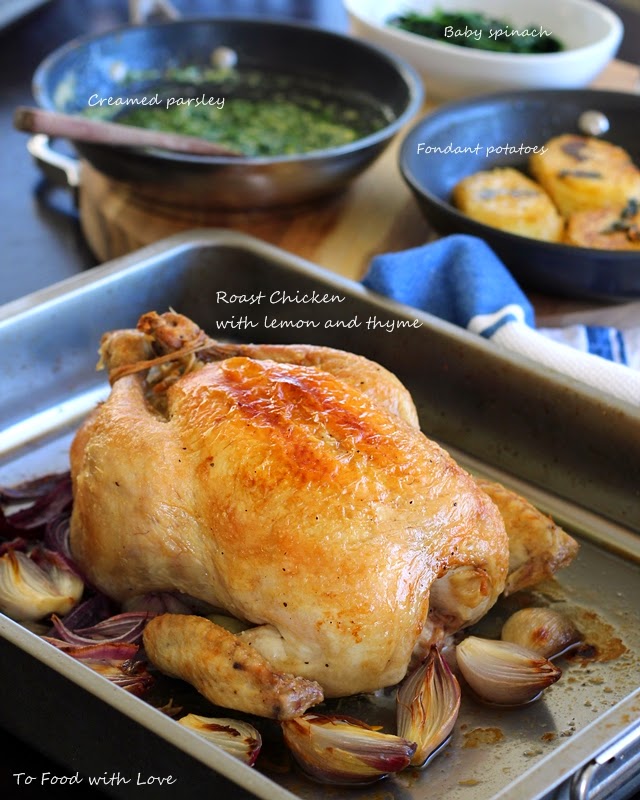
    So far, I've attempted two recipes from the book. One is the XO sauce, which is utterly, utterly delicious. I was a little skeptical about making a big batch of it, but I'm so glad I did because it means I can eat more of it with more of everything! The other recipe that tempted my tastebuds was the Creamy Parsley and Nutmeg, which I found a little unusual yet intriguing with the combination of parsley and cream. A little like creamed spinach, but with a herby taste, I suppose? It turned out to be one of the most amazing things I've ever made with parsley. It's luxuriously rich and creamy, and the added sweetness from the shallots makes this so tasty that I couldn't stop eating it out of the pan (I was just checking for seasoning, really). In his book, Gary recommends serving it with a roast chook or rib of beef. I've been cooking a lot of red meat lately, specifically pork belly and pork shoulder (see my previous post on Korean Pulled Pork Burgers), so I settled on a recipe for roast chicken from Gary's other book (under Lantern Cookery Classics). The recipe is also available on the Penguin/Lantern website.

    Creamy parsley and nutmeg
    It's wonderful how the simplest recipe for roast chicken can yield the most satisfying results. A testament to how good it is, is when my 6-year old takes a bite and her face just lights up as she goes "Mmmmm..." before she reaches for another mouthful. It's really just chicken stuffed with thyme, garlic and lemon, but I guess it's the technique and method of cooking it that makes the difference. Also important is to make sure you use good quality, corn-fed, free-range chicken. I find that La Ionica (chemical and hormone free) chickens are really good too, which we always use when making our best ever Hainanese chicken rice.

    Fondant potatoes
    I also made the buttery, thyme-scented fondant potatoes which were lovely and luscious. With the butter left in the pan, I added some of it to the creamy parsley, and used the rest for sautéing some baby spinach with garlic and shallots.

    To make the creamy parsley, you will need 4 bunches of parsley (continental flat-leaf, or mixed with curly parsley). Pick the leaves and boil them in water for 2-3 minutes until softened. Drain and squeeze out all the water, then chop finely. Heat a pan with some olive oil and saute some shallots and garlic, season with salt and pepper. Then pour in some thickened cream (about 2 cups) and simmer until reduced by half. Add in the parsley, followed by some grated nutmeg. Simmer briefly until most of the cream is absorbed. Add more seasoning if necessary. Serve immediately.


    Roast chicken with fondant potato
    Adapted from Lantern Cookery Classics: Gary Mehigan

    Ingredients
    1 × 1.6 kg free-range chicken
    1 lemon, quartered
    2 sprigs thyme
    2 cloves garlic, peeled
    table salt
    1½ tablespoons olive oil
    5 small golden shallots, peeled
    splash of dry white wine
    100ml (about 1/2 cup) chicken stock

    Fondant potato
    170 g unsalted butter, chopped
    4 large desiree potatoes, cut into 7 cm × 5 cm × 1 cm-thick rectangles

    Method


    1. Preheat a fan-forced oven to 180°C/350°F  (200°C/400°F conventional).
    2. To remove the wishbone from the chicken, lift the neck skin to reveal the breast. Scrape the point of a small sharp knife down the wishbone (it looks like an upside-down ‘V’ shape). Put your fingers behind the bone and tug to remove it. Stuff the cavity with the lemon, thyme and 1 clove of the garlic. Truss the chicken with kitchen twine.
    3. Heat a flameproof roasting pan over high heat. Season the chicken with salt and pour the olive oil into the pan. Brown the chicken lightly on all sides, starting with one leg, turning it over to brown the other leg, then the breast. Turn the chicken onto its back, then roast for 20 minutes.
    4. Baste the chicken with the pan juices. Add the shallots and remaining garlic and roast for a further 40 minutes or until the chicken is cooked. To test, pierce the thigh at the thickest part – the juices should run clear. Transfer the chicken to a large plate and rest for 10 minutes.
    5. Meanwhile, to make the fondant potato, melt the butter in a deep heavy-based frying pan over medium heat. As the butter begins to bubble, add the potato and thyme in layers (I made two layers). Reduce the heat to low, then cook for 10 minutes or until the potato is golden. Turn the potato over and cook for another 10 minutes or until golden. Add the water; the butter will foam and darken slightly. Baste the potato well and continue to cook for another 10 minutes or until tender. Remove from the heat, then leave to stand for 5 minutes. Season with salt. Set aside and keep warm.
    6. Place the roasting pan of cooking juices over low heat, then crush the roasted garlic and shallots into the pan with the back of a fork. Add the wine and stock and simmer over low heat for 2 minutes. Set aside.
    7. Cut chicken into quarters and serve with creamy parsley, gravy and fondant potatoes.


    reade more... Résuméabuiyad

    Pulled Pork Burger with Spicy Mayo and Korean Slaw

     
    This started with a craving for a Korean-style slaw with a spicy gochujang dressing. Gochujang (as many of you might be familiar with) is a Korean red pepper paste that are sold in tubs and come in varying degrees of "heat". You can usually tell by the number of chillies on the label. I chose one with 3 chillies I think, as these things can pack quite a punch in terms of heat and intensity of flavour. So, I was wondering what would go with Korean slaw, and thought of bo ssam (Korean boiled pork belly with lettuce wraps). I found David Chang's bo ssam recipe using pork shoulder/butt and decided to turn that into a pulled pork burger with Korean slaw. And what's a burger without mayonnaise, especially a spicy gochujang mayonnaise? And to top it off (no pun intended), I baked these wonderful buttermilk buns (or brioche) which were moist, tender and didn't fall apart like most buns do when you're halfway through a burger.
     
     
    Korean food doesn't just stop at Korean Fried Chicken and Korean hotpot. Give these a go at your next party. They don't require much preparation (the buns are relatively easy too) and will feed an army or two. Moreover, you can make the slaw one day ahead, which allows the cabbage to absorb the tangy, spicy and sweet flavours from the dressing. Oh, and that slow-roasted pork? Amazing.


    Pulled Pork Recipe
    Serves 12-16 | Prep 20mins | Cook 6 hours | Prep one day ahead
     
    2kg (4-5 pounds) bone-in pork shoulder or pork butt, skin-on
    1/2 cup caster sugar (granulated sugar)
    1/4 cup plus 1 teaspoon coarse salt
    1/4 cup light-brown sugar
     
    Using a sharp knife, score the pork skin at 1cm intervals. Place pork in a large bowl or roasting pan. In a medium bowl, mix together granulated sugar and 1/4 cup salt. Rub sugar mixture all over pork and cover bowl with plastic wrap; transfer to refrigerator for at least 6 hours and up to overnight.
     
    Preheat oven to 160C (300F).
     
    Transfer pork to a large roasting pan, skin-side up, discarding any accumulated juices (or drain accumulated juices from roasting pan that pork is in). Brush off any remaining salt/sugar from the skin and pat dry with a paper towel. Transfer roasting pan to oven and cook, basting the meat every hour with rendered fat in roasting pan. After 2 hours, carefully remove crackling from the pork and place on a baking tray. Continue roasting the pork and crackling for another 3-4 hours until meat is tender and easily shredded with a fork.
     
    Meanwhile, in a small bowl, mix together remaining 1 teaspoon of salt and brown sugar. Rub mixture all over pork.
     
    Increase oven temperature to 250C (500F). Return pork to oven until sugar has melted into a crisp crust, 10 to 15 minutes. Remove and cover pan with a foil to keep warm. To serve, use two forks and pull the pork into shreds, mixing them with the rendered fat in the pan. Enjoy on a buttermilk (brioche) bun with Korean slaw and gochujang mayo (see below for recipe). For a "healthier" alternative, serve in a lettuce wrap using Cos/Romaine lettuce, with ginger-scallion sauce, ssamjang, kimchi and Korean slaw.
     
    Korean Slaw
    Serves 12-16 | Prep 20 mins | Make one day ahead
     
    1/4 small savoy cabbage, finely shredded
    1/4 small red cabbage, finely shredded
    1 large carrot, peeled and julienned
    1 small red onion, sliced thinly
    2-3 stalks scallions, sliced thinly
     
    Slaw dressing (mixed well in a bowl):
    7 tablespoons cider vinegar
    3 tablespoons gochujang
    4 1/2 tablespoons sesame oil
    2 tablespoons brown sugar
    1 1/2 tablespoons honey
    1 tablespoon soy sauce
    1 tablespoon finely chopped garlic
    2 tablespoon toasted sesame seeds
     
    I like to prepare this one day ahead and refrigerate it overnight. This allows the cabbage to absorb all those flavours from dressing. Whisk together the ingredients for the dressing. Place the cabbage, carrots, onions and scallions in a large bowl and gradually add the dressing, tossing to ensure it's evenly mixed through. Cover with clingwrap and refrigerate overnight until ready to serve.
     
    Gochujang mayonnaise
     
    3/4 cup gochujang (Korean red pepper paste)
    1 cup + 2 tablespoons Japanese/Korean mayonnaise
    2 tablespoons ketchup
     
    Combine and mix well in a bowl. Set aside until ready to serve with burgers.
     
    Buttermilk buns
    Serves 12-16 | Prep 20 mins | Cook 30 mins
    100ml milk
    28g active yeast (10g. dried)
    90g sugar
    2 free range eggs
    840g strong bread flour
    70g butter, softened at room temperature
    400ml buttermilk
    14g Malden sea salt
    80ml vegetable oil
     
    Glaze:
    1 egg yolk + 1/2 tbsp milk
    Sesame seeds (black/white)
    Sea salt
     
    Prepare this while the pork is cooking in the oven. In the bowl of a stand-mixer, add salt and sugar followed by flour and yeast. Mix using a dough hook on medium speed. Combine the milk, buttermilk, eggs and oil then add to the bowl, still on medium speed. Once a dough forms, add the butter in small knobs and knead until gluten is formed (about 10 minutes). Sprinkle a bit of flour if it's still too sticky. Prove in a bowl covered by cling film or a damp cloth in a warm place. Once it doubles in size, bring back down making sure as much of the air is removed from the dough, then form round buns and prove again. When ready, glaze with egg yolk and sprinkle with sesame seeds and sea salt. Bake at 160C (300F) for 25-30 minutes until crust is richly brown and glossy. When done, remove from the oven and leave to cool before cutting.
     
    Assemble the burgers!
    Slice the buns in half, spread with butter and toast them buttered side down on a hot grill pan.
    Spread some gochujang mayonnaise on the bottom half of the bun, followed by some pulled pork, bits of crackling. Top with a handful of Korean slaw and cover with the other half of the bun. Add more mayo if desired. Serve immediately and enjoy!
     
    Nice Buns!


    More spicy mayo for more oomph!


    reade more... Résuméabuiyad

    Cinnamon Rolls with Cream Cheese Frosting


    Breads are actually pretty easy to make. You mostly let the machine do the kneading, then leave the dough to rise while you go about doing your chores, updating your Facebook status and checking out what's happening on Twitter, enjoy a cuppa etc. Then, it's time to roll out the dough and shape them into whatever you like, which doesn't really matter because after you let them rise again, they somehow bounce back into shape. I hardly make breads because I'd have to make a big batch, and they are best eaten on the same day.
     
    These cinnamon rolls however, can be kept overnight refrigerated, about two days. All it takes is a few seconds in the microwave, and you've got fresh, soft and tasty cinnamon rolls all over again. I was never a big fan of cinnamon rolls as I find them a little too sweet and sticky for my liking. These, on the other hand, are not sticky nor overly sweet. It's the combination of that cream cheese frosting and the almost-savoury cinnamon filling that make this so addictive, and yet not too rich that you'd stop at one.


    The kids came back from school one day saying that they had super-awesome cinnamon rolls in school, and that gave me the perfect excuse to make these. As they preferred their rolls plain, I skipped the frosting on half the batch. I must say, I was pleased with how they turned out. If you leave the frosting to set on the rolls for a few minutes, it leaves a thin crunchy layer on top, like Krispy Kreme frosting. The rolls rose beautifully despite the fact that it was a cold winter's day, and it helped to place the dough under the cooker hood lights for some heat.

    The kids enjoyed the rolls although they still preferred the one from school, because those were sweet and sticky! Looks like I'll be making more cinnamon rolls this weekend, and I have just the perfect recipe in mind!


    Cinnamon Rolls with Cream Cheese Frosting

    Ingredients

    3/4 cup milk, warm (slightly above body temperature)
    2 tbsp sugar
    2 tsp dry yeast
    1 egg, lightly beaten
    1/2 tsp salt
    2 1/4 cup plain flour, plus extra
    1/4 cup potato flour
    1/3 cup unsalted butter, softened

    Filling:
    1/2 cup brown sugar, firmly packed
    1 tbsp ground cinnamon
    1 tbsp plain flour
    1/4 cup butter, softened

    Frosting:
    3 tbsp cream cheese
    3 tbsp butter, softened
    2/3 cup icing sugar
    1 tsp milk (approx.)
    1/2 tsp vanilla extract
    1/8 tsp salt

    Method

    Measure out the milk in a measuring cup and heat up in the microwave for 30 seconds until warm. Mix through 2 tbsp sugar and the yeast. Set aside for 15 minutes until it turns frothy and nearly doubled in height.

    In the bowl of an electric mixer, pour in the yeast mixture followed by the egg, salt, plain and potato flours. Attach a dough hook and mix on low speed for 2 minutes until it's mixed through and almost coming together. Add the softened butter and mix on medium speed for about 10 minutes until the dough is elastic and smooth. Add a few extra tablespoons of plain flour during kneading if the dough looks sticky.

    Turn out the dough into a large lightly greased bowl. Cover with a cloth or clingwrap and set aside in a warm place (like underneath the warm lights of your cooker hood). Let it rise for about 1-2 hours until doubled in size.

    Meanwhile, mix the brown sugar, cinnamon and plain flour for the filling.

    Lightly grease a large baking pan (or two small ones).

    When the dough is ready, punch it down. Roll it out onto a lightly floured surface until about 1/4 inch thick, large rectangle. The short side of the rectangle should be parallel to you.

    Use your fingers to spread the softened butter all over the dough, to within 1/2 inch of the border. Sprinkle and spread the filling mixture all over the butter. Then starting from the long side furthest from you, roll it up tightly and seal the edge with a little water.

    Use a serrated knife to cut into 16 slices (about 1 inch thick). Arrange in the baking pans, spacing them out about 3/4 inch apart. Cover with clingwrap and set aside for an hour or so until it has doubled in size. Remove clingwrap.

    Preheat oven to 180C (350F). Bake the rolls in the oven for 25 minutes or until lightly browned.

    Meanwhile, beat the frosting ingredients together, adding the milk last to thin it slightly to a spreadable consistency.

    Remove rolls from the oven, and spread some of the frosting over each one. Let it sit for 5 minutes, then drizzle more frosting on top. Serve warm. Leftovers can be refrigerated, and heated up the next day in the microwave for 15-20 seconds.


    reade more... Résuméabuiyad

    Pad Thai with Prawn and Pork


    It's hard to find a good pad thai in Sydney with the exception of Thai La Ong where I had the most delicious pad thai with sliced pork. I've only been there once quite a few years ago, but I vividly remember the pad thai which was moist, saucy, and bursting with flavours of tamarind and the charry smokiness from the wok. Nothing like those pale-looking, bland and boring pad thais some other restaurants serve. That was my benchmark for pad thai, and today, I've got the perfect recipe that I hope you will enjoy. The only thing was that I couldn't find thin pad thai rice sticks at the supermarket. So I had to make do with the broader version which was about 1 cm wide. When the craving hits, you just have to make do with what's available! Continue reading to find the recipe.


    Pad Thai
    Serves 1 | Prep time: 30 mins | Cook time: 10 mins

    Ingredients

    60g thin pad thai rice sticks
    Vegetable oil
    1/4 large red onion, sliced
    1 eggs
    2 tsp chopped preserved radish/turnip
    5 prawns, shelled with tail on
    80g pork belly, skin-off, thinly sliced and marinated with 1/2 tsp fish sauce, 1/2 tsp sugar, 1/4 tsp cornflour
    1/4 cup diced firm tofu

    Sauce:
    1 tbsp (15g) palm sugar, chopped
    1 1/2 tbsp tomato sauce
    1/4 cup tamarind paste / puree
    1/4 cup water
    1/4 tsp salt

    Handful of garlic chives, cut into 2 inch lengths
    1 cup bean sprouts, rinsed and tailed

    Garnish:
    Garlic chives (see above)
    1 tsp dried roasted red chilli powder/flakes
    1 tbsp crushed roasted peanuts
    Lemon/lime wedges

    Method

    Preparation:
    1. Marinate the pork belly slices.
    2. Soak the rice sticks in water (not hot) for 30-60 minutes until soft and pliable. Drain and set aside.
    3. Place sauce ingredients in a saucepan and bring to a simmer until sugar is dissolved. Turn off heat.
    Cooking:

    1. Heat 1 tbsp oil in a large wok. Add 2 tbsp of red onions and fry for 1 minute. Crack 1 egg into a bowl and lightly beat. Pour over the onions and scramble the eggs. Transfer to a plate and set aside.
    2. Add 2 tbsp oil into the work and add the remainder red onions, followed by 2 tsp preserved radish. Then add pork and prawns and fry until cooked. Add the tofu.
    3. Toss in the noodles and fry briskly on high heat. Add the eggs from Step 1. Pour the sauce around the edge of the wok and toss with the noodles for 1 minute until the sauce is almost absorbed. However, there should be some liquid left to keep the noodles moist. Toss in half of the bean sprouts and garlic chives for 20 seconds. Turn off heat and transfer noodles to a plate.
    4. Garnish with bean sprouts, chives, chilli powder/flakes, crushed peanuts and lemon wedges. Serve immediately and enjoy the best pad thai! 


    reade more... Résuméabuiyad