Pages

.

Showing posts with label Chicken. Show all posts

Best Ever Korean Fried Chicken (with sweet and sticky spicy sauce)


Best ever Korean Fried Chicken (IMHO). Need I say more? Think of crispy chewy and crunchy batter coated in a candy-like sweet, spicy and sticky glaze. And oh yeah, the chicken. Juicy. Delicious. Yummy. Continue reading to find the recipe.

Korean Fried Chicken with Sweet and Spicy sauce

Ingredients

800g (about 1 lb) chicken wings (drummettes and mid-wings, separated)
1 1/2 teaspoon salt
Canola/Vegetable oil for deep-frying
Sesame seeds for garnishing (optional)

Batter:
2/3 cup plain flour
1 1/2 tablespoon cornstarch
3/4 cup water

Sauce:
1 tbsp vegetable oil
3 cloves garlic, minced
1 small red chilli pepper, finely chopped (optional if you want more heat)
1 tbsp light soy sauce
5 tbsp corn syrup
2 tsp apple cider vinegar (or rice wine vinegar)
2 tsp brown sugar
2 tsp gochujang (Korean chilli paste)

Method

Prepare sauce first. Fry garlic (and chilli if used) in the oil, for half a minute, but don't let it brown. Add the rest of the ingredients for the sauce and simmer for 1-2 minutes until it turns syrupy. Turn off heat and set aside. (Note: It will thicken slightly upon cooling. If so, heat up again before using)

Rinse the chicken wings and pat dry with paper towels. Rub all over with salt and lay out in a single layer to draw the moisture out, about 10 minutes. Brush off excess salt and pat the chicken dry again with paper towels.

Mix the batter ingredients with a whisk until you get a smooth paste. Add chicken and coat in the batter. Heat sufficient oil in a wok for deep-frying (about 2 inches deep) at medium-high heat (180C/350F). Shake off excess batter from each chicken wing before frying it in the hot oil. Do not overcrowd the pan, otherwise the batter will not stick properly. Fry in batches for 6-8 minutes until golden. Drain on a wire rack or paper towels. Repeat with the rest of the wings. Once all the wings have been fried once, bring the oil back to temperature again, on high heat this time. Fry the chicken a second time for 4-5 minutes until golden brown and crispy. Drain again. Toss the chicken in the spicy sauce until well coated. You can also reheat the sauce, and toss the chicken into the pan to coat. Transfer to a serving plate and garnish with sesame seeds if desired. Enjoy immediately!
reade more... Résuméabuiyad

Soboro Don (Japanese Ground Chicken Rice Bowl)


Loving this simple dish that's kid-friendly, yet perfect for a weeknight family meal if you're looking for something quick and easy to prepare. I love eggs, and especially scrambled eggs. This chicken mince rice bowl is served with an egg crumble, which is made by scrambling the eggs with a pair of chopsticks until it turns into crumbs (of course!). Leftovers also make great lunchboxes for kids the next day.


Soboro Don
Source: Adam's Big Pot

Ingredients

1 tbsp vegetable oil
500g chicken mince
¼ cup soy sauce
¼ cup sake
2 tbsp caster sugar
2 tbsp mirin
¼ cup water
2 cups snow peas, tailed
8 cups steamed short-grain rice,

To serve

1 sheet nori, finely sliced, to serve

EGG CRUMBLE

4 eggs
2 tbsp mirin
1 tsp caster sugar

Method

Heat the oil in a medium saucepan over medium heat and add the chicken mince. Fry the mince until it turns white (you don't need to brown it) and add the soy sauce, sake, sugar, mirin and water.

Bring to a simmer, stirring occasionally for about 10 minutes, or until the liquid has almost completely evaporated. Stir again to moisten the chicken and set aside.

To make the egg crumble, heat the eggs, mirin, sugar and salt together in a medium saucepan over medium heat, stirring frequently for about 10 minutes, or until the egg dries and is in small pieces. Blanch the snow peas in boiling salted water for about 1 minute, then refresh in cold water.

Cut the snow peas in half diagonally. Divide the rice between four bowls and press down to create a flat surface.

Arrange the chicken, sliced snow peas and egg crumble in sections over the top of the rice.

Serve with sliced nori.

TIP:  This recipe works equally well with pork, turkey or beef mince. For the snow peas you could substitute cooked green peas, or blanched green beans sliced into rounds.


reade more... Résuméabuiyad

Yurinchi (Deep fried chicken with sweet and sour sauce)


When I was little, I used to follow my mum to the Malaysian "wet" market in the mornings, where fresh meat and produce were sold. I have vague memories of those adventures, particularly how "smelly" the place was and I had to hold my breath every time we walked past the chicken section. There must have been hundreds of hens cooped up in their tiny plastic cages, clucking away noisily, awaiting their fate. I would cup my hand over my mouth to "filter" the air so that I didn't inhale any bits of chicken feathers floating around. I was relieved once mum finished her marketing and we could move on to the real purpose of the trip - which was to buy breakfast! There were street vendors outside the market who sold "yu tiao" (deep-fried dough fritters) and "muah chee" (glutinous rice balls with crushed peanuts and sugar) and getting to eat them always made the trip so worth it!

I haven't been to a wet market since I came to Sydney. Here, you can buy nicely prepacked meats in all shapes, sizes, grades and cut, which is convenient for those who have no time (or skill) to trim and debone meat. However, one thing I don't understand is why deboned meats don't come with the skin attached. I love using chicken thighs, though I had to debone them myself as I needed them with skin on for this Yurinchi dish. Yurinchi is a Japanese version of Chinese "oil-drenched chicken" and this recipe was based on Adam's Big Pot cookbook, by Adam Liaw. It is a simple dish of fried chicken fillets with a sweet and sour scallion dressing. As the chicken is coated in flour and deep-fried, the skin turns golden, crunchy and chewy at the same time.
             

The sweet and sour dressing for the chicken is superb. When you eat the chicken together with the lettuce, it all tastes so fresh and absolutely delicious, it's hard to believe all that talk about fried chicken being unhealthy. But then again, if you prefer a healthier alternative, try using poached chicken breast instead.

Yurinchi
Adapted from Adam's Big Pot by Adam Liaw

Ingredients

4 chicken thigh fillets, skin on (about 800g)
1/2 tsp salt
1/2 cup potato/corn flour
Oil for deep frying
2 cups shredded iceberg lettuce

Sauce:
3 tbsp rice vinegar
2 tbsp caster sugar
2 tbsp soy sauce
1 tsp sesame oil
2-3 large spring onions, finely chopped
1 tbsp toasted sesame seeds
1 clove garlic, finely minced
1/2 tsp grated ginger

Method

Rub the salt over the chicken. Toss chicken in the flour to coat, shake off any excess.

Heat oil to 180C (medium to high heat) and deep fry the chicken in batches until golden brown and cooked (about 3-4 minutes each side). Drain on a wire rack.

To prepare the sauce, mix all ingredients together until the sugar dissolves.

Arrange the lettuce on a large serving plate. Slice the chicken into 2cm slices and place on the lettuce. Drizzle all over with the sauce. Serve immediately with steamed rice or enjoy on its own!


reade more... Résuméabuiyad

Korean Fried Chicken with garlic wasabi soy glaze


If there's one thing I can't resist, it's crispy Korean Fried Chicken (see my earlier posts here and here). So far, this is one of my favourites, with a lightly battered yet slightly chewy and crispy skin. The sweet, salty and sticky garlic soy glaze has a hint of wasabi to give it some kick. Chew on that crispy skin smothered with the soy glaze and sprinkling of toasted sesame seeds and you're in heaven. I almost forgot, every bite should be enjoyed with some of those thin ribbons of scallions. It helps to lighten up the dish, adds some freshness and makes the chicken taste more healthy than oily. Like, really. It's not just a garnish, it's a main ingredient. Don't skip it.


Here's a closer look at the crispy chicken wings!
The batter for the chicken was based on a recipe from Saveur. The soy glaze is my own concoction based on the famous "Red Pepper Korean Fried Chicken" at Strathfield Sports Club. Koreans enjoy their fried chicken with a glass of cold beer. I think I might try that next time.

Korean Fried Chicken with Soy Glaze
Recipe for batter adapted from Saveur

Ingredients

800g (about 1 lb) chicken wings
1 1/2 teaspoon salt
Canola/Vegetable oil for frying

Batter:
2/3 cup plain flour
1 tablespoon cornstarch
2/3 cup water

Soy glaze:
2 tablespoon soy sauce
2 tablespoon mirin
2 tablespoon water
1 clove garlic, crushed
1 teaspoon brown sugar (or to taste)
1/4 cup corn syrup
1/2 teaspoon sesame oil
1 teaspoon wasabi paste (or to taste)

Garnish:
Toasted sesame seeds
Scallions, julienned into thin long ribbons

Method

Prepare soy glaze first. Mix the soy, mirin, water and garlic in a saucepan and bring to a boil. Simmer for 1-2 minutes, and add brown sugar and corn syrup and simmer again briefly until it starts to reduce slightly. Stir in sesame oil and wasabi paste. Turn off heat and set aside.

Rinse the chicken wings and pat dry with paper towels. Rub all over with salt and lay out in a single layer to draw the moisture out, about 10 minutes. Brush off excess salt and pat the chicken dry again with paper towels.

Mix the batter ingredients with a whisk until you get a smooth paste. Add chicken and coat in the batter. Heat sufficient oil in a wok for deep-frying (about 2 inches deep) at medium-high heat (180C/350F). Shake off excess batter from each chicken wing before frying it in the hot oil. Fry in batches for 6-8 minutes until golden. Drain on a wire rack or paper towels. Repeat with the rest of the wings. Once all the wings have been fried once, bring the oil back to temperature again, on high heat. Fry the chicken a second time for 3-4 minutes until golden brown and crispy. Drain again. Arrange on a serving plate and drizzle with the soy glaze. Sprinkle with sesame seeds and top with scallions. Enjoy immediately!

Note: If the soy glaze has thickened upon cooling, just heat up slightly in the microwave before serving.


reade more... Résuméabuiyad

Nasi Ayam (Chicken Rice)


Hainanese Chicken Rice makes a regular appearance on our dinner table almost every Sunday evening. We would make a big batch of it so that it will last for the next couple of dinners. It's easy, simple and the kids hardly complain about it (unless it stretches out to the third or forth time in a row, then there'd be the occasional whining "Chicken rice? Again....?"). And so, I decided to try out a different version of chicken rice which is more Malay style, with the addition of spices like cinnamon and star anise. The chicken is rubbed with kecap manis before roasting it in the oven, which gives the skin a touch of sweetness.


Nasi Ayam (Chicken Rice) Recipe
Ingredients

1.8 kg chicken marylands (drumstick and thigh) - reserve the chicken fat for the rice
1-2 tbsp margarine/butter

Marinade:
3 tbsp kecap manis (sweet soy sauce)
1 1/2 tsp salt
1/2 tsp pepper

Broth:
2 litres water
2 cloves garlic
2 slices ginger
500g chicken bones/wing tips
1 medium onion, quartered
1 large carrot, diced
Salt and pepper to taste
Coriander stems/roots
Coriander leaves for garnish

Rice:

3 rice cups (approx 2 1/4 metric cups) of jasmine/basmati rice, rinsed
2 tbsp margarine/butter
2 pieces of chicken fat
3 cloves garlic, smashed
2 slices ginger
1 star anise
1 inch cinnamon stick
2 cloves
Chicken stock/broth
1 stalk lemongrass, bruised
1 pandan leaf
1/2 tsp salt or to taste

Chilli sauce:

3-4 red chillies, chopped
2 cloves garlic
1/2 inch ginger, grated
2-3 tsp white vinegar
2-3 tbsp chicken broth
Salt and sugar to taste

Chilli soy sauce:

Mix some kecap manis with chopped bird's eye chillies.

Method

Marinate the chicken by rubbing the salt and pepper all over, followed by the kecap manis. Leave refrigerated for 2-4 hours.

Prepare the chicken broth next. Bring water to the boil in a large pot and add garlic, ginger, chicken bones and onions. Simmer for 1 hour. Add a pinch of salt and pepper to taste.

Preheat oven to 190C. Rub some margarine/butter over and under the chicken skin. and roast the chicken for 45-50 minutes until browned and cooked through. Remove and chop into pieces.

While chicken is roasting, cook the rice. Heat up some margarine in a pan and fry the chicken fat for 3-5 minutes. Add garlic, ginger, star anise, cinnamon and cloves to fry. Add in the rice and fry until rice is well coated with the mixture. Pour into rice cooker and add the chicken broth until it comes up to the mark on your rice cooker. Add lemongrass, pandan leaf and stir in salt to taste. Start the rice cooker, and once cooked, fluff up the rice with a fork.

To the remaining broth in the pot, add carrots and coriander stems/roots. Simmer for 10 minutes, adding salt and pepper to taste. Ladle into bowls and garnish with coriander leaves.

To prepare chilli sauce, blend everything in a blender and adjust seasoning to taste.


Serve rice with chopped chicken, cucumber and tomatoes, chilli sauce, chilli soy sauce and chicken broth.

reade more... Résuméabuiyad

Malaysian Satay Recipe

 
Mention the word "satay" and I am instantly reminded of my childhood years and years ago, how the Malay Satay Man would peddle his mobile satay stall on his bicycle in my neighbourhood, tooting his horn. Sometimes, I could even smell the aroma from my house, even though he could be grilling his satay down the road. I would get all excited at the prospect of having satay for dinner, and run to the window to see if I could detect any "smoke" signals in the sky. He made one of the best satays in town, and the fact that he peddled his stall around the neighbourhood meant that we could walk up to him with empty plates and bowls waiting to be filled with freshly made satay. Those were the simple things in life back then, though coming from a foodie family, food was and is a big deal, as to most Malaysians of course.

Malaysian Satay is such a luxury item in Sydney. I don't think I've ever ordered satay here before, not when I know it costs multiple times less back in Malaysia. Thai style satay is quite common here, although I'm not a fan of it as they are often presented as a single long piece of chicken breast meat on a bamboo skewer, grilled (and often a tad dry) and served with a sweet peanut sauce which tastes like peanut butter mixed with loads of palm sugar. I guess my tastebuds are more accustomed to savoury and spicy Malaysian cuisine, rather than the sweet side of Thai food.

Anyway, I digress. I had to make satay at home from scratch, and it's pretty simple really. Serve it with cucumbers and ketupat (compressed rice) for a complete meal.

Malaysian Satay Recipe

1kg (2 lbs) chicken thigh fillet or beef scotch fillet steak
Vegetable oil and a stick of lemongrass for basting

Marinade (finely blended into a paste):
150g shallots
4 cloves garlic
1 inch ginger
2-3 lemongrass (white part only), sliced
1 tbsp ground coriander
2 tsp ground fennel
2 tsp ground cumin
1 tbsp ground turmeric
3/4 cup white sugar
2 tsp salt

Condiments:
1 red onion, sliced/cubed
Cucumbers, sliced into wedges
Ketupat (compressed rice cakes) - see here for recipe

You will need about 40-50 bamboo skewers (or less if they are long skewers), soaked in water for  a few hours.

Method:

  1. Cut the meat into 1 inch x 2 inch slices, about 1/4 inch thick. Combine with marinade and mix well. Add 2 tablespoons of vegetable oil and mix through. Leave to marinate in the fridge for at least 2 hours or overnight.
  2. Thread the pieces of meat onto the bamboo skewers (about 3-4 pieces each) and set aside on a plate.
  3. For basting the satay, take the lemongrass and smash the white part until it's "frayed" like a brush.
  4. Grill the satay sticks over a barbecue, using the lemongrass "brush" to baste the satay with vegetable oil.
  5. Serve with peanut sauce and condiments.

Satay sauce / Peanut sauce Recipe

500g raw unsalted peanuts, skinless
1/2 cup vegetable oil
2 tbsp tamarind pulp, soaked in 1 cup hot water to extract the juice
2-3 cups water, plus extra
150g gula Melaka (dark brown palm sugar), chopped
4 tbsp dark brown sugar
1 tsp salt or to taste

Spice paste (finely blended into a paste):
100g shallots
4 clove garlic
2-3 stalks lemongrass, white part only, chopped
15-20 long dried chillies, deseeded, soaked in a hot water overnight and chopped (discard the water)
1 inch galangal

Method:

  1. Dry fry the peanuts in a large wok, without any oil, until the peanuts are lightly browned and fragrant. Remove and set aside to cool.
  2. Pound/grind/blend the peanuts until almost smooth but with some coarse bits still visible, depending on whether you like it smooth or chunky I guess. Set aside.
  3. Heat up the 1/2 cup oil in a medium sized pot. Add the blended spice paste and fry until the chilli oil starts to separate from the paste. Add the tamarind juice, gula Melaka and water and bring to a boil and simmer for 10-20 minutes.
  4. Add the ground peanuts and stir to mix well. Bring to a boil, then add salt and brown sugar to taste. Add more water if it's too thick. Sauce will thicken as it cools.
  5. Turn off heat and set the sauce aside until the oil rises to the top. Serve warm with satay and ketupat (rice cakes).


reade more... Résuméabuiyad

Ayam Bakar (Indonesian Grilled Chicken)


I have a weakness for Indonesian grilled chicken (or Ayam Bakar as you will often find on Indonesian menus) - the char and smokiness from the caramelized chicken skin, the sweet aromatic spices, the distinctive taste of kecap manis (sweet soy sauce) combined with the heat from the savoury sambal belacan, all complemented with a mound of steamed white rice. The preparation method involves first simmering the chicken in the pot with the spice mix (bumbu or rempah) so that the chicken absorbs all those wonderful flavours. I then reduced the sauce to a thick syrupy paste which I used to baste the chicken before placing under the grill. This gives it a more concentrated flavour and also helps form a shiny dark coating on the skin.

 
I was a little sceptical about making this for the first time, as I wasn't sure if the kids would take to the complex spices in this dish. Well, it turned out that they couldn't get enough of it! If only they could eat chilli, they don't know what they are missing out on without the sambal belacan!

Ayam Bakar Recipe

Ingredients

1.6kg (3.5 lbs) chicken Maryland (thigh + drumstick)
2 tbsp vegetable oil
1-2 lemongrass, white part only, bruised
1 inch galangal, bruised
4 pieces kaffir lime leaves
2-3 cups water
6 tbsp kecap manis (I used Bango brand)
1 tbsp tamarind puree/juice
2 tsp sugar
1 1/2 tsp salt (or to taste)
Dash of black pepper

Spice paste (finely blended):
100g (3oz) shallots
4 cloves garlic
3/4 inch ginger
1 tbsp ground coriander
1/4 tsp ground cumin
1/2 tsp ground turmeric

Method

  1. Heat vegetable oil in a pot (large enough to arrange the chicken in one layer). Fry the spice paste for 5 minutes on medium heat until fragrant. Add lemongrass, galangal, lime leaves, water, kecap manis, tamarind puree, salt and sugar, and bring to a boil. Add the chicken and simmer for 30 minutes or until chicken is cooked. Turn off the heat. If you have time, you can leave the chicken to soak in the sauce for another hour to let the flavours permeate into the meat.
  2. Transfer the chicken to a baking dish or pan, as you will need to grill the chicken in the oven later. Leave the sauce in the pot, and bring it to a boil. Simmer until sauce is reduced to a thick paste. Spoon some of this paste onto the chicken (skin-side up).
  3. Turn on the oven grill/broiler. Grill the chicken for 20 minutes or until the skin is caramelized and black. Be careful not to burn it. Brush on more of the reserved paste from step 2 above if you like and grill again.
  4. Transfer to a serving dish and serve with steamed with rice, cucumbers, a drizzle of kecap manis and sambal belacan (see recipe below).
Sambal Belacan recipe

4 small chillies and 4-6 long red chillies (as desired)
4 candlenuts
2 cloves garlic, peeled
1/2 tsp toasted belacan
Salt to taste
1 tsp sugar, or to taste
Splash of lime juice or vinegar

Method

Remove the chilli stalks. Place chillies and candlenuts in a pot of boiling water, and simmer for 10 minutes. Drain of the water. Roughly slice the chillies. Place chillies, belacan, candlenuts and garlic in a food processor/blender and chop finely. Add salt, sugar and lime juice to taste. Transfer to a small dish, and serve with Ayam Bakar. If desired, drizzle some kecap manis over the sambal belacan before serving.


reade more... Résuméabuiyad

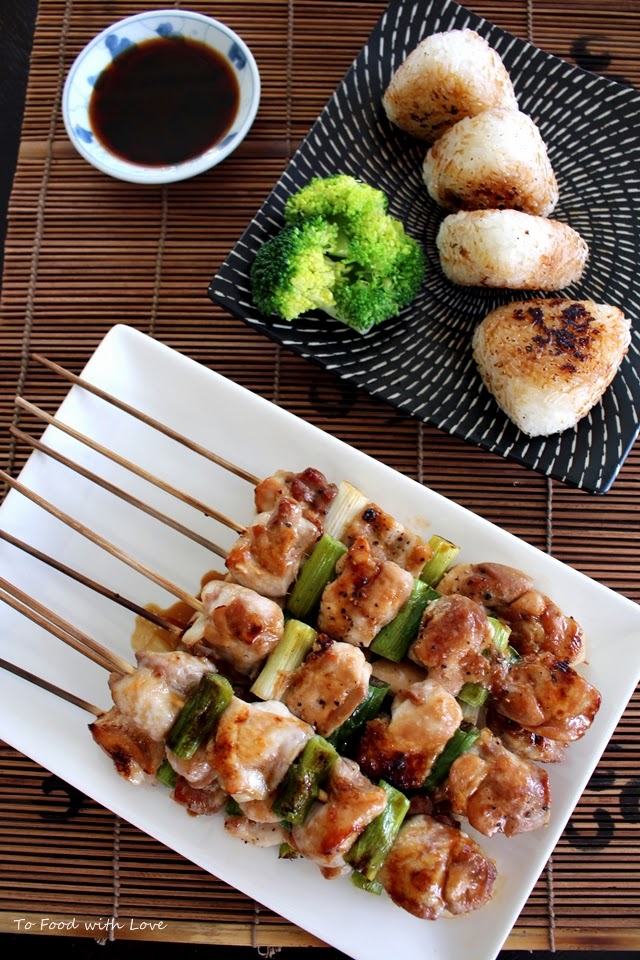
Yakitori with Yaki Onigiri (Grilled chicken with grilled rice ball)

 
Grilling chicken tends to dry out the meat easily, so these chicken skewers are best made with drumstick or thigh fillets, and never breast fillets.  If you want to add some chicken skin on the skewers, that's even better (but entirely optional). Yakitori ("grilled chicken") is typically Japanese grilled chicken on bamboo skewers, and could either be plainly seasoned with salt ("shio") or basted with "tare" sauce, which is what I've done here. The kids love it, and it's just something about food served on a stick that makes it so appealing.


Yakitori (Grilled chicken skewers)
 
Ingredients
 
500g (1 pound) chicken thigh fillets, cut into 1 inch cubes
Vegetable oil
Salt and black pepper
4-5 scallions, light green / white part only, cut into 1 inch stems
 
Yakitori sauce:
1/3 cup Kikkoman soy sauce
1/3 cup mirin
3 tbsp cooking sake
2 tsp white sugar
2 tsp brown sugar
 
Equipment:
10-12 bamboo sticks
Barbecue grill or oven grill
Basting brush
 
Method
 
Soak the bamboo sticks for at least 4 hours before using.
 
Prepare the sauce by combining it in a saucepan, and then boil it over medium heat until it's reduced by less than half.  Leave to cool, and it should thicken slightly to a syrupy consistency.
 
Skewer the chicken on the bamboo sticks alternating with a piece of scallion. Brush with vegetable oil and season lightly with salt and pepper.
 
If using an oven, turn on the grill to high.  Place skewered chicken on a baking tray lined with foil, and grill for about 8 minutes each side (turning once) until lightly browned. Baste the chicken halfway through with some of the yakitori sauce. Continue to grill for 2-3 minutes until chicken is lightly charred. If the bamboo sticks start to brown/burn, you can place a piece of aluminium foil over the bamboo sticks to prevent it from burning. Alternatively, wrap the ends of each stick with foil.
 
Serve the chicken skewers with white short-grain rice or yaki onigiri (Japanese grilled rice balls). 
 
To make grilled onigiri, cook some sushi or short-grain rice (in a rice cooker). Shape the rice into triangular cakes and lightly compress them so that they don't fall apart. Grill the rice balls in a lightly greased non-stick pan for about 10 minutes until all sides are lightly browned.  Lower the heat and brush some yakitori sauce over the rice balls. Return the rice balls to the pan and briefly grill them again (only for a few seconds as they burn easily) on each side until lightly charred. 


reade more... Résuméabuiyad

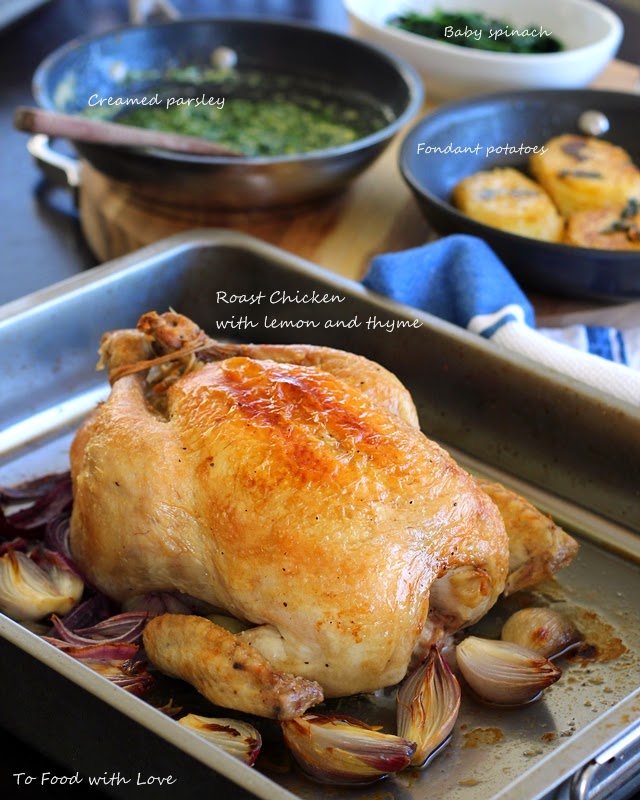
Roast Chicken with Creamy Parsley and Fondant Potatoes


I purchased Gary Mehigan's new book "Favourites" a couple of weeks ago during his book-signing at Costco. I love that he has put together his all-time favourite recipes in one book, because honestly, there are way too many recipes out there that I would love to try. I may be dreaming of cooking chilli crab one minute and baking kouign amann the next, and sometimes I just end up making more that I can fit leftovers in the fridge.

So far, I've attempted two recipes from the book. One is the XO sauce, which is utterly, utterly delicious. I was a little skeptical about making a big batch of it, but I'm so glad I did because it means I can eat more of it with more of everything! The other recipe that tempted my tastebuds was the Creamy Parsley and Nutmeg, which I found a little unusual yet intriguing with the combination of parsley and cream. A little like creamed spinach, but with a herby taste, I suppose? It turned out to be one of the most amazing things I've ever made with parsley. It's luxuriously rich and creamy, and the added sweetness from the shallots makes this so tasty that I couldn't stop eating it out of the pan (I was just checking for seasoning, really). In his book, Gary recommends serving it with a roast chook or rib of beef. I've been cooking a lot of red meat lately, specifically pork belly and pork shoulder (see my previous post on Korean Pulled Pork Burgers), so I settled on a recipe for roast chicken from Gary's other book (under Lantern Cookery Classics). The recipe is also available on the Penguin/Lantern website.

Creamy parsley and nutmeg
It's wonderful how the simplest recipe for roast chicken can yield the most satisfying results. A testament to how good it is, is when my 6-year old takes a bite and her face just lights up as she goes "Mmmmm..." before she reaches for another mouthful. It's really just chicken stuffed with thyme, garlic and lemon, but I guess it's the technique and method of cooking it that makes the difference. Also important is to make sure you use good quality, corn-fed, free-range chicken. I find that La Ionica (chemical and hormone free) chickens are really good too, which we always use when making our best ever Hainanese chicken rice.

Fondant potatoes
I also made the buttery, thyme-scented fondant potatoes which were lovely and luscious. With the butter left in the pan, I added some of it to the creamy parsley, and used the rest for sautéing some baby spinach with garlic and shallots.

To make the creamy parsley, you will need 4 bunches of parsley (continental flat-leaf, or mixed with curly parsley). Pick the leaves and boil them in water for 2-3 minutes until softened. Drain and squeeze out all the water, then chop finely. Heat a pan with some olive oil and saute some shallots and garlic, season with salt and pepper. Then pour in some thickened cream (about 2 cups) and simmer until reduced by half. Add in the parsley, followed by some grated nutmeg. Simmer briefly until most of the cream is absorbed. Add more seasoning if necessary. Serve immediately.


Roast chicken with fondant potato
Adapted from Lantern Cookery Classics: Gary Mehigan

Ingredients
1 × 1.6 kg free-range chicken
1 lemon, quartered
2 sprigs thyme
2 cloves garlic, peeled
table salt
1½ tablespoons olive oil
5 small golden shallots, peeled
splash of dry white wine
100ml (about 1/2 cup) chicken stock

Fondant potato
170 g unsalted butter, chopped
4 large desiree potatoes, cut into 7 cm × 5 cm × 1 cm-thick rectangles

Method


  1. Preheat a fan-forced oven to 180°C/350°F  (200°C/400°F conventional).
  2. To remove the wishbone from the chicken, lift the neck skin to reveal the breast. Scrape the point of a small sharp knife down the wishbone (it looks like an upside-down ‘V’ shape). Put your fingers behind the bone and tug to remove it. Stuff the cavity with the lemon, thyme and 1 clove of the garlic. Truss the chicken with kitchen twine.
  3. Heat a flameproof roasting pan over high heat. Season the chicken with salt and pour the olive oil into the pan. Brown the chicken lightly on all sides, starting with one leg, turning it over to brown the other leg, then the breast. Turn the chicken onto its back, then roast for 20 minutes.
  4. Baste the chicken with the pan juices. Add the shallots and remaining garlic and roast for a further 40 minutes or until the chicken is cooked. To test, pierce the thigh at the thickest part – the juices should run clear. Transfer the chicken to a large plate and rest for 10 minutes.
  5. Meanwhile, to make the fondant potato, melt the butter in a deep heavy-based frying pan over medium heat. As the butter begins to bubble, add the potato and thyme in layers (I made two layers). Reduce the heat to low, then cook for 10 minutes or until the potato is golden. Turn the potato over and cook for another 10 minutes or until golden. Add the water; the butter will foam and darken slightly. Baste the potato well and continue to cook for another 10 minutes or until tender. Remove from the heat, then leave to stand for 5 minutes. Season with salt. Set aside and keep warm.
  6. Place the roasting pan of cooking juices over low heat, then crush the roasted garlic and shallots into the pan with the back of a fork. Add the wine and stock and simmer over low heat for 2 minutes. Set aside.
  7. Cut chicken into quarters and serve with creamy parsley, gravy and fondant potatoes.


reade more... Résuméabuiyad

Chicken Cacciatore with Pappardelle

 
Chicken Cacciatore is a simple and delicious Italian-style chicken stew made with tomatoes and white wine. "Cacciatore" means "hunter" in Italian, so this is also known as hunter's stew. I first made this a year ago when my friend Tracey shared her recipe with me. I think she visited some cooking school on her Italian holiday and kept raving to me about chicken cacciatore. Get hold of fresh pappardelle if you can (here, I've used cracked black pepper and basil pappardelle), but otherwise, any of your favourite pasta will work too. You can omit the red peppers if you like, but I find that it lends a lovely sweetness and flavour to the dish. This is ideal for those big family dinners, where you can cook up a big batch, let it simmer on the stove while you sit, relax and have a sip or two of wine. That's stress-free cooking for you. Read on to get the recipe.


Chicken Cacciatore
Serves 4 | Prep time: 15 mins | Cook time: 50 mins

Ingredients

1.2kg (2 lb) chicken thigh cutlets, skin on*
2 tbsp extra virgin olive oil
1 onion, diced
4 cloves garlic, minced
100g pancetta, diced
2 bay leaves
1 small red pepper, sliced (optional)
2 sprigs thyme (optional)
1 tbsp chopped fresh rosemary
1 cup dry white wine
1 can (400g / 14oz) diced tomatoes
Salt and freshly ground black pepper
2-3 tsp chilli flakes (optional)
2 tbsp butter**

600g fresh pappardelle

Method

  1. Heat olive oil in a large pan and place chicken skin-side down in the pan. Shake the pan occasionally to prevent chicken from sticking to the pan. Brown the chicken 5 minutes each side. Remove chicken from pan and transfer to a plate. Set aside.
  2. Add the onion and garlic to the remaining oil in the pan and sauté for 5 minutes until lightly browned. Add the pancetta, red pepper, bay leaves, thyme and rosemary. Saute for for 2 minutes.
  3. Pour in the wine, bring to a boil and simmer until it's reduced to half. Return the chicken to the pan and add tomatoes and chilli flakes (if desired). Season with salt and pepper. Bring to a boil, cover and simmer on medium heat for 30 minutes, turning the chicken once halfway through. Stir in the butter towards the end and simmer for 2 minutes. Before serving, remove the bay leaves and thyme stalks.
  4. Meanwhile, cook the pasta in salted boiling water till al dente. Drain and place on serving plates. Ladle the chicken and sauce over the pasta and serve immediately.

Note:
* Chicken thigh cutlet comes with one bone still attached
** I've added in butter to help thicken the sauce a little


Served with black pepper and basil pappardelle


reade more... Résuméabuiyad

Portuguese Chicken with Piri-piri Sauce


Piri-piri is a Swahili word for "pepper pepper", and is also known as African Bird's Eye chilli. It is the predominant ingredient in making piri-piri sauce - a tangy, garlicky, fiery hot chilli sauce that is popular in South Africa cuisine. If you didn't know already, piri-piri chicken (also known as Portuguese chicken) originated in Mozambique (some say Angola), which were former Portuguese colonies. Hence, the influence of spicy Portuguese cooking found its way into South African cuisine.

It's probably more accurate to refer to this dish as piri-piri chicken, rather than Portuguese Chicken. After all, it did not originate from Portugal. It's a bit like Hainanese Chicken Rice, which did not originate from Hainan Island in China, but is one of the national dishes of Singapore (next to Singapore Chilli Crab, I suppose?). Anyway, piri-piri sauce is a great way to dress up your next roast chicken, and tastes fantastic especially if you love chillies, lemon and garlic. Serve it with a salad and some hot chips/fries.


Portuguese Roast Chicken with Piri-piri Sauce
Adapted from BBC Food

Ingredients

1 whole chicken (about 1.2kg), butterflied (alternatively, use whole chicken legs)
Salt and freshly ground black pepper
For the piri-piri sauce:
6-12 fresh red chillies, depending on how hot you want it
1 tbsp minced garlic
1/2 tsp salt, or to taste
1 bay leaf
½ tsp oregano (optional)
½ tbsp paprika
100ml/3½fl oz olive oil
1 1/2 tbsp red wine vinegar
2 tbsp lemon juice
1 tbsp brown sugar

Method

To make the piri-piri sauce, boil the chillies in a pot of water for 3-5 minutes. Drain and roughly chop the chillies. Place the chillies, garlic, salt, bay leaf, oregano, paprika, olive oil and vinegar in a saucepan, and simmer for about 5 minutes. Stir in lemon juice and sugar to taste.

Allow the mixture to cool, then blend it to a purée in a jug blender or food processor. Store in a lidded container at room temperature.

Rub some salt and black pepper all over the butterflied chicken. Place the chicken in a sealable plastic bag. Add 2 tbsp of the piri-piri sauce, spreading it evenly over the chicken. Seal and marinate in the refrigerator for 4 hours or overnight.

Preheat the oven to 200C (400)F. Place the chicken in a roasting tray and roast in the oven for 45 minutes or until cooked. Baste the chicken with pan juices halfway through roasting.

Serve with extra piri-piri sauce, chips and salad. I made a simple pear and rocket salad with a lemon and olive oil dressing to go with it. Yum!
reade more... Résuméabuiyad

Roast Chicken with Russian Salad {Best Ever}

 
This is the most amazing and easy roast chicken ever. I'm dreaming of having this chicken again as I write this. I actually ate this three days in a row and never got tired of it. In fact, it tasted even better the following days, with the flavours from the marinade (and the pan juices) having absorbed into the chicken. I was a little sceptical about the Russian salad
(although it was really the "exotic" reference to "Russian" that enticed me to try out this recipe) as I don't usually have cold creamy salads with roast chicken. Well, I was pleasantly surprised that they complemented each other really well and I just kept going back for more (and more, and more). I made sure the egg was cooked just right, with a jellied yolk centre, because that's the best way to have 'em!
 

Roast Chicken with Russian Salad
Adapted from Gourmet Traveller (July 2013)

Ingredients

2.4 kg chicken marylands (whole chicken leg)
2 lemons, quartered

Spice rub:
1 tbsp ground coriander
1 tbsp smoked paprika
1 1/2 tbsp dark brown sugar
2 tsp dried chilli flakes
1 tsp ground cinnamon
1 tbsp sea salt
2 tbsp olive oil

Russian salad
4 eggs
3-4 potatoes (about 500g)
2 carrots, halved horizontally
200 g frozen peas, defrosted
250 g (1 cup) mayonnaise
60 ml (¼ cup)
cider vinegar
4 golden shallots, thinly sliced (or substitute with deep fried shallots)
1 cup loosely packed chopped dill (optional)
Salt and black pepper, to taste

Method

For spice rub, combine ingredients in a bowl. Rub over chicken, place in a non-reactive container, cover with plastic wrap and refrigerate overnight (or at least 24 hours) to marinate.

For Russian salad, cook eggs in a saucepan of boiling water until soft-boiled (6-7 minutes). Cool under running water, peel, quarter and set aside. Peel and dice potatoes into 1/2 inch cubes, place in a saucepan of cold salted water, bring to the boil and cook until tender. Drain and set aside. Cook carrot in a saucepan of boiling salted water until just tender (10-12 minutes), cool and cut into 1/2 inch pieces. Blanch peas in a saucepan of boiling salted water until bright green (1 minute), refresh and drain. Combine mayonnaise and vinegar in a large bowl, season to taste and stir until smooth. Add all ingredients and toss to combine.

Preheat oven to 200C (400F). Arrange on a large baking tray and roast until cooked through (45-55 minutes). Cover loosely with foil and rest for 10 minutes. Cut each chicken into quarters, season to taste, squeeze over lemon and serve with warm salad.

Note: You'll need to begin this recipe a day ahead to marinate the chicken.


reade more... Résuméabuiyad

Spicy Chicken (Vindaloo)


Here's a hot and spicy chicken dish that's quick and easy to prepare, and will have you going back for more! This tastes even better the next day or two, so double the batch if you want to save some leftovers for a busy weeknight dinner.


Spicy Chicken (Vindaloo)

Ingredients

500g (1/2 lb) chicken thigh fillets, cubed
Vegetable oil, for frying
3-4 medium-sized onions, peeled and sliced into rings
1/2 tsp mustard seeds, coarsely ground with mortar and pestle
3 cloves garlic, minced
1/2 inch ginger, grated
1 tsp cumin
2-3 tbsp chilli paste (made from ground dried chillies)
1/2 cup water
2 tsp sugar
Salt to taste
2 tbsp vinegar (or to taste)

Method

Heat up 3 tbsp vegetable oil in a pan or wok. Fry the onions for 5-10 minutes until softened and slightly browned.  Remove the onions and transfer to a plate, leaving the remaining oil in the pan.

In the same wok, add the mustard seeds and fry until they start to pop. Add the minced garlic and ginger, cumin and chilli paste. Fry for 2 minutes, then add the chicken. Brown the chicken in the pan, then add the onions (that was fried earlier) and approximately 1/2 cup water. Bring to a boil and let the chicken simmer until fully cooked (about 10 minutes), and the sauce reduced to a gravy consistency. Add sugar, salt and vinegar to taste.  Dish up and serve with steamed basmati or other white rice.

reade more... Résuméabuiyad

Grilled Miso Chicken Don

 
There's been a lot of chicken going on in the TFWL household lately. We've been having Grilled Miso Chicken, Roast chicken, Hainanese chicken rice, air-fried soy honey chicken wings and as of last night, Chicken Katsu. As I'm typing, Mr G is preparing chicken rice for tonight's dinner, by popular demand from the three little fussy eaters. I was wondering what to post this week, as we've been busy with Christmas shopping, cleaning and planning for our Christmas party.


Remember my post on miso-grilled chicken a couple of weeks back? I've made it twice since, and decided to use it in my Oyakodon recipe where I substituted the chicken with this grilled one instead. It's a great way to use up any leftover grilled chicken to make a simple one-bowl meal.
 
Click here and here for the Oyakodon and Grilled Miso Chicken recipe.


reade more... Résuméabuiyad

Moroccan-spiced Roast Chicken

 
I was inspired to make a Moroccan-style roast after having some super tasty barbecued chicken at Gladstone Park Bowling Club recently. They also served up the most amazingly crispy and delicious roasted potatoes. Best I've ever had. I'm still trying to figure out they made those potatoes, and if I do, you'll see it here first! Anyway, I came across this recipe for Moroccan-spiced roast chicken and thought it might be close to what I was searching for. Well, it turned out really good, and I loved the idea of tossing the cauliflower and sweet potatoes with the spice mix. This is a nice change from the usual lemon and herb roasted chicken I usually make for the family. And with summer just around the corner, this spice rub will be perfect for barbecued chicken wings and thighs.


Moroccan-spiced Roast Chicken
Adapted from Leite's Culinaria
 
Ingredients
 
One whole chicken (1.8kg / 4lbs)
Coarse salt and freshly ground black pepper
2 tbsp sweet paprika
1 tsp ground cumin
3/4 tsp chilli flakes
1/2 tsp ground cinnamon
1/2 lemon
4 tablespoons olive oil
2 small orange-fleshed sweet potatoes, unpeeled
1/2 head of cauliflower, cut into 2-inch florets
1 large red onion, cut into 8 wedges 

Method

1. Preheat the oven to 430°F (220°C). Slick a heavy large rimmed baking sheet–preferably not a roasting pan, but if you do use a roasting pan, make it a big one–with a little oil.

2. Pull out and discard the fat and giblets from the cavity of the chicken. Pat the chicken very dry with paper towels. Starting at the edge of the main cavity, slide a finger under the skin over each breast half, making a pocket between the skin and meat. Rub a total of 2-3 teaspoons of salt over the chicken skin. Toss some extra salt inside the cavity. Sprinkle the chicken generously with black pepper. Tie the legs together, if desired.

3. In a small bowl, mix the paprika, cumin, chilli flakes, and cinnamon. Set aside 2 teaspoons of the spice mixture for the vegetables. The rest is for the chicken. Finely grate the zest from the lemon, cut the lemon in two, and mix the zest into the spices for the chicken. Gradually mix in 2 tablespoons of the olive oil to make a paste. Spread a little of the paste inside the cavity, slather some of it under the skin over the chicken breasts, and rub the rest of the paste all over the outside of the chicken. Stuff the lemon inside the cavity. Place the chicken in the center of the baking sheet and roast for 30 minutes. Keep an eye on it and if it browns too quickly cover it loosely with a sheet of foil.

4. Meanwhile, cut the sweet potatoes in half crosswise, and then quarter each half lengthwise to create wedges. Combine the sweet potatoes, cauliflower, and onion in a bowl. Add the remaining 2 tablespoons oil and toss to coat. Add the reserved spice mixture, sprinkle with 1/2 teaspoon each salt and pepper, and toss to coat.


5. After the chicken has roasted for 30 minutes, remove it from the oven. Arrange the vegetables around the chicken. Return the pan to the oven and continue roasting until cooked (about another 40 minutes). (Note: the bird will take longer to roast if the legs have been tied together).

6. Transfer the chicken to a platter and let rest for 10 minutes. Carve the chicken and serve with the vegetables.


Oh so juicy!

reade more... Résuméabuiyad

Grilled Miso Chicken

 
It's been a busy weekend in the kitchen. The kids have been waiting all year (since last Christmas) to make gingerbread men, and so we did that this afternoon and they had fun painting the gingerbread men, trees and stars pastel colours of blue, green and pink. They enjoyed them so much that I couldn't bear to eat any (maybe I will pinch a bit when they're not looking!). In the midst of the baking and cookie-decorating, I prepared a simple dinner of grilled miso chicken. With the leftover rice in the fridge, I made a garlic butter fried rice (click here for recipe) to serve with the chicken. And since there were bones from the thighs I had deboned, I made a chicken soup with carrot and corn. No waste!
 
 
For a fuss-free meal (and more time to do Christmas shopping...), let the oven do all the cooking and enjoy this oh-so-tasty grilled chicken with garlic and miso.

Grilled Miso Chicken

Ingredients

6 medium-large chicken thighs, deboned, skin on

Marinade:
4 tbsp Shiro Miso (white miso paste)
3 tbsp mirin
2 tbsp sake
1 tbsp minced garlic
1 tbsp soy sauce
2 tsp brown sugar

Method

Rinse the chicken and pat dry.

Combine marinade ingredients in a small bowl and mix well.

In a large bowl or a Ziploc bag, combine the chicken with the marinade ingredients. Seal the bowl/bag and refrigerate for 3-4 hours.

Preheat oven to 200C (400F). Arrange chicken in a single layer, skin side up, on a baking tray lined with baking paper or aluminium foil. Place in oven on the top rack and bake for 30 minutes.

After 30 minutes, switch on the grill function and turn up the heat to 220C (430F). Use a brush to baste the chicken skin with the juices on the tray. Continue to cook the chicken for 15 minutes until the skin is charred and crisp. Watch it closely as it can burn quite quickly.

Remove the chicken from the tray and cut into slices.

Pour out the juices from the tray into a bowl. Skim off the oil and discard. The remaining makes a delicious sauce you can serve with the chicken and some steamed or fried rice.

For garlic fried rice recipe, click here.
reade more... Résuméabuiyad

Chimichurri Roast Chicken


Seems like ages since my last post. I've been quite busy of late. Well, actually, I've been on holidays. Busy on holidays with the kids. Then, I returned from my holidays and was busy getting back into routine again. Now that I've settled back in, it was time to start those blogging juices flowing. Not. Speaking of which, I made a juicy roast chicken with chimichurri for dinner last night. I only just discovered chimichurri a few months ago.Prior to that, it always crossed my mind as being related to chimichanga (well, they do sound like they come from the same family!). We have a little herb garden at home, and there are two plants in particular that are thriving throughout the year - the rosemary and the parsley. There was a time, many years ago, when our parsley never survived more than a few months. Now, we have a parsley bush that's enough to make chimichurri for a month.

So, there. What do you do when your garden is overgrown with parsley? Make chimichurri of course. This delicious parsley sauce is now my best friend. It goes with absolutely anything that's grilled or roasted - prawns, fish, steaks, chicken, vegetables, you name it. And because it has a slight tang to it from the vinegar, it makes everything taste so appetizing that you keep eating more and more. That's not really a bad thing, unless one is pregnant and lactating, as there might be uterotonic effects of excessive consumption of parsley. In fact, did you know that parsley is one of the most underrated superfoods, and is often overlooked in its popular role as a garnish? Parsley is packed full of nutrients such as vitamins, minerals and antioxidants, has healing properties and can potentially reduce the risk of cancer and heart disease. Google parsley and read all about the nutritional benefits of this wonderful herb.

Anyway, I digress. Chimichurri - super easy to prepare, super tasty and versatile and great if you're looking to use up extra parsley lying around. Make sure you use flat-leaf or Italian parsley, and not the curly ones. If you've never tried it, you should! Delizioso!

Chimichurri Roast Chicken

Ingredients

2 chicken marylands (whole leg)
Salt and pepper

Chimichurri Sauce:

1 1/2 cups tightly packed flat-leaf parsley leaves, chopped
3 cloves garlic, minced
1/2 tsp dried oregano
1/4 tsp dried chilli flakes
2 tbsp red wine vinegar
1/2 cup extra virgin olive oil
Salt and black pepper, to taste

Method

Prepare Chimichurri by mixing all the ingredients together. Set aside, or refrigerate for up to 3 days until ready for use.

Preheat oven to 200C (400F).

Rub salt and pepper over the chicken. Gently lift the skin until it separates from the flesh, and stuff it with some chimichurri. Rub 1 tbsp of chimichurri all over each chicken Maryland. Place in a roasting tin. Toss some potatoes and vegetables with olive oil, salt and pepper (and butter if you like). Arrange these in the roasting tin. Bake for 1 hour until chicken is cooked and browned. Turn up the heat to 230C (440F) for the last 5 minutes to crisp up the skin. Serve immediately with extra chimichurri on the side.
reade more... Résuméabuiyad