Pages

.

Showing posts with label Vegetables. Show all posts

Malaysian Vegetable Curry (Sayur Lodeh)


Sayur lodeh is a vegetable curry commonly found in Malaysia, Singapore and Indonesia. The version I grew up with contains cabbage, eggplant, long beans, deep-fried tofu (and sometimes tofu puffs) and glass noodles. I made this for lunch today and it turned out perfect (really!) and so I decided to post the recipe here in case I forget how to replicate the dish next time. Cooking is a bit of trial and error sometimes, especially with Asian cooking. I think I've got the recipe down as accurately as I can, and it's super duper delicious with rice (or even on its own).

Malaysian Vegetable Curry (Sayur Lodeh)
Serves 6

Ingredients

1 packet (300g) deep fried tofu
1 cup sliced carrots
3 cups cabbage (about 1/4 of a cabbage), cut into 2 inch strips
2 cups green/long beans, cut into 2 inch lengths
2 eggplants (the long and slender type), sliced into 2 inch halves
2 pieces kaffir lime leaves, torn and crushed
4 cups water
1 1/2 teaspoon ikan bilis stock powder
1 tablespoon palm sugar
1/2 cup vegetable oil
3 tablespoons chilli paste (made from dried chillies)
1 1/2 cups coconut milk
1 1/2 teaspoon salt (or to taste)
2 teaspoons soy sauce
1 handful glass noodles, soaked in water until softened

Spice paste (blend finely):
3 tablespoons dried shrimp (rinse with water and drain, then leave for 15 minutes to soften)
2 medium onions
4 cloves garlic
1/2 inch ginger
1/2 inch galangal
1 stalk lemongrass, white part only (reserve the rest of the stalk to simmer separately in the broth later)
2-3 teaspoons toasted belacan
1 teaspoon ground coriander
1/2 teaspoon ground cumin
1/2 teaspoon ground turmeric

Method
  1. In a large pot, heat up the vegetable oil and fry the spice paste and chilli paste for 5-10 minutes. Add the kaffir lime leaf and reserved lemongrass stalk (the non-white part) and fry briefly. Add water and bring to a boil. Cover and simmer for 1/2 hour.
  2. Add coconut milk ikan bilis stock powder, sugar and bring to a simmer. Do not let it boil vigorously. Season with salt and soy sauce.
  3. Add the tofu and carrots, followed by the cabbage, long beans and eggplant. When it starts to simmer, cover with a lid and let it simmer for 15 minutes until vegetables are just cooked. Just before serving, add the glass noodles until it's softened. Serve immediately with steamed white rice.


reade more... Résuméabuiyad

Roast Chicken with Creamy Parsley and Fondant Potatoes


I purchased Gary Mehigan's new book "Favourites" a couple of weeks ago during his book-signing at Costco. I love that he has put together his all-time favourite recipes in one book, because honestly, there are way too many recipes out there that I would love to try. I may be dreaming of cooking chilli crab one minute and baking kouign amann the next, and sometimes I just end up making more that I can fit leftovers in the fridge.

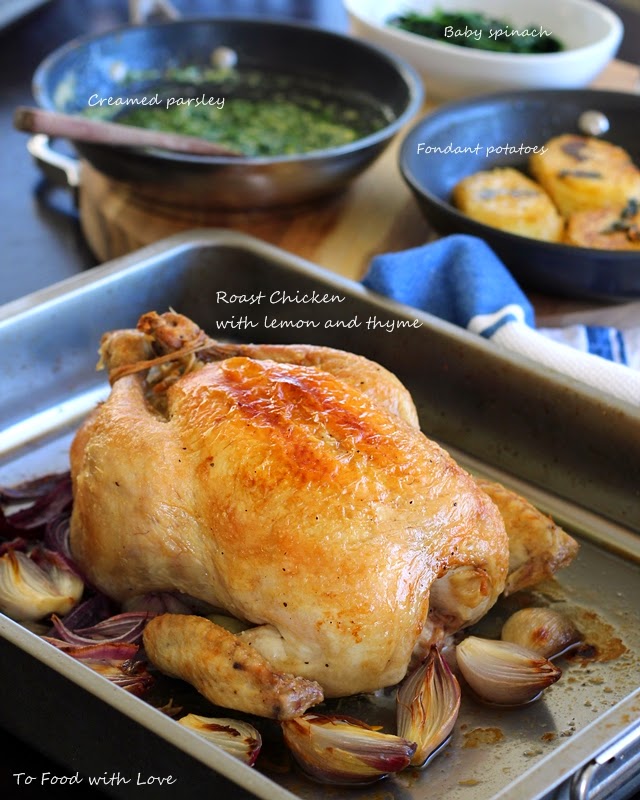
So far, I've attempted two recipes from the book. One is the XO sauce, which is utterly, utterly delicious. I was a little skeptical about making a big batch of it, but I'm so glad I did because it means I can eat more of it with more of everything! The other recipe that tempted my tastebuds was the Creamy Parsley and Nutmeg, which I found a little unusual yet intriguing with the combination of parsley and cream. A little like creamed spinach, but with a herby taste, I suppose? It turned out to be one of the most amazing things I've ever made with parsley. It's luxuriously rich and creamy, and the added sweetness from the shallots makes this so tasty that I couldn't stop eating it out of the pan (I was just checking for seasoning, really). In his book, Gary recommends serving it with a roast chook or rib of beef. I've been cooking a lot of red meat lately, specifically pork belly and pork shoulder (see my previous post on Korean Pulled Pork Burgers), so I settled on a recipe for roast chicken from Gary's other book (under Lantern Cookery Classics). The recipe is also available on the Penguin/Lantern website.

Creamy parsley and nutmeg
It's wonderful how the simplest recipe for roast chicken can yield the most satisfying results. A testament to how good it is, is when my 6-year old takes a bite and her face just lights up as she goes "Mmmmm..." before she reaches for another mouthful. It's really just chicken stuffed with thyme, garlic and lemon, but I guess it's the technique and method of cooking it that makes the difference. Also important is to make sure you use good quality, corn-fed, free-range chicken. I find that La Ionica (chemical and hormone free) chickens are really good too, which we always use when making our best ever Hainanese chicken rice.

Fondant potatoes
I also made the buttery, thyme-scented fondant potatoes which were lovely and luscious. With the butter left in the pan, I added some of it to the creamy parsley, and used the rest for sautéing some baby spinach with garlic and shallots.

To make the creamy parsley, you will need 4 bunches of parsley (continental flat-leaf, or mixed with curly parsley). Pick the leaves and boil them in water for 2-3 minutes until softened. Drain and squeeze out all the water, then chop finely. Heat a pan with some olive oil and saute some shallots and garlic, season with salt and pepper. Then pour in some thickened cream (about 2 cups) and simmer until reduced by half. Add in the parsley, followed by some grated nutmeg. Simmer briefly until most of the cream is absorbed. Add more seasoning if necessary. Serve immediately.


Roast chicken with fondant potato
Adapted from Lantern Cookery Classics: Gary Mehigan

Ingredients
1 × 1.6 kg free-range chicken
1 lemon, quartered
2 sprigs thyme
2 cloves garlic, peeled
table salt
1½ tablespoons olive oil
5 small golden shallots, peeled
splash of dry white wine
100ml (about 1/2 cup) chicken stock

Fondant potato
170 g unsalted butter, chopped
4 large desiree potatoes, cut into 7 cm × 5 cm × 1 cm-thick rectangles

Method


  1. Preheat a fan-forced oven to 180°C/350°F  (200°C/400°F conventional).
  2. To remove the wishbone from the chicken, lift the neck skin to reveal the breast. Scrape the point of a small sharp knife down the wishbone (it looks like an upside-down ‘V’ shape). Put your fingers behind the bone and tug to remove it. Stuff the cavity with the lemon, thyme and 1 clove of the garlic. Truss the chicken with kitchen twine.
  3. Heat a flameproof roasting pan over high heat. Season the chicken with salt and pour the olive oil into the pan. Brown the chicken lightly on all sides, starting with one leg, turning it over to brown the other leg, then the breast. Turn the chicken onto its back, then roast for 20 minutes.
  4. Baste the chicken with the pan juices. Add the shallots and remaining garlic and roast for a further 40 minutes or until the chicken is cooked. To test, pierce the thigh at the thickest part – the juices should run clear. Transfer the chicken to a large plate and rest for 10 minutes.
  5. Meanwhile, to make the fondant potato, melt the butter in a deep heavy-based frying pan over medium heat. As the butter begins to bubble, add the potato and thyme in layers (I made two layers). Reduce the heat to low, then cook for 10 minutes or until the potato is golden. Turn the potato over and cook for another 10 minutes or until golden. Add the water; the butter will foam and darken slightly. Baste the potato well and continue to cook for another 10 minutes or until tender. Remove from the heat, then leave to stand for 5 minutes. Season with salt. Set aside and keep warm.
  6. Place the roasting pan of cooking juices over low heat, then crush the roasted garlic and shallots into the pan with the back of a fork. Add the wine and stock and simmer over low heat for 2 minutes. Set aside.
  7. Cut chicken into quarters and serve with creamy parsley, gravy and fondant potatoes.


reade more... Résuméabuiyad

Pulled Pork Burger with Spicy Mayo and Korean Slaw

 
This started with a craving for a Korean-style slaw with a spicy gochujang dressing. Gochujang (as many of you might be familiar with) is a Korean red pepper paste that are sold in tubs and come in varying degrees of "heat". You can usually tell by the number of chillies on the label. I chose one with 3 chillies I think, as these things can pack quite a punch in terms of heat and intensity of flavour. So, I was wondering what would go with Korean slaw, and thought of bo ssam (Korean boiled pork belly with lettuce wraps). I found David Chang's bo ssam recipe using pork shoulder/butt and decided to turn that into a pulled pork burger with Korean slaw. And what's a burger without mayonnaise, especially a spicy gochujang mayonnaise? And to top it off (no pun intended), I baked these wonderful buttermilk buns (or brioche) which were moist, tender and didn't fall apart like most buns do when you're halfway through a burger.
 
 
Korean food doesn't just stop at Korean Fried Chicken and Korean hotpot. Give these a go at your next party. They don't require much preparation (the buns are relatively easy too) and will feed an army or two. Moreover, you can make the slaw one day ahead, which allows the cabbage to absorb the tangy, spicy and sweet flavours from the dressing. Oh, and that slow-roasted pork? Amazing.


Pulled Pork Recipe
Serves 12-16 | Prep 20mins | Cook 6 hours | Prep one day ahead
 
2kg (4-5 pounds) bone-in pork shoulder or pork butt, skin-on
1/2 cup caster sugar (granulated sugar)
1/4 cup plus 1 teaspoon coarse salt
1/4 cup light-brown sugar
 
Using a sharp knife, score the pork skin at 1cm intervals. Place pork in a large bowl or roasting pan. In a medium bowl, mix together granulated sugar and 1/4 cup salt. Rub sugar mixture all over pork and cover bowl with plastic wrap; transfer to refrigerator for at least 6 hours and up to overnight.
 
Preheat oven to 160C (300F).
 
Transfer pork to a large roasting pan, skin-side up, discarding any accumulated juices (or drain accumulated juices from roasting pan that pork is in). Brush off any remaining salt/sugar from the skin and pat dry with a paper towel. Transfer roasting pan to oven and cook, basting the meat every hour with rendered fat in roasting pan. After 2 hours, carefully remove crackling from the pork and place on a baking tray. Continue roasting the pork and crackling for another 3-4 hours until meat is tender and easily shredded with a fork.
 
Meanwhile, in a small bowl, mix together remaining 1 teaspoon of salt and brown sugar. Rub mixture all over pork.
 
Increase oven temperature to 250C (500F). Return pork to oven until sugar has melted into a crisp crust, 10 to 15 minutes. Remove and cover pan with a foil to keep warm. To serve, use two forks and pull the pork into shreds, mixing them with the rendered fat in the pan. Enjoy on a buttermilk (brioche) bun with Korean slaw and gochujang mayo (see below for recipe). For a "healthier" alternative, serve in a lettuce wrap using Cos/Romaine lettuce, with ginger-scallion sauce, ssamjang, kimchi and Korean slaw.
 
Korean Slaw
Serves 12-16 | Prep 20 mins | Make one day ahead
 
1/4 small savoy cabbage, finely shredded
1/4 small red cabbage, finely shredded
1 large carrot, peeled and julienned
1 small red onion, sliced thinly
2-3 stalks scallions, sliced thinly
 
Slaw dressing (mixed well in a bowl):
7 tablespoons cider vinegar
3 tablespoons gochujang
4 1/2 tablespoons sesame oil
2 tablespoons brown sugar
1 1/2 tablespoons honey
1 tablespoon soy sauce
1 tablespoon finely chopped garlic
2 tablespoon toasted sesame seeds
 
I like to prepare this one day ahead and refrigerate it overnight. This allows the cabbage to absorb all those flavours from dressing. Whisk together the ingredients for the dressing. Place the cabbage, carrots, onions and scallions in a large bowl and gradually add the dressing, tossing to ensure it's evenly mixed through. Cover with clingwrap and refrigerate overnight until ready to serve.
 
Gochujang mayonnaise
 
3/4 cup gochujang (Korean red pepper paste)
1 cup + 2 tablespoons Japanese/Korean mayonnaise
2 tablespoons ketchup
 
Combine and mix well in a bowl. Set aside until ready to serve with burgers.
 
Buttermilk buns
Serves 12-16 | Prep 20 mins | Cook 30 mins
100ml milk
28g active yeast (10g. dried)
90g sugar
2 free range eggs
840g strong bread flour
70g butter, softened at room temperature
400ml buttermilk
14g Malden sea salt
80ml vegetable oil
 
Glaze:
1 egg yolk + 1/2 tbsp milk
Sesame seeds (black/white)
Sea salt
 
Prepare this while the pork is cooking in the oven. In the bowl of a stand-mixer, add salt and sugar followed by flour and yeast. Mix using a dough hook on medium speed. Combine the milk, buttermilk, eggs and oil then add to the bowl, still on medium speed. Once a dough forms, add the butter in small knobs and knead until gluten is formed (about 10 minutes). Sprinkle a bit of flour if it's still too sticky. Prove in a bowl covered by cling film or a damp cloth in a warm place. Once it doubles in size, bring back down making sure as much of the air is removed from the dough, then form round buns and prove again. When ready, glaze with egg yolk and sprinkle with sesame seeds and sea salt. Bake at 160C (300F) for 25-30 minutes until crust is richly brown and glossy. When done, remove from the oven and leave to cool before cutting.
 
Assemble the burgers!
Slice the buns in half, spread with butter and toast them buttered side down on a hot grill pan.
Spread some gochujang mayonnaise on the bottom half of the bun, followed by some pulled pork, bits of crackling. Top with a handful of Korean slaw and cover with the other half of the bun. Add more mayo if desired. Serve immediately and enjoy!
 
Nice Buns!


More spicy mayo for more oomph!


reade more... Résuméabuiyad

Börek or Burek (with spinach and cheese)

 
So, I'm not an expert on Burek, nor do I know enough about its cultural background and history to be able to give an accurate account of how it originated. I'm thinking Wikipedia should be fairly reliable, and therefore I quote a few sections from it which provide some insight into this delicious filled pastry.

"Börek (also burek and other variants) is a family of baked or fried filled pastries made of a thin flaky dough known as phyllo (or yufka). It can be filled with cheese, minced meat, or vegetables. Most probably invented in what is now Modern Turkey, in the Anatolian Provinces of the Ottoman Empire in its early era, to become a popular element of Ottoman cuisine.

Börek is also very popular in the cuisines of the former Ottoman Empire, especially in North Africa and throughout the Balkans. The Northern Slavic cuisines, historically developed by people living in close contact with the Turkic peoples of Asia and Europe, also feature derivatives of the börek. Börek is also part of Mizrahi and Sephardic Jewish traditions. They have been enthusiastically adopted by the Ottoman Jewish communities, and have been described, along with boyos de pan and bulemas, as forming "the trio of preeminent Ottoman Jewish pastries".

Börek has its origins in the Turkish cuisine (cf. Baklava) and is one of its most significant and, in fact, ancient elements of the Turkish cuisine, having been developed by the Turks of Central Asia before their westward migration to Anatolia.

Börek in Turkish language refers to any dish made with yufka. The name comes from the Turkic root bur- 'to twist', (similar to Serbian word savijača (from savijati - to twist) which also describes a layered dough dish)."
 

Alright! Now that we've gotten our history lesson out of the way, it's time to make some Burek. Whenever I discover a new favourite food, my first instinct is to look for the recipe and attempt it at home. I love a good challenge. Some may think it's strange, but I used to look forward to exams when I was in school. It bore different consequences of course, but was a challenge nonetheless.

Anyway, I first made this interesting discovery while I was browsing for new dining options. The review on Balkan Oven Burek Bakery Café (what a mouthful!) on Grab Your Fork grabbed my attention. Apparently, burek is the speciality there. Unfortunately, when I made the trip down to Rockdale, the shop was closed for renovations, until the following week! Imagine my dismay! Well, anyway, there was a signboard outside the shop, pointing to restaurant Korzo up the street, and read "We sell Burek" (or something to that effect). It was either that or we head home defeated and empty-stomached. So, we made our way there, and passed by a few people carrying what looked like stacks of pizza boxes. I later found out that they contained whole bureks that they bought from Korzo. We went there and settled for some coffee and a slice of spinach and cheese burek. I was pretty excited trying it for the first time. It's sort of like a flaky layered pie, round in shape and filled with spinach and cheese. It was tasty, with crisp layers outside and soft billowy layers in between the fillings. I would have preferred the pastry to be thinner though, as I found it a little "hard and crunchy". Maybe I could have had the perfect burek if Balkan Oven was open! Oh well, another time perhaps.


Here's a round burek that I made

As I embarked on my quest for the perfect burek recipe, I learnt that the burek (or other name it's known by) comes in different forms and versions depending on which country or region it's from. In Serbia, Macedonia, Croatia and Slovenia, burek is made by alternating layers of dough with other fillings in a circular baking pan. Traditionally it may be baked with no filling (prazan), with stewed minced meat and onions, or with cheese. Based on my sources (Wikipedia), the recipe for "round" burek was developed in the Serbian town of Niš. In 1498, it was introduced by a famous Turkish baker, Mehmed Oğlu from Istanbul. Eventually burek spread from the southeast (southern Serbia, Kosovo and Macedonia) to the rest of Yugoslavia. Most bakers who offer burek in Serbia, Macedonia, Croatia, Montenegro and Slovenia originate from the Niš area of southern Serbia, Kosovo or Macedonia.

Preparing the pastry is similar to making Malaysian roti canai, where dough soaked in oil is stretched until it's silky thin, then folded to form layers. I've included a link below to a video which shows how the pastry is made. It's not as difficult as it looks. What you really need is patience, gentle hands and a large stone countertop to stretch the dough on.

Börek or Burek
(makes one 10-inch Burek)
Source: Various
 
Ingredients
 
250g plain flour
1/2 tsp salt
150ml water (approx.)
3/4 cup vegetable/canola oil
 
Filling:
1/2 cup feta
1 cup cooked and chopped spinach, drained
1/2 egg, beaten
 
Method
 
1. Place the flour and salt into a large mixing bowl of a stand mixer. Attach the dough hook, start the mixer and gradually add the water and until the dough comes together. Let it knead for about 7 minutes until the dough is soft and elastic. Divide into five and flatten slightly into a disc. Take a bowl/saucepan big enough to hold all five pieces of dough. Pour a little vegetable oil into the bowl, place one piece of dough into it, pour a little more oil over the it and repeat until all five are in the bowl. Pour enough vegetable oil over the top to virtually cover the stack of dough. Set aside for half an hour while you make the filling.
 
2. Place cheese and spinach into a bowl and stir through the egg.

Preheat the oven to 200°C (400°F).

3. Grease your marble/stone workbench with a thin layer of vegetable oil all. Take one disc of pastry from the oil, scrape off the oil, then place it onto your oiled work bench. Flatten the disc from the inside to outside, then place your fingers under the edge, gently lift, pull and stretch the dough outwards until it's thin, about 2 feet diameter. Fold in the edges (like an envelope) to form a pentagon (or circle) about 10 inch in diameter. Set aside.

4. Start with another disc of pastry from the pot of oil. Stretch it again to form a thin round sheet. Place the first layer (from step 3) in the middle. Sprinkle the cheese filling in the middle, sprinkle some oil over the pastry, and fold in the edges again. Repeat until you have 5 layers of pastry enclosing each one.

At this stage, it's probably easier to refer to this video to get a better idea how it's made: Click on the link here Balkan Burek Party.

5. Place the prepared pastry on a baking pan and pour some of the oil over the top of the burek. Place in the preheated oven and bake for 30 minutes or until golden brown and crispy. Remove and drain off excess oil, or blot with a paper towel. Slice or cut into wedges and serve hot.

Stretching out the dough as thin as possible - be careful with those sharp nails!


Rectangular "burek" with spinach and feta

A bastardised version of the "burek" made with minced lamb and potato curry


reade more... Résuméabuiyad

Thai Roast Duck Salad


So, I googled "game meat" and according to Wikipedia, "Game is any animal hunted for food or not normally domesticated. Game animals are also hunted for sport". I never knew that duck was considered game until someone told me that it is not commonly served or eaten in the United States for that very reason. Well, it makes sense now that I recall seeing duck hunting on TV (specifically the old Looney Tunes cartoons featuring Elmer Fudd and Daffy Duck - rings a bell?). Maybe because I've grown up eating a lot of Chinese roast duck (and Peking duck during special occasions), and so I can't say that it tastes gamey at all. Or maybe duck just tastes best when it's roasted until the fat has rendered and the skin's gone all thin and crispy. The only thing I don't like about duck is that it's really boney and fatty. If you buy half a roast duck, you'd end up with half of it being bones and fat. The meat and skin however is very tasty. If you've watched the "roast duck seller" chop up a roast duck before, you might notice how he tips out the juices from the cavity and reserves them, probably to make the duck sauce or gravy. It's so good over steamed white rice.


In my previous post, I wrote about my wine pairing lunch with a Thai-inspired theme, and one of the dishes was a Thai Roast Duck Salad. I bought the roast duck from the Chinese barbecue shop, which made the preparation of this salad really easy. Alternatively, you could buy some duck breast and pan-fry it until the fat's rendered and the skin's all thin and crispy. If after all my raving about duck and you're still not game (pardon the pun) enough for it, you can substitute the duck with beef steak, pan-seared to medium rare and thinly sliced. Or why not try it with stir-fried beef or chicken if you're in the mood for something warm? The proof is in the dressing!
 
Thai-style Roast Duck Salad
Serves 6
 
Ingredients
 
One whole Chinese roasted duck (store-bought), meat picked and sliced
200g (7oz) mixed salad leaves (spinach, endive/frisee, rocket)
1 handful fresh coriander (cut off the bottom part of the stem)
1 bunch fresh mint, leaves picked and roughly torn
1 cucumber, halved lengthways, seeded and diagonally sliced
1/2 red onion, thinly sliced
1 punnet cherry tomatoes, halved
Crispy fried shallots for garnish
 
Dressing:
6 cloves garlic, finely chopped
3 tbsp chopped scallions
3-4 bird's eye chillies, thinly sliced
7-8 tbsp freshly squeezed lime/lemon juice
3 tbsp fish sauce
3 tbsp grated palm sugar
3-4 tbsp Thai sweet chilli sauce
 
Method
 
  1. Using a mortar and pestle, pound the garlic into a paste. Then add the rest of the dressing ingredients and mix well using the pestle. Taste and adjust until you get the right balance of sweet, sour and salty. Set aside.
  2. Place the rest of the salad ingredients in a large bowl and top with the sliced duck meat. Just before serving, drizzle with the prepared dressing and toss well until evenly mixed. Garnish with crispy fried shallots.

reade more... Résuméabuiyad

Baked Kale Chips


There's been all this hype over kale chips, and how they taste like potato chips, except that they are loaded with vitamins and minerals. I finally bought some kale from the supermarket last Sunday and was pretty excited to make these. It's really easy. Roughly tear up the kale into pieces, and then wash and dry them thoroughly. Lay them out on a baking tray lined with baking paper, drizzle with a little olive oil and sprinkle with a pinch salt. Be careful not to put too much oil or salt, because the kale will shrink to a quarter of its size and you don't want to end up with oily salty kale chips (now how did I know that?). Bake them in the oven at 180C (350F) for 20 minutes, turning once halfway through. They will be turn translucent and crispy, and they really taste almost like potato chips! And totally guilt-free!

PS: These make a good substitute for crispy seaweed, the Japanese or Korean type that comes in individual packs and taste so umami with flakes of MSG all over. I reckon these kale chips would be great as a topping for noodle soups, or even crumbled over some pasta.
reade more... Résuméabuiyad

Mutter Paneer (Peas and Cottage Cheese)


Mutter paneer is a popular North Indian dish consisting of paneer (cottage cheese) and peas (mutter) cooked in a spiced tomato-based gravy, and it tastes fantastic especially when eaten with boiled basmati rice. I enjoy the paneer for its "bitey" texture that can be described as almost "meaty", and all of this combined together makes a delicious meal that can be quite addictive. I must admit I wasn't really a fan of paneer nor vegetarian food right up till middle of last year when I had some friends visiting from India and we frequented a few Indian restaurants. What an eye-opener it was for me. Indian vegetarian cuisine wasn't just all about peas and lentils, but very much about spices, colours, textures and exotic flavours.
 
I first tried mutter paneer at Curry at the Rocks, and became an instant fan. I put it on my to-cook list immediately, and was thrilled at how my recipe for this turned out. It tasted really authentic (which Mr G concurred with), as it had the perfect balance of flavours and just the right amount of spices. This is a versatile dish in that you can adjust the quantities of spices used according to personal preference. And if peas or paneer aren't your thing, you can omit them or substitute with fresh button mushrooms if you like.


Mutter Paneer (Peas and Cottage Cheese)

Ingredients

200g paneer cheese, cubed
1 tbsp ghee

3 tbsp vegetable oil
1 onion, finely chopped
1 1/2 tbsp chopped garlic
1 tbsp grated ginger
3 cloves
1 tsp cumin
1/4 tsp ground turmeric
1/2 tsp garam masala
1/2 tbsp chilli powder
400g canned diced tomatoes
1 cup water
1 cup peas
Pinch of asafoetida (optional)
1 tbsp dried fenugreek leaves (kasuri methi)
Salt, to taste
3 tbsp cream

Method
 
  1. Heat ghee in a small non-stick pan and fry the paneer cubes until lightly browned. Remove and set aside.
  2. Heat oil in a medium pot and add onions, garlic, ginger, cloves, cumin, turmeric, garam masala and chilli powder. Fry for 3-5 minutes until fragrant.
  3. Add diced tomatoes and water. Bring to a boil and simmer, covered, for 20 minutes. Add asafoetida and fenugreek leaves.
  4. Add the fried paneer and peas and bring to a boil again. Simmer for 10 minutes until peas are tender and gravy is slightly reduced. Add salt to taste. Stir in the cream and it's ready! Serve with boiled basmati rice.


reade more... Résuméabuiyad

Pav Bhaji (Bread and vegetables)


My Indian friends from work threw a little Diwali party at their apartment last Friday, and I must say it was a very enjoyable evening, with good food, great company and lots of dancing. Moreover, it's hard not to fall in love with the phenomenal view from the balcony of the 33rd floor apartment right in the heart of Sydney. Dinner was a wonderful spread of  home-cooked vegetarian dishes, including pasta, salad and this delicious dish called pav bhaji. Pav (pronounced "pau" as in char siew pau) is equivalent to bun/bread, and bhaji refers to a vegetable dish. Apparently (or so internet sources say), pav bhaji is a popular Indian streetfood snack that originated in Marathi cuisine. It is basically a dish of mashed vegetables cooked in spices, and served with fried buttered pav. This dish uses loads of butter, which explains why it tastes so good. The bhaji is also topped with chopped onions, coriander and a splash of lemon juice which lifts the flavours in the dish.

Here are ten good reasons to love pav bhaji:
1. It's vegetarian, so it contains loads of veggies which are good for you.
2. It's got potatoes, which I love!
3. Great flavour from the spices, and it doesn't have to be spicy (hot).
4. The dish is cooked with butter.
5. The dish is served with more butter.
6. The pav (bun) is fried with lots of butter.
7. It's almost like an Indian vegetarian version of a Coney dog, sans the dog.
8. It's not too difficult to prepare if you use a food processor to blend the veggies.
9. It tastes sooooo good, even though there's no meat (although that could be an option).
10. Butter. I love butter, don't you?


Here is my version of the recipe for this dish. You can use hamburger or hotdog buns for the pav. As for the vegetables, any combination of capsicum (bell peppers), carrots, peas, cauliflower or eggplant will do. The spice used is pav bhaji masala, which should be available at most Indian grocery stores.
 
Pav Bhaji
 
Ingredients
 
Vegetables, boiled and mashed/pureed:
2 large (or 3 medium) potatoes
1/2 cup green capsicum (bell peppers), chopped
1/4 cup carrots, chopped
2 cups cauliflower, chopped
1/4 cup peas
 
3 tbsp butter
1 large onion, chopped
1 tbsp grated ginger
1 1/2 tbsp minced garlic
3 tomatoes, chopped
1 tbsp tomato paste (optional)
1 tbsp chilli powder
1/4 tsp ground turmeric
2 tbsp pav bhaji masala
1-2 cups water
1/8 tsp hing powder (asafoetida) (optional)
1 tbsp dried fenugreek leaves (optional)
Salt and black pepper
Corinder leaves
Lemon juice
 
To serve:
Pav (burger or hotdog buns will do)
Butter
Chopped coriander leaves
Lemon wedges
1 small onion, chopped
 
Method
 
In a large non-stick pan, melt the butter over medium-high heat and add the onions, garlic and ginger. Fry until onions are softened, then add tomatoes. Fry until tomatoes are slightly dry, then mix in the mashed vegetables and potatoes. Add tomato paste, chilli powder, turmeric and masala. Mix well and add 1 cup water. Cook for 15-20 minutes. Add asafoetida, crushed fenugreek leaves, salt and black pepper to taste. Stir in some chopped coriander leaves and the juice of half a lemon. Simmer, adding more water if necessary and cook until it turns into a thick gravy. Dish out and add a knob of butter on top, garnished with chopped onions and coriander leaves. Serve with fried pav.
 
For the pav, slice the buns in half horizontally, and fry in butter until lightly browned and crisp. Serve with the prepared vegetables (bhaji) and some lemon wedges.
 
Note: If you don't have pav bhaji masala, try substituting with garam masala instead.


reade more... Résuméabuiyad

Asparagus and Prawn Stir-fry


Asparagus and Prawn Stir-fry
 
Ingredients
 
1 tbsp vegetable/peanut oil
2 cloves garlic, sliced/chopped
200g prawns, peeled, deveined and tails intact
2 bundles asparagus, woody ends snapped off, halved crossways
2-3 bird's eye chillies, sliced
 
Sauce:
1 tbsp oyster sauce
1 tbsp fish sauce
1 tbsp palm sugar (or to taste)
1 tbsp Thai sweet chilli sauce
3 tbsp water
 
Method
 
Heat oil in a wok on high heat. Add the garlic, followed by the prawns. Let the prawns cook on one side, then flip them over to cook the other side. When the prawns are almost cooked, remove and transfer them to a plate and leave the oil in the wok. Next, add the asparagus to the wok and fry for 30 seconds, then push them aside. Add the chillies and pour the sauce ingredients down the side of the wok into the centre and bring to a boil. Toss the prawns in with the asparagus and sauce, and stir-fry briefly until everything is well coated, and sauce is slightly reduced. Turn off the heat and transfer to a serving plate. Serve with steamed jasmine rice.
reade more... Résuméabuiyad

Snow Peas and Asparagus in Oyster Sauce


In my previous post (Grilled Beef with Charred Tomato and Chilli Sauce), I wrote about my visit to Sailors Thai where I had the luxury of savouring an array of creative and exotic Thai dishes and was simply enamoured by the overall gastronomic experience. I attempted to make a mental note of how each dish tasted so that I could recreate the same at home if I ever had a craving for it. And so, this post features a very simple recipe for delicious stir-fried vegetables in oyster sauce. In the menu, it was actually stated as "stir fried broccolini and sugar snap peas with oyster sauce", but they looked more like asparagus than broccolini, and so I've used asparagus in my recipe here. How timely it was that Ms AC received a bag of snow peas from her neighbour who just harvested them from the backyard, and she brought some to the office for me!
 
 
I decided to ramp up this dish by garnishing it with some crispy garlic chips and crispy dried baby anchovies. Not only do they add texture (crispy on anything is always a good thing!), but also flavour and saltiness from the baby anchovies. You can buy these dried baby anchovies from the Asian supermarket (the one I bought comes from Korea), but they are entirely optional, so feel free to omit them. This is a versatile dish where you can add or substitute with other ingredients like carrots, broccoli, mushrooms, seafood, meat and so on. From there, you can also add kaffir lime leaves, sliced chillies, or perhaps a splash of lemon juice for a little zing. The sauce makes a great base for any stir-fry, and I've kept it simple here, as it was when I tried it at Sailors Thai.
 
For best results, do use good quality ingredients especially when it comes to the oyster sauce (I used Lee Kum Kee premium oyster sauce - great umami flavours!) and fish sauce (Squid Brand). Also, take care not to overcook or undercook the vegetables, particularly the asparagus.
 
Snow Peas and Asparagus in Oyster Sauce

Ingredients


3 tbsp dried baby anchovies (optional)
1-2 cloves garlic, thinly sliced
Vegetable/peanut oil
1 bunch asparagus, woody ends removed, cut into 3 inch lengths
1 1/2 cups snow peas, topped and tailed, strings removed

Sauce (combined in a bowl):
1 tbsp Lee Kum Kee oyster sauce
1 tbsp Squid brand fish sauce
1 tbsp brown sugar
1/2 tbsp palm sugar
1/4 tsp black pepper
1/4 tsp sesame oil
1/4 cup water
1/4 tsp Maggi seasoning (optional)

Method

Heat 1 tbsp oil in a wok and fry the anchovies on medium heat for about 3-5 minutes until crispy. Discard the oil and transfer the anchovies to a plate.

Heat 1 tbsp oil in a wok and fry the garlic on medium-high heat until lightly golden and crispy. Remove the garlic chips and set aside together with the anchovies above. Leave the oil in the wok.

Heat the wok with the garlic oil on high and fry the asparagus for half a minute. Then add the snow peas and fry for another half minute. Push the vegetables to the side of the wok and pour the sauce in the centre. Bring to a boil and reduce slightly and toss the vegetables in the sauce briefly to coat. Turn off the heat and transfer everything to a serving dish. Garnish with fried garlic chips and crispy baby anchovies. Serve hot with steamed jasmine rice.


reade more... Résuméabuiyad

Malai Kofta with Roasted Capsicum


I first tried malai kofta at this Indian restaurant called Curry at the Rocks in Sydney, and was pleasantly surprised at how delicious it was, given that I'm not a big fan of vegetarian-type dishes. My colleague who introduced this dish to me explained that malai koftas are deep-fried potato balls served in a creamy sauce prepared from boiled milk, spices and fresh cream. The first thought that came to me was "I have to make this at home!", and so I looked up some recipes on the internet to get an idea of the basic ingredients that went into this dish. The koftas are usually made with mashed potato and paneer (an Indian cottage cheese) which are formed into balls and deep-fried until they form a crisp layer. The sauce predominantly comprises tomatoes and cream, but I decided to substitute part of the tomatoes with roasted red peppers instead.


I was quite happy with how the dish turned out, which I think it was pretty successful for a first attempt. I added a few paneer cubes and almond flakes in the sauce for texture (and also because that's how it was served at the restaurant where I tried it). The sauce is rich, creamy and slightly sweet, and compliments the crispy cheese and potato balls.

Malai Kofta with Roasted Capsicum Sauce

Ingredients

Koftas:
1 cup boiled and mashed potato
1 cup paneer, crumbled
1/2 tsp salt, or to taste
1/2 tsp cumin
1/2 tsp garam masala
1 tbsp chopped coriander leaves
2 tsp cornflour
Besan or cornflour for coating

Sauce:
Vegetable oil
1 clove garlic, chopped
1/2 tbsp grated ginger
1 1/2 tsp ground coriander
1 tsp ground cumin
1 tsp garam masala
1 roasted capsicum, peeled and chopped
1 tomato, quartered
1 tsp chilli (or to taste)
2-3 tbsp sugar (or to taste)
Salt to taste
1/2 cup thickened cream (or more)
1/4 cup cubed paneer
1 tbsp almond flakes
1 tbsp chopped coriander leaves

Method

Use a blender and finely chop the tomatoes and red peppers until smooth. Prepare the sauce first by heating some oil in a saucepan. Fry the garlic and ginger, followed by the ground spices. Then add the blended tomatoes and red peppers, chilli and sugar. Bring to a boil and simmer for about 10 minutes. Add salt to taste. Add the cream and bring to a boil. Add the cubed paneer. Simmer for 3-4 minutes until sauce is  thickened. Add more cream if necessary. If too thick, add a little water. Check for seasoning. Set aside and keep warm for later.

For the koftas, combine all ingredients except for the flour coating. Mix and knead well and form into rounds the size of golf balls. Roll in the besan or cornflour and coat well. Shake off excess.

Heat suffiicent oil in a pan for deep-frying. On medium heat, fry the koftas for 5 minutes or until lightly golden brown and crisp.  Drain on kitchen paper.

To serve, place the koftas in a bowl and pour the sauce over. Sprinkle with almond flakes and chopped coriander leaves. Serve with boiled white rice.

reade more... Résuméabuiyad

Crispy Roasted Brussel Sprouts with Maple Pecan Dressing


Brussel sprouts are DELICIOUS! I just thought I should mention that first before you skip this post. I can count on one hand the number of times I've eaten them, and it's just one of those vegetables that I just don't think about, and is easy to miss at the vegetable section of the supermarket because they don't sell a lot of them. They are also seasonal and are usually available around autumn to early winter in Australia. We were hunting high and low for brussel sprouts last December as we wanted to serve them for Christmas lunch, but they weren't in season then.  And so, when I came across them a few weeks ago at the supermarket, I was thrilled and grabbed a pack immediately.


I have never cooked brussel sprouts before this, but I've heard from G that they are great deep-fried and served with bacon. Well, I happened to have some maple syrup in the fridge and I thought, why not serve it with maple syrup instead? Anyway, maple syrup and bacon go together, so maple syrup should work with brussel sprouts too, right? Indeed, they were the perfect combination. I roasted the brussel sprouts until they were slightly caramelized, and a little charred round the edges, and then tossed them through with the maple and pecan dressing. It was soooo good, I kept eating it from the bowl as though it was popcorn. They were wonderfully sweet, tender and creamy on the inside, with just a subtle hint of bitterness. Even my 4-year old loved it! I also used the same dressing as a glaze for grilled salmon which I served it with along with some creamy buttery mashed potatoes. It's also great with steak (topped with sundried tomato butter!) and mash. Gee, I'm getting hungry already. I think I'm going to be shopping for brussel sprouts this weekend.


Roasted Brussel Sprouts with Maple Pecan Dressing

Ingredients

4 cups (450g or 1 pound) brussel sprouts, trimmed and halved lengthwise
1 small red/spanish onion, cut into wedges, leaving the root end intact
2-3 tbsp olive oil
Salt and black pepper
1/4 cup chopped pecans

Dressing:
3 tbsp maple syrup
3 tbsp orange juice
1/2 tsp dijon mustard
1 tsp soy sauce

Method

  1. Preheat oven to 230C (450F). Toss brussel sprouts and onion wedges with oil, and season with salt and pepper. Lay them out in a single layer (cut-side up) on a lined baking tray. Bake in oven for 15-20 minutes, turning once, until they are slightly browned and crisp.
  2. In the meantime, combine ingredients for dressing and place them in a saucepan. Bring to a boil and simmer gently until it starts to reduce. Add pecans and continue to simmer until the sauce thickens to a syrup. Remove from heat and set aside.
  3. When the brussel sprouts and onions are cooked, remove them from the oven immediately and place in a bowl. Toss with the maple pecan dressing. Serve with steak and mash potatoes or whatever you like! Or just enjoy it on its own!


reade more... Résuméabuiyad

Almost Applebee's Oriental Chicken Salad


Even though I've only had Applebee's Oriental Chicken Salad once in my life (and many years ago), I will always remember it as being one of the tastiest salads I've had. I'm no salad lover, which is why the crunchy toasted almond flakes and crispy noodles really did it for me, not to mention the deep-fried chicken tenders scattered over the top of the salad which made it a complete and satisfying meal. The "oriental" dressing was fantastic, although at the time, I was more focused on enjoying my meal rather than trying to analyse and figure out the components of the dressing.

I googled it and was pleasantly surprised to see a few recipes (bordering around similar ingredients) for this salad. Apparently, I'm only one in thousands of other people who love Applebee's Oriental Chicken Salad, and so of course there are many out there who have attempted to recreate this dish at home. As I am thousands and thousands of miles away from the nearest Applebee's, it is quite impossible for me to sample this salad for the sake of replicating it in my kitchen. I could only hope that the copycat recipe I found on the Learntocookit.com was close to the real thing.

The salad component of it is pretty easy - romaine/cos lettuce, Napa/chinese cabbage, red cabbage and carrots. Then you have the deep-fried chicken tenders, which can easily be substituted with frozen chicken tenders that are either oven-baked or deep-fried. Then add some toasted almond flakes and crispy noodles (which I found in the Asian food aisle at the supermarket).

Then comes the dressing. I followed the recipe for the dressing and realised that it tasted just like the sauce used in Chili's Chicken Crispers with Honey Mustard sauce. Delicious as a dipping sauce, but as a salad dressing, it didn't taste very oriental to me. I think the only thing that's oriental about the salad is the crispy noodles! I decided to make a second batch of the dressing and added a touch of soy sauce and plum sauce, and used more sesame oil. I think that seemed to increase the depth of flavour and made it a little more tangy and not just sweet all the way. The combination of the salad with the chicken, dressing and crispy almonds and noodles is fantastic and I enjoyed it so much that I had it again for dinner the next day! I can't say that it tastes like Applebee's (because I had it so very long ago that I can't remember!), but it is a delicious chicken salad that I'll be making again!


Almost Applebee's Oriental Chicken Salad
Adapted from LearntoCookit.com

Ingredients

Ingredients

Dressing:

3 tbsp honey (use a neutral tasting honey)
1 1/2 tbsp rice wine vinegar
1 tsp soy sauce
1 tsp plum sauce
1/4 cup mayonnaise
1 tsp Maille Dijon mustard
1 tbsp sesame oil
2 tbsp chopped green onions

For the Salad:

1 egg beaten with 1 tbsp milk
1/4 cup flour
1 1/2 cup corn flake crumbs (finely crushed cornflakes)
1 tsp salt
1/4 tsp pepper
1 boneless, skinless chicken breast half (or use 4 chicken tenders)
4 cups vegetable oil (for deep frying)
3 cups chopped romaine/cos lettuce
1 cup red cabbage
1 cup Napa cabbage
1/2 carrot, julienned or shredded
2 tbsp toasted almond flakes
1/3 cup crispy chow mein noodles

Method

Place ingredients for the dressing in a small bowl and beat with a handwhisk until smooth and creamy. Chill in the fridge.

Place the egg and milk mixture in a shallow bowl. Place flour in another shallow bowl. Place cornflake crumbs on a plate.

Cut the chicken into strips and season with salt and pepper. Dip each strip first in the flour, then egg mixture followed by the cornflake crumbs.

Heat up oil in a wok and deep-fry the chicken for 2-3 minutes each side until golden brown and cooked. Drain on absorbent kitchen paper. Slice the chicken into strips.

Toss the romaine/cos lettuce, red cabbage, Napa cabbage and carrots in a large bowl and top with the almonds and crispy chow mein noodles. Arrange chicken strips over the salad and drizzle the dressing all over.

reade more... Résuméabuiyad