Pages

.

Showing posts with label Spicy. Show all posts

Best Ever Korean Fried Chicken (with sweet and sticky spicy sauce)


Best ever Korean Fried Chicken (IMHO). Need I say more? Think of crispy chewy and crunchy batter coated in a candy-like sweet, spicy and sticky glaze. And oh yeah, the chicken. Juicy. Delicious. Yummy. Continue reading to find the recipe.

Korean Fried Chicken with Sweet and Spicy sauce

Ingredients

800g (about 1 lb) chicken wings (drummettes and mid-wings, separated)
1 1/2 teaspoon salt
Canola/Vegetable oil for deep-frying
Sesame seeds for garnishing (optional)

Batter:
2/3 cup plain flour
1 1/2 tablespoon cornstarch
3/4 cup water

Sauce:
1 tbsp vegetable oil
3 cloves garlic, minced
1 small red chilli pepper, finely chopped (optional if you want more heat)
1 tbsp light soy sauce
5 tbsp corn syrup
2 tsp apple cider vinegar (or rice wine vinegar)
2 tsp brown sugar
2 tsp gochujang (Korean chilli paste)

Method

Prepare sauce first. Fry garlic (and chilli if used) in the oil, for half a minute, but don't let it brown. Add the rest of the ingredients for the sauce and simmer for 1-2 minutes until it turns syrupy. Turn off heat and set aside. (Note: It will thicken slightly upon cooling. If so, heat up again before using)

Rinse the chicken wings and pat dry with paper towels. Rub all over with salt and lay out in a single layer to draw the moisture out, about 10 minutes. Brush off excess salt and pat the chicken dry again with paper towels.

Mix the batter ingredients with a whisk until you get a smooth paste. Add chicken and coat in the batter. Heat sufficient oil in a wok for deep-frying (about 2 inches deep) at medium-high heat (180C/350F). Shake off excess batter from each chicken wing before frying it in the hot oil. Do not overcrowd the pan, otherwise the batter will not stick properly. Fry in batches for 6-8 minutes until golden. Drain on a wire rack or paper towels. Repeat with the rest of the wings. Once all the wings have been fried once, bring the oil back to temperature again, on high heat this time. Fry the chicken a second time for 4-5 minutes until golden brown and crispy. Drain again. Toss the chicken in the spicy sauce until well coated. You can also reheat the sauce, and toss the chicken into the pan to coat. Transfer to a serving plate and garnish with sesame seeds if desired. Enjoy immediately!
reade more... Résuméabuiyad

Malaysian Vegetable Curry (Sayur Lodeh)


Sayur lodeh is a vegetable curry commonly found in Malaysia, Singapore and Indonesia. The version I grew up with contains cabbage, eggplant, long beans, deep-fried tofu (and sometimes tofu puffs) and glass noodles. I made this for lunch today and it turned out perfect (really!) and so I decided to post the recipe here in case I forget how to replicate the dish next time. Cooking is a bit of trial and error sometimes, especially with Asian cooking. I think I've got the recipe down as accurately as I can, and it's super duper delicious with rice (or even on its own).

Malaysian Vegetable Curry (Sayur Lodeh)
Serves 6

Ingredients

1 packet (300g) deep fried tofu
1 cup sliced carrots
3 cups cabbage (about 1/4 of a cabbage), cut into 2 inch strips
2 cups green/long beans, cut into 2 inch lengths
2 eggplants (the long and slender type), sliced into 2 inch halves
2 pieces kaffir lime leaves, torn and crushed
4 cups water
1 1/2 teaspoon ikan bilis stock powder
1 tablespoon palm sugar
1/2 cup vegetable oil
3 tablespoons chilli paste (made from dried chillies)
1 1/2 cups coconut milk
1 1/2 teaspoon salt (or to taste)
2 teaspoons soy sauce
1 handful glass noodles, soaked in water until softened

Spice paste (blend finely):
3 tablespoons dried shrimp (rinse with water and drain, then leave for 15 minutes to soften)
2 medium onions
4 cloves garlic
1/2 inch ginger
1/2 inch galangal
1 stalk lemongrass, white part only (reserve the rest of the stalk to simmer separately in the broth later)
2-3 teaspoons toasted belacan
1 teaspoon ground coriander
1/2 teaspoon ground cumin
1/2 teaspoon ground turmeric

Method
  1. In a large pot, heat up the vegetable oil and fry the spice paste and chilli paste for 5-10 minutes. Add the kaffir lime leaf and reserved lemongrass stalk (the non-white part) and fry briefly. Add water and bring to a boil. Cover and simmer for 1/2 hour.
  2. Add coconut milk ikan bilis stock powder, sugar and bring to a simmer. Do not let it boil vigorously. Season with salt and soy sauce.
  3. Add the tofu and carrots, followed by the cabbage, long beans and eggplant. When it starts to simmer, cover with a lid and let it simmer for 15 minutes until vegetables are just cooked. Just before serving, add the glass noodles until it's softened. Serve immediately with steamed white rice.


reade more... Résuméabuiyad

Malaysian Satay Recipe

 
Mention the word "satay" and I am instantly reminded of my childhood years and years ago, how the Malay Satay Man would peddle his mobile satay stall on his bicycle in my neighbourhood, tooting his horn. Sometimes, I could even smell the aroma from my house, even though he could be grilling his satay down the road. I would get all excited at the prospect of having satay for dinner, and run to the window to see if I could detect any "smoke" signals in the sky. He made one of the best satays in town, and the fact that he peddled his stall around the neighbourhood meant that we could walk up to him with empty plates and bowls waiting to be filled with freshly made satay. Those were the simple things in life back then, though coming from a foodie family, food was and is a big deal, as to most Malaysians of course.

Malaysian Satay is such a luxury item in Sydney. I don't think I've ever ordered satay here before, not when I know it costs multiple times less back in Malaysia. Thai style satay is quite common here, although I'm not a fan of it as they are often presented as a single long piece of chicken breast meat on a bamboo skewer, grilled (and often a tad dry) and served with a sweet peanut sauce which tastes like peanut butter mixed with loads of palm sugar. I guess my tastebuds are more accustomed to savoury and spicy Malaysian cuisine, rather than the sweet side of Thai food.

Anyway, I digress. I had to make satay at home from scratch, and it's pretty simple really. Serve it with cucumbers and ketupat (compressed rice) for a complete meal.

Malaysian Satay Recipe

1kg (2 lbs) chicken thigh fillet or beef scotch fillet steak
Vegetable oil and a stick of lemongrass for basting

Marinade (finely blended into a paste):
150g shallots
4 cloves garlic
1 inch ginger
2-3 lemongrass (white part only), sliced
1 tbsp ground coriander
2 tsp ground fennel
2 tsp ground cumin
1 tbsp ground turmeric
3/4 cup white sugar
2 tsp salt

Condiments:
1 red onion, sliced/cubed
Cucumbers, sliced into wedges
Ketupat (compressed rice cakes) - see here for recipe

You will need about 40-50 bamboo skewers (or less if they are long skewers), soaked in water for  a few hours.

Method:

  1. Cut the meat into 1 inch x 2 inch slices, about 1/4 inch thick. Combine with marinade and mix well. Add 2 tablespoons of vegetable oil and mix through. Leave to marinate in the fridge for at least 2 hours or overnight.
  2. Thread the pieces of meat onto the bamboo skewers (about 3-4 pieces each) and set aside on a plate.
  3. For basting the satay, take the lemongrass and smash the white part until it's "frayed" like a brush.
  4. Grill the satay sticks over a barbecue, using the lemongrass "brush" to baste the satay with vegetable oil.
  5. Serve with peanut sauce and condiments.

Satay sauce / Peanut sauce Recipe

500g raw unsalted peanuts, skinless
1/2 cup vegetable oil
2 tbsp tamarind pulp, soaked in 1 cup hot water to extract the juice
2-3 cups water, plus extra
150g gula Melaka (dark brown palm sugar), chopped
4 tbsp dark brown sugar
1 tsp salt or to taste

Spice paste (finely blended into a paste):
100g shallots
4 clove garlic
2-3 stalks lemongrass, white part only, chopped
15-20 long dried chillies, deseeded, soaked in a hot water overnight and chopped (discard the water)
1 inch galangal

Method:

  1. Dry fry the peanuts in a large wok, without any oil, until the peanuts are lightly browned and fragrant. Remove and set aside to cool.
  2. Pound/grind/blend the peanuts until almost smooth but with some coarse bits still visible, depending on whether you like it smooth or chunky I guess. Set aside.
  3. Heat up the 1/2 cup oil in a medium sized pot. Add the blended spice paste and fry until the chilli oil starts to separate from the paste. Add the tamarind juice, gula Melaka and water and bring to a boil and simmer for 10-20 minutes.
  4. Add the ground peanuts and stir to mix well. Bring to a boil, then add salt and brown sugar to taste. Add more water if it's too thick. Sauce will thicken as it cools.
  5. Turn off heat and set the sauce aside until the oil rises to the top. Serve warm with satay and ketupat (rice cakes).


reade more... Résuméabuiyad

Ayam Bakar (Indonesian Grilled Chicken)


I have a weakness for Indonesian grilled chicken (or Ayam Bakar as you will often find on Indonesian menus) - the char and smokiness from the caramelized chicken skin, the sweet aromatic spices, the distinctive taste of kecap manis (sweet soy sauce) combined with the heat from the savoury sambal belacan, all complemented with a mound of steamed white rice. The preparation method involves first simmering the chicken in the pot with the spice mix (bumbu or rempah) so that the chicken absorbs all those wonderful flavours. I then reduced the sauce to a thick syrupy paste which I used to baste the chicken before placing under the grill. This gives it a more concentrated flavour and also helps form a shiny dark coating on the skin.

 
I was a little sceptical about making this for the first time, as I wasn't sure if the kids would take to the complex spices in this dish. Well, it turned out that they couldn't get enough of it! If only they could eat chilli, they don't know what they are missing out on without the sambal belacan!

Ayam Bakar Recipe

Ingredients

1.6kg (3.5 lbs) chicken Maryland (thigh + drumstick)
2 tbsp vegetable oil
1-2 lemongrass, white part only, bruised
1 inch galangal, bruised
4 pieces kaffir lime leaves
2-3 cups water
6 tbsp kecap manis (I used Bango brand)
1 tbsp tamarind puree/juice
2 tsp sugar
1 1/2 tsp salt (or to taste)
Dash of black pepper

Spice paste (finely blended):
100g (3oz) shallots
4 cloves garlic
3/4 inch ginger
1 tbsp ground coriander
1/4 tsp ground cumin
1/2 tsp ground turmeric

Method

  1. Heat vegetable oil in a pot (large enough to arrange the chicken in one layer). Fry the spice paste for 5 minutes on medium heat until fragrant. Add lemongrass, galangal, lime leaves, water, kecap manis, tamarind puree, salt and sugar, and bring to a boil. Add the chicken and simmer for 30 minutes or until chicken is cooked. Turn off the heat. If you have time, you can leave the chicken to soak in the sauce for another hour to let the flavours permeate into the meat.
  2. Transfer the chicken to a baking dish or pan, as you will need to grill the chicken in the oven later. Leave the sauce in the pot, and bring it to a boil. Simmer until sauce is reduced to a thick paste. Spoon some of this paste onto the chicken (skin-side up).
  3. Turn on the oven grill/broiler. Grill the chicken for 20 minutes or until the skin is caramelized and black. Be careful not to burn it. Brush on more of the reserved paste from step 2 above if you like and grill again.
  4. Transfer to a serving dish and serve with steamed with rice, cucumbers, a drizzle of kecap manis and sambal belacan (see recipe below).
Sambal Belacan recipe

4 small chillies and 4-6 long red chillies (as desired)
4 candlenuts
2 cloves garlic, peeled
1/2 tsp toasted belacan
Salt to taste
1 tsp sugar, or to taste
Splash of lime juice or vinegar

Method

Remove the chilli stalks. Place chillies and candlenuts in a pot of boiling water, and simmer for 10 minutes. Drain of the water. Roughly slice the chillies. Place chillies, belacan, candlenuts and garlic in a food processor/blender and chop finely. Add salt, sugar and lime juice to taste. Transfer to a small dish, and serve with Ayam Bakar. If desired, drizzle some kecap manis over the sambal belacan before serving.


reade more... Résuméabuiyad

King brown mushroom with XO sauce


This has been the dish of the month for me. I've made these mushrooms at least five times since the start of August, and I've enjoyed it as a side dish, a light lunch and even added it to my instant noodles for a touch of "gourmet". I made a big batch of it which has lasted up till now (there's still some left in the fridge) and have been spooning it liberally on almost anything I can think of. Last night, I made some sushi for the kids and had leftover rice, which I mixed through with some XO sauce. Tasty! I also used the XO sauce in cooking Mapo tofu (instead of using hot bean paste) along with some diced chinese mushrooms. It's a wonderful condiment which I've also used to spruce up some boring fried rice from the Chinese takeaway.


I never knew how to make XO sauce until I found it in Gary Mehigan's new book "Favourites", and it was the first recipe I bookmarked to try (among many others). I thought it was the perfect recipe to try, as I had some premium dried scallops that was long forgotten in the fridge, and the rest were just pantry ingredients that I had. A pretty simple recipe, though I added some extra dried chillies to "colour" the oil more. I added a drop of Cheong Chan caramel towards the end for a little extra flavour. Homemade XO sauce is definitely worth making, and it's probably best you use good quality dried scallops if you plan to do so. I highly recommend serving it on top of grilled king brown (or king oyster) mushrooms and grilled scallions (also from "Favourites") as it's the simplest and tastiest way to enjoy XO sauce.


reade more... Résuméabuiyad

Portuguese Chicken with Piri-piri Sauce


Piri-piri is a Swahili word for "pepper pepper", and is also known as African Bird's Eye chilli. It is the predominant ingredient in making piri-piri sauce - a tangy, garlicky, fiery hot chilli sauce that is popular in South Africa cuisine. If you didn't know already, piri-piri chicken (also known as Portuguese chicken) originated in Mozambique (some say Angola), which were former Portuguese colonies. Hence, the influence of spicy Portuguese cooking found its way into South African cuisine.

It's probably more accurate to refer to this dish as piri-piri chicken, rather than Portuguese Chicken. After all, it did not originate from Portugal. It's a bit like Hainanese Chicken Rice, which did not originate from Hainan Island in China, but is one of the national dishes of Singapore (next to Singapore Chilli Crab, I suppose?). Anyway, piri-piri sauce is a great way to dress up your next roast chicken, and tastes fantastic especially if you love chillies, lemon and garlic. Serve it with a salad and some hot chips/fries.


Portuguese Roast Chicken with Piri-piri Sauce
Adapted from BBC Food

Ingredients

1 whole chicken (about 1.2kg), butterflied (alternatively, use whole chicken legs)
Salt and freshly ground black pepper
For the piri-piri sauce:
6-12 fresh red chillies, depending on how hot you want it
1 tbsp minced garlic
1/2 tsp salt, or to taste
1 bay leaf
½ tsp oregano (optional)
½ tbsp paprika
100ml/3½fl oz olive oil
1 1/2 tbsp red wine vinegar
2 tbsp lemon juice
1 tbsp brown sugar

Method

To make the piri-piri sauce, boil the chillies in a pot of water for 3-5 minutes. Drain and roughly chop the chillies. Place the chillies, garlic, salt, bay leaf, oregano, paprika, olive oil and vinegar in a saucepan, and simmer for about 5 minutes. Stir in lemon juice and sugar to taste.

Allow the mixture to cool, then blend it to a purée in a jug blender or food processor. Store in a lidded container at room temperature.

Rub some salt and black pepper all over the butterflied chicken. Place the chicken in a sealable plastic bag. Add 2 tbsp of the piri-piri sauce, spreading it evenly over the chicken. Seal and marinate in the refrigerator for 4 hours or overnight.

Preheat the oven to 200C (400)F. Place the chicken in a roasting tray and roast in the oven for 45 minutes or until cooked. Baste the chicken with pan juices halfway through roasting.

Serve with extra piri-piri sauce, chips and salad. I made a simple pear and rocket salad with a lemon and olive oil dressing to go with it. Yum!
reade more... Résuméabuiyad

Roast Chicken with Russian Salad {Best Ever}

 
This is the most amazing and easy roast chicken ever. I'm dreaming of having this chicken again as I write this. I actually ate this three days in a row and never got tired of it. In fact, it tasted even better the following days, with the flavours from the marinade (and the pan juices) having absorbed into the chicken. I was a little sceptical about the Russian salad
(although it was really the "exotic" reference to "Russian" that enticed me to try out this recipe) as I don't usually have cold creamy salads with roast chicken. Well, I was pleasantly surprised that they complemented each other really well and I just kept going back for more (and more, and more). I made sure the egg was cooked just right, with a jellied yolk centre, because that's the best way to have 'em!
 

Roast Chicken with Russian Salad
Adapted from Gourmet Traveller (July 2013)

Ingredients

2.4 kg chicken marylands (whole chicken leg)
2 lemons, quartered

Spice rub:
1 tbsp ground coriander
1 tbsp smoked paprika
1 1/2 tbsp dark brown sugar
2 tsp dried chilli flakes
1 tsp ground cinnamon
1 tbsp sea salt
2 tbsp olive oil

Russian salad
4 eggs
3-4 potatoes (about 500g)
2 carrots, halved horizontally
200 g frozen peas, defrosted
250 g (1 cup) mayonnaise
60 ml (¼ cup)
cider vinegar
4 golden shallots, thinly sliced (or substitute with deep fried shallots)
1 cup loosely packed chopped dill (optional)
Salt and black pepper, to taste

Method

For spice rub, combine ingredients in a bowl. Rub over chicken, place in a non-reactive container, cover with plastic wrap and refrigerate overnight (or at least 24 hours) to marinate.

For Russian salad, cook eggs in a saucepan of boiling water until soft-boiled (6-7 minutes). Cool under running water, peel, quarter and set aside. Peel and dice potatoes into 1/2 inch cubes, place in a saucepan of cold salted water, bring to the boil and cook until tender. Drain and set aside. Cook carrot in a saucepan of boiling salted water until just tender (10-12 minutes), cool and cut into 1/2 inch pieces. Blanch peas in a saucepan of boiling salted water until bright green (1 minute), refresh and drain. Combine mayonnaise and vinegar in a large bowl, season to taste and stir until smooth. Add all ingredients and toss to combine.

Preheat oven to 200C (400F). Arrange on a large baking tray and roast until cooked through (45-55 minutes). Cover loosely with foil and rest for 10 minutes. Cut each chicken into quarters, season to taste, squeeze over lemon and serve with warm salad.

Note: You'll need to begin this recipe a day ahead to marinate the chicken.


reade more... Résuméabuiyad

Spicy Chicken (Vindaloo)


Here's a hot and spicy chicken dish that's quick and easy to prepare, and will have you going back for more! This tastes even better the next day or two, so double the batch if you want to save some leftovers for a busy weeknight dinner.


Spicy Chicken (Vindaloo)

Ingredients

500g (1/2 lb) chicken thigh fillets, cubed
Vegetable oil, for frying
3-4 medium-sized onions, peeled and sliced into rings
1/2 tsp mustard seeds, coarsely ground with mortar and pestle
3 cloves garlic, minced
1/2 inch ginger, grated
1 tsp cumin
2-3 tbsp chilli paste (made from ground dried chillies)
1/2 cup water
2 tsp sugar
Salt to taste
2 tbsp vinegar (or to taste)

Method

Heat up 3 tbsp vegetable oil in a pan or wok. Fry the onions for 5-10 minutes until softened and slightly browned.  Remove the onions and transfer to a plate, leaving the remaining oil in the pan.

In the same wok, add the mustard seeds and fry until they start to pop. Add the minced garlic and ginger, cumin and chilli paste. Fry for 2 minutes, then add the chicken. Brown the chicken in the pan, then add the onions (that was fried earlier) and approximately 1/2 cup water. Bring to a boil and let the chicken simmer until fully cooked (about 10 minutes), and the sauce reduced to a gravy consistency. Add sugar, salt and vinegar to taste.  Dish up and serve with steamed basmati or other white rice.

reade more... Résuméabuiyad

Malaysian Fish Head Curry


This is a Malaysian-Chinese style fish head curry, as opposed to the Indian-style which uses fish curry powder, curry leaves, fenugreek and mustard seeds. I think most commercial fish curry powders are meant for Indian style curries, and so I made my own from scratch using ground coriander, chilli and turmeric. After three attempts, I was happy with how this final one turned out. Cod fish head was fantastic, although snapper head works perfectly well too. Some of you may cringe at the thought of having a fish head served at the dining table. If that's the case, you can always substitute with fish tail or fish cutlets. I love having lots of okra, eggplant and tofu puffs in my curry, making it pretty much a one pot wonder. Find the recipe after the jump.


Some handy tips before you start cooking this.

1. Ask your fishmonger to scale your fish head properly. Trust me, it's not pleasant having fish scales in the curry while you're eating.
2. Don't overcook the okra. 10-15 minutes is fine.
3. Don't let the coconut boil in the curry for too long, otherwise it will start to split.
4. Don't overcook the fish either.
5. Cook plenty of white rice as you will need it.
6. And finally, the fish cheek is the best part, so get to it first before anyone else does, but politely offer it to others before you land it on your plate.

Fish Head Curry Recipe

Ingredients

1 kg fish head (snapper or cod), cleaned and scaled
4 tbsp oil
2 stalks lemongrass, lightly bruised 
3-4 cups water
1 1/4 cup (300ml) coconut milk (I used Kara canned coconut milk)
10 tofu puffs (Soya King brand)
2-3 tomatoes, quartered
10 okra (or add eggplant if desired)
Coriander leaves for garnish

Blend finely:
120g (4oz) shallots
4 cloves garlic
1 inch galangal
1 inch ginger
2 candlenuts
1/2 tbsp toasted belacan
3 tbsp chilli paste (dried chillies that have been soaked until softened, and finely blended)

Curry powder (mixed with 4 tbsp water to form a paste):
2 tbsp ground coriander
2 tbsp chilli powder
1/2 tbsp ground turmeric
1/2 tsp ground cumin

Seasoning:
2 tsp chicken/ikan bilis stock powder
1 1/2 tbsp fish sauce
1-2 tbsp sugar (or to taste)
Salt to taste

Method

  1. Rub some salt over the fish head and set aside for 1/2 hour before rinsing it off. Ensure there is no blood left on the fish as it may cause bitterness in the curry.
  2. In the meantime, heat up 4 tbsp oil in a large pan/pot. Fry the blended ingredients (shallots, garlic etc) for 3-5 minutes. Then add curry powder mixture continue frying for 2 minutes until the chilli oil starts to release into the pan. Add the lemongrass.
  3. Add water, cover and bring to a boil. Simmer for 1/2 hour. Then add seasoning and coconut milk. Once it starts to simmer, quickly add the tofu puffs and okra. Simmer for 5 minutes before adding tomatoes and the fish. Cover and simmer gently for 10 minutes until the fish is cooked. Turn off the heat and let it sit for 3 minutes so that the oil rises to the top. Dish out
  4. immediately, garnish with coriander and serve hot with steamed white rice.


reade more... Résuméabuiyad

Korean Fried Chicken with Hot Dipping Sauce


There's been a lot of deep-fried wings going on in my house lately. I've been experimenting with different recipes to come up with the ultimate crispiest chicken wings and the best Korean chilli dipping sauce, and so far, nobody's been complaining. I finally got it down to using a batter made with self-raising flour, rice flour and glutinous rice flour to achieve a light and crisp layer on the wings. The double-frying simply maximises the crunch factor (and I think it prolongs the crispiness too). One of our favourite places for Korean Fried Chicken is Stra Pocha in Strathfield, where you can ask for their special chilli sauce for dipping the wings in. We love the sauce, and I'm happy that my version of it comes quite close - sweet and spicy with a lot of heat from the red peppers.
 
Let me tempt you with some photos....


Isn't the sauce looking lovely? You can bet those wings are crispy too!


I prefer to serve the chilli sauce on the side, rather than toss the chicken into the sauce as they are sometimes served. That way, the wings stay crisp and crunchy, and it's less messy too if you're eating with your  hands (that's the only way to eat chicken wings!).

Here's the recipe for these delicious wings. Enjoy!

Crispy-battered Korean Fried Chicken

Ingredients

1kg (2 pounds) chicken wings
Salt
Vegetable oil for deep-frying

Batter:
1/4 cup self-raising flour
2 tbsp rice flour
3 tbsp glutinous rice flour
1/4 tsp salt
1/2 cup water (approx)
1/2 tbsp vegetable oil

Dipping sauce:
2 cloves garlic, minced
2 tbsp Gochujang (Korean red pepper paste), extra hot/spicy
2 tsp soy sauce
1 1/2 tbsp brown sugar (or to taste)
1 tbsp corn syrup (or substitute with sugar)
1 tbsp ketchup
1/2 tbsp sesame oil
2 tbsp water

Method

Prepare the sauce by combining the ingredients in a saucepan. Bring to a boil for about 1 minute until it's thick and glossy. Remove from heat and transfer to a serving bowl. Set aside.

Pat the chicken dry with paper towels. Sprinkle all over with 1/2 tbsp salt and leave for 10 minutes. Use a paper towel to absorb any excess moisture and shake off excess salt.

Combine ingredients for batter in a bowl and mix until smooth.

Heat oil in a wok for deep-frying. Dip wings into batter and let excess batter drip off. Slowly drop it into the hot oil (on medium-high heat), and repeat with more wings. Fry in batches until golden brown and cooked (about 8-10 minutes). Drain on kitchen paper.

When all the wings have been cooked and are resting a plate lined with kitchen paper, turn up the heat to high. Fry the wings a second time for 1-2 minutes to crisp them up further. Drain on kitchen paper, then transfer to a plate. Serve immediately with the dipping sauce for maximum enjoyment.


reade more... Résuméabuiyad

Singapore Fried Carrot Cake (Chai Tau Kuih)

 
This is the crispy pancake version of Singapore fried carrot cake, though there's some debate over whether it should be called radish cake instead since it uses radish, and not carrot. But then again, sometimes it does not contain radish, so should it be just called rice cake? The radish (or daikon - I think they are similar) gives it a subtle sweetness and flavour. I do like the radish cake to be soft, so the proportion of water to rice flour I've used is about 2:1. After it's fried, the carrot cake will be crispy on the outside, soft and smooth inside. This is a popular dish in Singapore and Malaysia, and is usually eaten for breakfast, lunch, dinner or supper. Look out for it when you're visiting a hawker centre there!


Carrot (or radish) cake
 
Ingredients
 
500g radish/daikon, grated/finely shredded
300g (3 cups) rice flour
50g (1/3 cup) tapioca starch
1 1/2 tsp salt
1/4 tsp white pepper
1 1/2 tbsp sugar
5 cups water
 
Method
 
Grease a 10 inch round pan and set aside. Prepare a steamer.
 
Take the grated radish and squeeze out as much water as you can. Discard the water.
 
In a large bowl, mix the rice flour, tapioca starch, salt, pepper and sugar together with 6 cups water. Stir to get a smooth runny batter.
 
Place the radish in a large pot and heat on medium flame. Stir it around for a few minutes to let any excess liquid evaporate. Add the batter and stir to mix evenly. Let it heat up and keep stirring until it starts to thicken into a starchy consistency. Turn off the heat and stir until evenly mixed. Pour into the greased pan and level the top.

Steam for 45 minutes until cooked. It will firm up upon cooling. Refrigerate the cake so that it's easier to cut into cubes for frying.
 
Fried carrot cake
 
Ingredients
 
2-3 tbsp vegetable oil
1 1/2 cups cubed (1/2 inch) pieces of steamed carrot cake (as prepared above)
1 tbsp chopped preserved salted radish
2 tsp chopped garlic
1 tsp light soy sauce + 1/2 tsp fish sauce + 1/2 tsp sugar
1 large egg, beaten with 1/4 tsp soy sauce and dash of pepper
1/2 tsp sambal chilli (I used Glory Nonya Sambal)
2 tbsp chopped scallions

Method

In a non-stick wok/pan, add the vegetable oil and place on high heat. When hot, add cubed carrot cake and spread them out in the pan. Be careful of oil splattering. Let it fry on one side for 1-2 minutes before turning them over to fry the other side. When sides are crisp, push the cubes aside. Let the oil come to the centre and add garlic and radish to fry for 1/2 minute. Mix through with the carrot cake. Drizzle in the soy, fish sauce and sugar mixture and mix it through evenly.

Arrange the carrot cake in the centre of the pan in one layer. Slowly pour the beaten egg mixture over the entire surface to ensure even coverage. Use your spatula to gently move the carrot cake so that the egg settles in between the pieces. Leave it for a minute to crisp up. Then cut into quarters with the spatula and flip each one over to cook the other side for half a minute. Take the sambal chilli sauce and smear it over the top of the carrot cake (which is now covered with egg). Flip over again for a few seconds, then flip back. Turn off the heat and transfer the to a serving plate. Sprinkle with chopped scallions and serve hot.

Note: Alternatively, break up the egg with the carrot cake and mix in the sambal chilli. Stir fry briefly and just before serving up, mix through with chopped scallions.

 
Steamed radish cake
Black version of carrot cake (with sweet soy sauce)
reade more... Résuméabuiyad

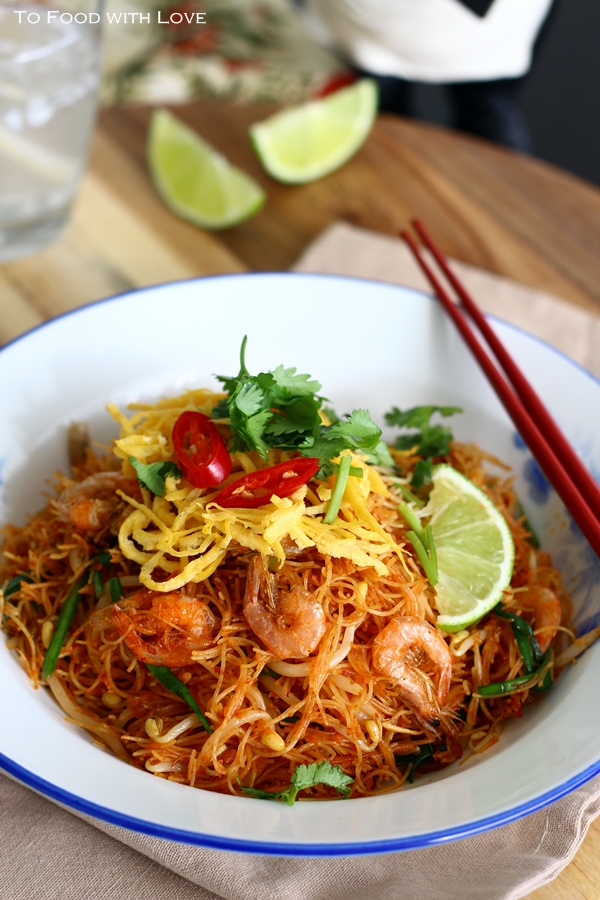
Fried Mee Siam (Vermicelli) with Crispy Shrimp


It was a bright and sunny Sunday morning. I was riding in the car when this song started playing on the radio:
 
Whatever I said, whatever I did I didn't mean it,
I just want you back for good,
(Want you back, want you back, want you back for good...)
 
Does that sound familiar? Well, Take That! Listening to the song evoked memories from my 21st birthday which I celebrated with my college friends. I still have photos from that day, when I had my first go at ice-skating and ended up with cuts and grazes from constantly breaking my fall with my bare hands. A couple of my friends had brought a guitar along and made a notable attempt to serenade me with "Back For Good", which is why hearing the song again made me feel quite nostalgic.


Like music, food can sometimes trigger feelings of nostalgia too. Back in my childhood days, before my cousins and I grew up and went our separate ways, we used to come together during festivities and celebrations, like Chinese New Year, birthday parties or just family get-togethers. The "women" in my family are great cooks, and they each have their "specialty" dishes. One of my aunts makes the most delicious fried mee siam (Malaysian-style spicy fried vermicelli) and I would always look forward to it during these family events. Now, whenever I see this dish, I would look back and reminisce about the wonderful times we had back then, eating together and enjoying good food.
 
 
How could I possibly not learn how to cook mee siam, one of my all-time favourite Malaysian dishes (amongst many others)? In fact, it was one of the first few dishes I learnt to cook when I moved into my own apartment and had full unlimited no-holds-barred access to the kitchen. Ah.... Now, that reminds me of the time I was renting a room and my vegetarian landlady kicked up a big fuss when the braised pork belly dish I was cooking simply engulfed her entire apartment in a whirlwind of porky and garlicky smells. Her instant reaction was to run to the balcony where she almost screamed her head off. It was quite a funny sight though, and rather unexpected. That was probably the last time I cooked in her kitchen.
 
Anyway, this Fried Mee Siam has been my go-to dish whenever I have guests over for lunch, or as my contribution to potluck lunches or dinners. It's simple, yet so tasty especially with the refreshing tang and acidity from the lime/lemon. The crispy shrimps (or school prawns) are lovely too, though you may omit them if you wish to keep it simple. I like to use Wai Wai brand of vermicelli noodles for this, as their superfine and silky texture allows the flavours to be better absorbed. It's quite a popular brand, and should be available at most supermarkets. Please find the recipe after the jump.


Fried Mee Siam (Vermicelli) with Crispy Shrimp
 
Ingredients
 
200g school prawns (tiny shrimp) with head and tail on, washed and feelers trimmed
Vegetable oil
2 cups chicken/beef stock
1/2 tbsp chicken stock powder
2 tbsp fish sauce
3-4 tbsp sugar
1-2 tbsp dried tamarind pulp, mixed with 1/4 cup hot water  until softened, then strain the pulp
1/4 tsp pepper
500g Wai Wai brand vermicelli noodles, soaked in water for 5 minutes until softened
 
Blend finely:
5 cloves garlic
3 large onions
20 dried chillies, deseeded and soaked in warm water
1/2 cup dried prawns
 
1 packet bean sprouts (about 200g / 7oz)
1 bunch garlic chives (about 150g / 5oz), cut into 2 inch lengths
 
Garnish:
4 eggs, beaten, seasoned with salt and pepper, fried into a thin omelette and finely shredded
2-3 limes or lemon wedges
Crispy fried shallots
Coriander leaves
Crispy fried shrimp
 
Method
 
1. Pat dry the shrimp with a paper towel. Sprinkle with a little salt. Heat up 1/2 cup vegetable oil in a wok and slowly deep-fry the shrimp for 5 minutes until crispy. Remove and drain on kitchen paper. Leave the oil in the wok.
 
2. Heat up the same oil in the wok. Fry the blended ingredients for 4-5 minutes. Add stock, chicken stock powder, fish sauce, sugar, pepper and tamarind liquid. Bring to a boil and simmer for 5 minutes.
 
3. Add the vermicelli and mix until well combined. Toss for 2-3 minutes until the liquid has been absorbed and noodles are almost dry. Add bean sprouts and chives and mix them into the noodles. Transfer to a serving plate and top with garnish. Squeeze over some lime/lemon juice before serving.


reade more... Résuméabuiyad

Malaysian Deep-fried Curry Puffs


I made these deep-fried curry puffs over the weekend when we had friends over for lunch (I figured just serving chicken rice might not be enough). As usual, I posted photos of these on facebook and a friend commented that it was his favourite. Actually, he thought that these were "gujia", which I later found out through Dr Google that it was a type of sweet Indian (Rajasthani, to be specific) deep-fried pastry filled with nuts, dried fruit or coconut. Mmm...this sounds like something right up my alley (and something for me to experiment with next!). 

In fact, if you think about it (or do a bit of research), there are many versions of these pastries around the world, like empanadas for example. The name "empanada" comes from the Spanish verb empanar, meaning to wrap or coat in bread. Empanadas, which are prevalent in Latin America, are pastry turnovers filled with a variety of savoury (or sometimes sweet) ingredients. The variant of these stuffed pastries in Indonesia are called "pastel". Calzone's another one, though probably a larger version of it. Whether you call them empanadas, hand pies, pocket pies, pasties, puffs or the like, they are the perfect snack food that can be both savoury or sweet. Why, you could even have them all for breakfast, lunch, afternoon tea, dinner and dessert! A round-the-clock empanada party - now that's an idea.

With that said, my all-time favourite has to be these Malaysian-style curry puffs, deep-fried to perfection to attain those light, crisp and flaky layers of pastry, enclosing a spicy and aromatic filling of curried chicken and potatoes. Nobody can resist a good curry puff and whether baked or fried, they are always a hit. These would be great for serving up at parties or picnics. Otherwise, simply have them for morning or afternoon tea, or really, just any time of the day.


Malaysian Deep-fried Curry Puffs
(makes about 15)

Curry puff filling:

2 cups cubed (5 mm) potatoes
2 tbsp vegetable oil
2 inch cinnamon stick
3 cloves
1/2 star anise
1 large onion, finely chopped with a blender
2 cloves garlic, chopped
2 tbsp Malaysian curry powder, mixed with 3 tbsp water to form a paste
2-3 tsp chilli powder/chilli flakes (add this to the curry powder)
250g chicken, roughly chopped/minced
1 sprig curry leaves
1/2 tbsp fish sauce
1 tsp soy sauce
1/2 tbsp sugar (or to taste)
1 tbsp ketchup
1/2 cup water
Salt, to taste

Pastry:

2  2/3 cup (400g) plain flour
1/2 tsp salt
3/4 cup (180g) butter, cut into tiny cubes
1/2 cup cold water (approx)

Method

You will need to prepare the curry puff filling a day ahead.

Curry puff filling:

Place cubed potatoes in a microwave safe bowl with 3 tbsp hot water, and cover loosely with a lid. Microwave on high for 2-3 minutes until cooked, stirring once in between. When cooked, drain off the excess liquid and set aside.

Heat the vegetable oil in a wok. Add cinnamon stick, cloves, star anise, onions and garlic. Fry for 2-3 minutes until onions are translucent, then add curry powder and chilli paste mixrture. Fry for 2-3 minutes until the oil separates. Add chicken and fry until cooked. Add curry leaves, the cooked potatoes, fish sauce, soy sauce, sugar and ketchup. Toss to mix evenly. Add 1/2 cup water and mix again. Bring to a boil and let it simmer until potatoes are soft and has absorbed all the flavours. Add salt to taste. Fry until the curry is thick and almost dry. Dish out and let it cool before refrigerating.

Making the pastry and puffs:

Place flour and salt in a large bowl and mix well. Add cubed butter and rub into the flour until it resembles breadcrumbs. Alternatively, use a pastry cutter or food processor to do this. Drizzle water into the mixture and stir around with the round tipped knife until the dough starts to come together. Bring the dough together with your hands, adding a little more water if it's too dry and crumbly. Do not overknead the dough as it may cause the pastry to be "tough/chewy" when fried. Place the ball of dough on a floured surface and roll out into a disc. Use a round cutter and cut out small discs (makes about 15 pieces). Roll out each disc into a flat oval shape (about 1/8 inch thick). Place 2 tbsp of curry filling in the centre, fold in half and pinch the edges to enclose. Use thumb and forefinger to pinch the edges to form fluted edges.

Heat sufficient oil in a wok/pan for deep-frying. Fry the curry puffs in batches on medium-high heat for 5-7 minutes until golden brown. Move the curry puffs around in the oil so that they brown evenly all over. Remove and drain and kitchen paper. Caution: Filling is hot! Enjoy!

Note: Alternatively, you can bake these in the oven instead of deep-frying. Preheat oven to 200C (400F). Place curry puffs on a lined baking tray and brush the tops with egg wash (beaten egg + 1 tbsp water). Bake for 20 minutes or until lightly golden and crisp.


reade more... Résuméabuiyad

Mutter Paneer (Peas and Cottage Cheese)


Mutter paneer is a popular North Indian dish consisting of paneer (cottage cheese) and peas (mutter) cooked in a spiced tomato-based gravy, and it tastes fantastic especially when eaten with boiled basmati rice. I enjoy the paneer for its "bitey" texture that can be described as almost "meaty", and all of this combined together makes a delicious meal that can be quite addictive. I must admit I wasn't really a fan of paneer nor vegetarian food right up till middle of last year when I had some friends visiting from India and we frequented a few Indian restaurants. What an eye-opener it was for me. Indian vegetarian cuisine wasn't just all about peas and lentils, but very much about spices, colours, textures and exotic flavours.
 
I first tried mutter paneer at Curry at the Rocks, and became an instant fan. I put it on my to-cook list immediately, and was thrilled at how my recipe for this turned out. It tasted really authentic (which Mr G concurred with), as it had the perfect balance of flavours and just the right amount of spices. This is a versatile dish in that you can adjust the quantities of spices used according to personal preference. And if peas or paneer aren't your thing, you can omit them or substitute with fresh button mushrooms if you like.


Mutter Paneer (Peas and Cottage Cheese)

Ingredients

200g paneer cheese, cubed
1 tbsp ghee

3 tbsp vegetable oil
1 onion, finely chopped
1 1/2 tbsp chopped garlic
1 tbsp grated ginger
3 cloves
1 tsp cumin
1/4 tsp ground turmeric
1/2 tsp garam masala
1/2 tbsp chilli powder
400g canned diced tomatoes
1 cup water
1 cup peas
Pinch of asafoetida (optional)
1 tbsp dried fenugreek leaves (kasuri methi)
Salt, to taste
3 tbsp cream

Method
 
  1. Heat ghee in a small non-stick pan and fry the paneer cubes until lightly browned. Remove and set aside.
  2. Heat oil in a medium pot and add onions, garlic, ginger, cloves, cumin, turmeric, garam masala and chilli powder. Fry for 3-5 minutes until fragrant.
  3. Add diced tomatoes and water. Bring to a boil and simmer, covered, for 20 minutes. Add asafoetida and fenugreek leaves.
  4. Add the fried paneer and peas and bring to a boil again. Simmer for 10 minutes until peas are tender and gravy is slightly reduced. Add salt to taste. Stir in the cream and it's ready! Serve with boiled basmati rice.


reade more... Résuméabuiyad

Sweet and Spicy Pork Ribs


I grew up in a culture where rice is a staple food, and almost every meal (that my mum cooked) would consist of boiled white rice served with a variety of meats, soups and vegetables. Mum's a fantastic cook who takes pride in the food she prepares for us, which is why I always look forward to her cooking whenever I go back to visit. I try to learn as much as I can from her, although in the much earlier years, before my foray into the kitchen, I was merely interested in consuming the end product and not so much how it was prepared.  I have, however, picked up many kitchen tips from her since then, which are truly invaluable and have probably saved me from countless pain and heartaches in the kitchen. Thanks Mum!

With my family, I've followed the same tradition of serving rice for dinner (except for the occasional fast food or fish and chips on the weekends - kids, you know, gotta keep them happy). There are  endless types of dishes that go with rice, ranging from healthy stir-fries and stews to sinfully indulgent deep-fried foods (which is really okay if you don't eat them too often).


In today's post, I'm featuring these crunchy deep-fried pork ribs slathered with a creamy chilli and tomato sauce (this probably falls under the "sinfully indulgent" category). I've made these three times already, simply because they are sooooo addictive and deliriously good. It's a little like sweet and sour pork, but more spicy than sour (uhh... hence I named it sweet and spicy pork ribs). G enjoyed them so much that he claimed he would drive miles just to eat it. But really, this is a simple and easy dish to pull off, and most of the ingredients should already be stocked in the fridge or pantry. I've specifically used Lingham's chilli sauce in the recipe as it has a sweet garlicky flavour that gives the sauce that "special" taste. It should be available in most good supermarkets, otherwise try substituting with Thai sweet chilli sauce instead.

Sweet and spicy pork ribs

Ingredients

450g (1 lb) pork spare ribs (or substitute with belly pork, skin removed)
3 tbsp cornflour, extra
2 cups vegetable oil for deep frying
1/2 tsp vegetable oil
Scallions, chopped, for garnish

Marinade:
1/2 tsp sesame oil
1/2 tsp bicarbonate of soda
1 small egg (or half a large egg)
1 tbsp plain flour
1 tbsp cornflour
1/3 tsp salt
Dash of pepper

Sauce (combine in a bowl):
2 tbsp Lingham's chilli sauce
1 tbsp ketchup
1 tsp Sriracha chilli sauce (or more to taste)
4 tbsp mayonnaise

Method
  1. Slice the pork into 3/4 inch cubes. Spread a few pieces out on the chopping board, cover with clingwrap and pound with a meat mallet to tenderise the meat. Repeat with the rest of the pork.
  2. Combine pork with the marinade and mix well. Set aside for 30 minutes.
  3. Heat vegetable oil in a deep pan or wok on high heat. Toss the 3 tbsp cornflour onto the pork and toss to coat evenly.  When the oil is hot (slowly lower a piece of pork into the oil - if it sizzles, the oil is ready), add the pork piece by piece so that they don't stick together when cooked. Cook in two batches to avoid overcrowding in the pan.
  4. Let the pork fry in the oil for 2-3 minutes before turning over. Fry for another 2 minutes or until lightly golden brown and crisp. Remove and drain on kitchen paper or a metal rack.
  5. Heat a medium sized wok or non-stick pan with 1/2 tsp vegetable oil. When hot, add the sauce ingredients and stir with a spatula until it starts to simmer a little (you just want to heat it up). Add the deep-fried pork and toss in the sauce until evenly coated. Transfer to a serving plate and garnish with chopped scallions. Serve immediately with boiled jasmine rice. Enjoy!
 
reade more... Résuméabuiyad

Char Kuay Teow, two-ways

 
Char Kuay Teow with sweet soy

If you know and love Malaysian food, then Char Kuay Teow needs no introduction. In terms of popularity, I would think that Laksa ranks number one, followed by Hainanese chicken rice, and then Char Kuay Teow. These three dishes are commonly found in most menus of restaurants serving Malaysian-style food in Sydney, but more often than not, the authenticity of the Char Kuay Teow is questionable. Char Kuay Teow (CKT) literally means fried rice noodles, but a plate of greasy fried rice noodles with black soy sauce does not qualify as CKT. I find that the CKT sold here usually omits the eggs, which is a must in every CKT. It coats the rice noodles and gives it flavour and texture. Cockles are another must-have in CKT, but I have omitted them in my dish as I was unable to find any at the shops here.


I made two versions of CKT. One is the savoury Penang-style, and the other is the sweet version, typical of that found in Singapore. The latter uses kecap manis (sweet soy sauce) and is relatively more moist, whilst the Penang-style is drier. I personally prefer the sweet version. My recipe below explains how you can easily make both.
 
Savoury Penang-style Char Kuay Teow

Char Kuay Teow
(1 serving)
 
Ingredients
 
3 tbsp lard (or substitute with vegetable oil)*
6 fresh prawns, peeled
1/2 Chinese sausage (lup cheong), thinly sliced on the diagonal
8 slices fried fishcake
1/2 tbsp chopped garlic
250g (1/2 lb) fresh rice noodles, at room temperature (separate the noodles to prevent clumping together)
1 tbsp chilli paste**
2 eggs
1/4 tsp salt (or to taste)
1 1/2 cups beansprouts
1/2 cup garlic chives, cut into 2 inch lengths
 
Sauce:
1 1/2 tbsp light soy sauce
1 tsp thick caramel (Cheong Chan brand)
2 tbsp ABC kecap manis (sweet soy sauce) - omit if Penang-style char kuay teow is preferred***
2 tbsp water
 
Method
 
1. In a large non-stick wok, heat up 1 tbsp lard over high heat and fry the prawns, Chinese sausage and fishcake slices. When the prawns are almost cooked, push  the ingredients aside and add 1 tbsp lard in the centre of the wok. Add garlic and fry briefly. Stir and mix well with the other ingredients. (It is important to keep stirring everything with the spatula in quick motion so that everything cooks evenly. Fry only one batch at a time)
 
2. Toss in the noodles and drizzle the sauce around the side of the wok. Mix in with the noodles and stir-fry quickly, moving the spatula back and forth until noodles are well coated. Do not overcook. Stir in the chilli paste.

3. Turn the heat down to medium. Push the noodles to the side and add 1 tbsp lard. Crack the 2 eggs into the centre of the wok and give it a quick scramble. Fold the noodles over the eggs and mix through again quickly and evenly before the eggs start to set. It should form sort of a slurry eggy coating over the noodles. If the noodles start to look a little dry at this point, drizzle 2-3 tablespoons water around the side of the wok and mix through quickly. Add salt to taste.
 
4. Toss in the beansprouts and garlic chives and mix through quickly for 20 seconds. The noodles should be fairly moist, and if not, add a few drops of water (or extra lard if desired). Transfer to a plate immediately and serve hot.
 
Note:
* To make lard, you can buy pork fat from the butcher and dice them into tiny cubes. For 2 servings, use 4 tbsp pork fat and fry in 3 tbsp vegetable oil on medium-high heat slowly until the fat turns brown and crisp. You can use the crispy lard to garnish the char kuay teow before serving.
 
** Chilli paste: I used dried chillies that have been soaked in water and blended finely, then fried in oil with some chopped garlic, seasoned with salt and sugar. You can substitute with your favourite brand of chilli paste if preferred. 

*** Penang-style char kuay teow is more savoury than sweet, and also drier. Adjust the quantity of kecap manis used to your preference.


reade more... Résuméabuiyad