Pages

.

Baked Kale Chips


There's been all this hype over kale chips, and how they taste like potato chips, except that they are loaded with vitamins and minerals. I finally bought some kale from the supermarket last Sunday and was pretty excited to make these. It's really easy. Roughly tear up the kale into pieces, and then wash and dry them thoroughly. Lay them out on a baking tray lined with baking paper, drizzle with a little olive oil and sprinkle with a pinch salt. Be careful not to put too much oil or salt, because the kale will shrink to a quarter of its size and you don't want to end up with oily salty kale chips (now how did I know that?). Bake them in the oven at 180C (350F) for 20 minutes, turning once halfway through. They will be turn translucent and crispy, and they really taste almost like potato chips! And totally guilt-free!

PS: These make a good substitute for crispy seaweed, the Japanese or Korean type that comes in individual packs and taste so umami with flakes of MSG all over. I reckon these kale chips would be great as a topping for noodle soups, or even crumbled over some pasta.
reade more... Résuméabuiyad

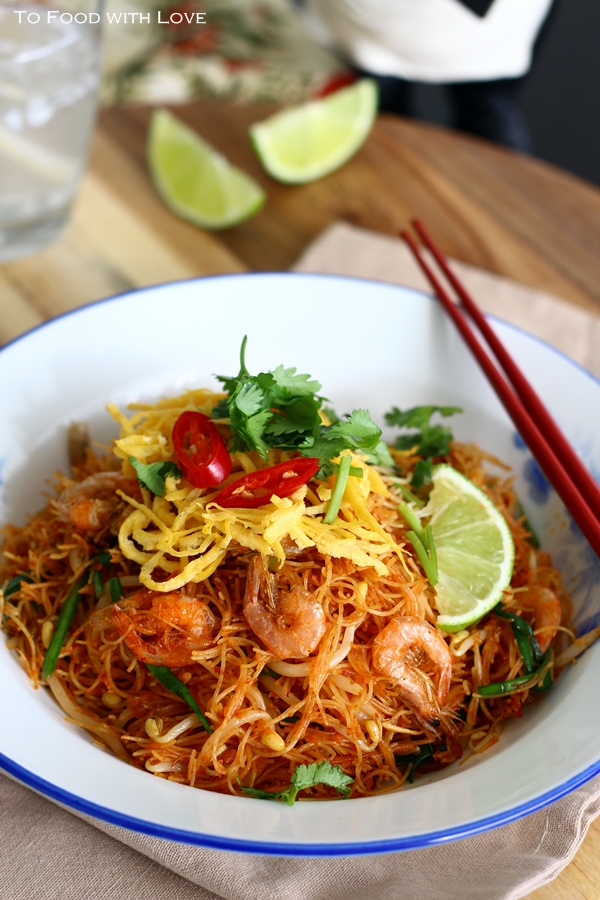
Fried Mee Siam (Vermicelli) with Crispy Shrimp


It was a bright and sunny Sunday morning. I was riding in the car when this song started playing on the radio:
 
Whatever I said, whatever I did I didn't mean it,
I just want you back for good,
(Want you back, want you back, want you back for good...)
 
Does that sound familiar? Well, Take That! Listening to the song evoked memories from my 21st birthday which I celebrated with my college friends. I still have photos from that day, when I had my first go at ice-skating and ended up with cuts and grazes from constantly breaking my fall with my bare hands. A couple of my friends had brought a guitar along and made a notable attempt to serenade me with "Back For Good", which is why hearing the song again made me feel quite nostalgic.


Like music, food can sometimes trigger feelings of nostalgia too. Back in my childhood days, before my cousins and I grew up and went our separate ways, we used to come together during festivities and celebrations, like Chinese New Year, birthday parties or just family get-togethers. The "women" in my family are great cooks, and they each have their "specialty" dishes. One of my aunts makes the most delicious fried mee siam (Malaysian-style spicy fried vermicelli) and I would always look forward to it during these family events. Now, whenever I see this dish, I would look back and reminisce about the wonderful times we had back then, eating together and enjoying good food.
 
 
How could I possibly not learn how to cook mee siam, one of my all-time favourite Malaysian dishes (amongst many others)? In fact, it was one of the first few dishes I learnt to cook when I moved into my own apartment and had full unlimited no-holds-barred access to the kitchen. Ah.... Now, that reminds me of the time I was renting a room and my vegetarian landlady kicked up a big fuss when the braised pork belly dish I was cooking simply engulfed her entire apartment in a whirlwind of porky and garlicky smells. Her instant reaction was to run to the balcony where she almost screamed her head off. It was quite a funny sight though, and rather unexpected. That was probably the last time I cooked in her kitchen.
 
Anyway, this Fried Mee Siam has been my go-to dish whenever I have guests over for lunch, or as my contribution to potluck lunches or dinners. It's simple, yet so tasty especially with the refreshing tang and acidity from the lime/lemon. The crispy shrimps (or school prawns) are lovely too, though you may omit them if you wish to keep it simple. I like to use Wai Wai brand of vermicelli noodles for this, as their superfine and silky texture allows the flavours to be better absorbed. It's quite a popular brand, and should be available at most supermarkets. Please find the recipe after the jump.


Fried Mee Siam (Vermicelli) with Crispy Shrimp
 
Ingredients
 
200g school prawns (tiny shrimp) with head and tail on, washed and feelers trimmed
Vegetable oil
2 cups chicken/beef stock
1/2 tbsp chicken stock powder
2 tbsp fish sauce
3-4 tbsp sugar
1-2 tbsp dried tamarind pulp, mixed with 1/4 cup hot water  until softened, then strain the pulp
1/4 tsp pepper
500g Wai Wai brand vermicelli noodles, soaked in water for 5 minutes until softened
 
Blend finely:
5 cloves garlic
3 large onions
20 dried chillies, deseeded and soaked in warm water
1/2 cup dried prawns
 
1 packet bean sprouts (about 200g / 7oz)
1 bunch garlic chives (about 150g / 5oz), cut into 2 inch lengths
 
Garnish:
4 eggs, beaten, seasoned with salt and pepper, fried into a thin omelette and finely shredded
2-3 limes or lemon wedges
Crispy fried shallots
Coriander leaves
Crispy fried shrimp
 
Method
 
1. Pat dry the shrimp with a paper towel. Sprinkle with a little salt. Heat up 1/2 cup vegetable oil in a wok and slowly deep-fry the shrimp for 5 minutes until crispy. Remove and drain on kitchen paper. Leave the oil in the wok.
 
2. Heat up the same oil in the wok. Fry the blended ingredients for 4-5 minutes. Add stock, chicken stock powder, fish sauce, sugar, pepper and tamarind liquid. Bring to a boil and simmer for 5 minutes.
 
3. Add the vermicelli and mix until well combined. Toss for 2-3 minutes until the liquid has been absorbed and noodles are almost dry. Add bean sprouts and chives and mix them into the noodles. Transfer to a serving plate and top with garnish. Squeeze over some lime/lemon juice before serving.


reade more... Résuméabuiyad

Salmon with Black Bean Sauce


Have you ever tried salmon with black bean sauce before? Honestly, I never knew salmon could be prepared this way until I found out from some friends that it is a common Chinese dish. I uusally cook salmon with either miso or teriyaki sauce, but with black beans? It actually turned out really good - sweet, salty, smoky (from the beans), with a hit of chilli in there. These flavours are just perfect with a bowl of steamed white rice, and it's all you really need for a satisfying meal. Of course, to make it complete, serve it with a plate of stir-fried asian greens like bok choy or snow pea sprouts.

I used fermented black beans that came in a jar, and not the dried ones that come in a packet. You should be able to find them at the Asian supermarket at the aisle where all the sauces and jars of pastes are. I've never tried the dried version before, so I'm not sure if they are any different. The flavours should be similar though. If salmon with black bean sauce is new to you too, why not try making this at home? It's pretty quick and easy, and most importantly, it's delicious served with white rice. I pan-fried the salmon, but you could easily steam of bake it in the oven for a healthier alternative.

 
Salmon with Black Bean Sauce

Ingredients

2x salmon fillets - about 450g / 1 lb
Salt
Vegetable oil

Sauce:
3 cloves garlic, chopped
1 inch ginger, grated
2 tbsp fermented black beans, chopped
1-2 bird's eye chillies, chopped (optional)
1 tbsp chinese cooking wine
2-3 tsp sugar
Dash of pepper
1 tsp soy sauce
1/2 tsp Cheong Chan brand thick caramel
1/4 tsp sesame oil
1/4 cup water

Cornflour solution:
1 tsp cornflour mixed with 1 tbsp water

Garnish:
Chopped spring onions
Sliced red chillies

Method

  1. Prepare the sauce first. Heat up a small frying pan with 1/2 tbsp vegetable oil. Add garlic, ginger, black beans and chillies. Fry for 1-2 minutes until fragrant.
  2. Add the rest of the sauce ingredients and bring to a boil. Simmer for 1-2 minutes, then add cornflour solution to thicken the sauce. Stir until it comes back to the boil. Turn off heat and keep warm.
  3. Clean the salmon fillets and pat dry with paper towel. Rub a little salt over the fillets. Heat up vegetable oil in a clean non-stick pan and fry for about 3 minutes each side or until just cooked. Transfer onto a serving plate and pour the black bean sauce over it. Garnish with chopped spring onions and chillies if desired. Serve hot with steamed jasmine rice.
Note: For the salmon fillets, you can choose to steam or bake them instead. Place the fish in aluminium foil and top with the cooked black bean sauce. Wrap in the foil, then bake in preheated oven at 200C/400F for 12-15 minutes until just cooked.
 
reade more... Résuméabuiyad

Exploring China – A Culinary Adventure (DVD REVIEW and GIVEAWAY - CLOSED)

I'm thrilled to be writing a post (sponsored by Nuffnang) reviewing the newly released DVD, SBS Cooking Titles - "Exploring China - A Culinary Adventure", featuring Ken Hom and Ching-He Huang. SBS is my go-to for all foodie programs, with my favourite being Food Safari. Showcasing the best in local & international cuisines, SBS is home to a who's who of the food scene – along with Luke Nguyen, Peter Kuruvita, Maeve O'Meara, Tetsuya, Matthew Evans, Adriano Zumbo and many more.  Ken Hom is just one of the SBS chefs and personalities whose wonderful shows are available on DVD. Click here to watch the trailer
 

"Exploring China" is a new series which was aired on SBS early this year, and comprises four episodes where Ken and Ching cook their way across China in a visually rich culinary journey. If you missed the premiere of this new series, don't worry because you can now get them on DVD - all four episodes in one! Read on to find out how to win one of these!
 
Ken Hom is regarded as the godfather of Chinese cuisine and is also one of the world's leading authorities on Chinese cookery. He is also known as the man who "introduced the wok to the West". A visit to his website will show that he's a prolific producer of cook books and with a slew of TV series, there is no doubt that he makes the perfect gastronomic guide.
 
Ching is a self-taught cook of Taiwanese descent and is based in the UK. She cooks with a conscience with an ethos for sustainability, and has already starred in three popular TV series. She is also the author of five best-selling cookbooks.

In each of the four episodes (running time of 59 minutes each), Ken and Ching travel across the vast regions of China, covering Beijing, Chengdu, Kashgar and Yunnan, and the Cantonese region of Guangzhou as well as Taiwan. Their epic journey uncovers every aspect of gastronomy and culinary delight you can think of, and gives an insight to how the country's rich historical background has influenced the local culture and cuisine.

Each episode provides a close look at the local food scene (street food and markets), agricultural landscapes, ancient history and family values and traditions. When one thinks of China, dishes like sweet and sour pork and dumplings quickly come to mind. This series will open your eyes to the diverse cuisine that is partially attributable to the myriad of ethnic minorities in China, where they form about ten percent of the local population. I was particularly fascinated by the episode on Kashgar, an ethnically divided city where there is a striking contrast between the modern "new city" and the ancient "old city". Kashgar is home to Uyghurs, a Turkic-speaking Muslim community, and it was fascinating to see a different side of China, especially when you don't expect to see people making naan bread in a tandoor oven on the street. Ken attempted to make his version of a popular Uyghur dish called pollo, a rice pilaf with raisins and nuts which looked delicious, like a Spanish paella.

It was interesting to see how noodles (of all sorts) were still being made using traditional methods. The local women painstakingly knead the dough, roll, pull, twist and cut these noodles so perfectly like clockwork, I would imagine it took them years of practice to master such a skillful art. It's always funny to watch Ken and Ching try their hand making them, which usually ended up with a less than perfect result, much to everyone's amusement.

We also see Ken and Ching visiting the homes of some of the local families, and it brings us straight to the kitchen where all the action is. From what I observe, Ching is a great cook and pretty handy with the wok (considering how petite she is) and often puts her own spin on the local cuisine. In small villages and towns where the food and cultural heritage is closely guarded, Ching sometimes finds it hard to please the locals, especially when cooking in another woman's kitchen. It was entertaining to watch how she tries to replicate some of the local dishes with a few variations, much to the faint displeasure of the older grannies and aunties who probably think that one should stick to the original recipe instead. However, the people in this show are real, the stories they tell are real, the food is authentic, and what you see is what you get. If you've ever wondered what authentic Mapo Tofu is like (since there are many versions of it nowadays), you'll find it in the "Chengdu" episode, along with other mouth-numbing Szechuan dishes. You will see a lot of "wok hei" (meaning "breath of the wok") happening throughout the programme, which must explain why all these dishes come out looking mouthwateringly delicious.

The series is not just an exciting food odyssey, but it is also an emotional homecoming, a cultural adventure, and an anthropological and historical road trip. I imagine that even a non-foodie would enjoy it for the heart-warming stories, great travel and educational experience. It was both entertaining and an eye-opener for me and I highly recommend it to anyone who loves food, travel and culture. The DVDs are available at Dymocks & Sanity stores nationwide (RRP A$29.95). If you are a fan of the SBS Food series like me, you can view the entire SBS Food DVD range at www.madman.com.au/sbsfood, and find out how you can enter to win the entire collection.
 
******************************************** 
 
GIVEAWAY
 
I have 15 copies of "Exploring China - A Culinary Adventure"  DVDs to give away!!
 
For your chance to WIN one of these, simply leave your comment on this post with your answer to the following question:
 
Why would you love to watch "Exploring China - A Culinary Adventure"?

This giveaway is open to Australian residents only. This giveaway commences 9:00 am AEDST on 14/3/13 and ends 5:00 pm AEDST on 22/3/13. Good luck!
 
 
reade more... Résuméabuiyad

Deep-fried Crumbed Oyster Mushrooms

 
A few weeks ago, I posted a recipe for Mutter Paneer on my blog, and if you saw the last photo in the post, you would have noticed a plate of unidentified crumbed stuff next to the mutter paneer. Well, I can now reveal that the foreign object that was the subject of curiosity was really crumbed oyster mushrooms! Deep-fried curry-crumbed oyster mushrooms, to be exact. And the things you learn about oyster mushrooms when you're trying to find some inspiration to write about them. Did you know that oyster mushrooms may be considered a medicinal mushroom since it contains statins which work to reduce bad cholesterol? Wow, that puts eating deep-fried oyster mushrooms into perspective. More for me please! The latin name for oyster mushroom is Pleurotus ostreatuswhich literally means "sideways oyster", and refers to the oyster-like shape of the mushroom, plus the fact that the stem grows sideways relative to the cap.


These crumbed fan-shaped mushrooms are crispy with a hint of curry flavour, and are just great to snack on. Alternatively, you could use fresh button mushrooms instead, or substitute the curry powder with herbs or other spices (e.g. cajun seasoning would work well too). As the mushrooms don't take long to cook, making this is fairly quick and easy. Preparation is simple - dredge, dip, dunk and deep-fry for a couple of minutes, and you'll know it's ready when you can feel the crunch of the crumb against the spatula. Serve with sweet chilli sauce or mayonnaise if you like.

Crumbed Oyster Mushrooms

Ingredients

1 tray (about 125g / 4oz) oyster mushrooms
1/4 cup plain flour
2 eggs, beaten with 2 tbsp water
3/4 cup breadcrumbs
1/2 tbsp curry powder
1/2 tsp chicken stock powder
1/4 tsp salt
Dash of pepper
Vegetable oil for deep-frying

Method

  1. Clean the mushrooms by gently wiping them with a moist kitchen towel.
  2. Place the flour and beaten egg in 2 separate shallow dishes.
  3. Combine breadcrumbs, curry powder, chicken stock powder, salt and pepper and mix well.
  4. Heat the vegetable oil in a wok or pan on medium-high heat until hot.
  5. Dredge each mushroom in the flour, shake off excess, then into the egg and followed by the breadcrumb mix. Set aside on a plate.
  6. When the oil is hot, fry the coated mushrooms in batches until golden brown and crisp. Remove and drain on kitchen paper. Serve on its own or with a sweet chilli sauce.


reade more... Résuméabuiyad

Malaysian Deep-fried Curry Puffs


I made these deep-fried curry puffs over the weekend when we had friends over for lunch (I figured just serving chicken rice might not be enough). As usual, I posted photos of these on facebook and a friend commented that it was his favourite. Actually, he thought that these were "gujia", which I later found out through Dr Google that it was a type of sweet Indian (Rajasthani, to be specific) deep-fried pastry filled with nuts, dried fruit or coconut. Mmm...this sounds like something right up my alley (and something for me to experiment with next!). 

In fact, if you think about it (or do a bit of research), there are many versions of these pastries around the world, like empanadas for example. The name "empanada" comes from the Spanish verb empanar, meaning to wrap or coat in bread. Empanadas, which are prevalent in Latin America, are pastry turnovers filled with a variety of savoury (or sometimes sweet) ingredients. The variant of these stuffed pastries in Indonesia are called "pastel". Calzone's another one, though probably a larger version of it. Whether you call them empanadas, hand pies, pocket pies, pasties, puffs or the like, they are the perfect snack food that can be both savoury or sweet. Why, you could even have them all for breakfast, lunch, afternoon tea, dinner and dessert! A round-the-clock empanada party - now that's an idea.

With that said, my all-time favourite has to be these Malaysian-style curry puffs, deep-fried to perfection to attain those light, crisp and flaky layers of pastry, enclosing a spicy and aromatic filling of curried chicken and potatoes. Nobody can resist a good curry puff and whether baked or fried, they are always a hit. These would be great for serving up at parties or picnics. Otherwise, simply have them for morning or afternoon tea, or really, just any time of the day.


Malaysian Deep-fried Curry Puffs
(makes about 15)

Curry puff filling:

2 cups cubed (5 mm) potatoes
2 tbsp vegetable oil
2 inch cinnamon stick
3 cloves
1/2 star anise
1 large onion, finely chopped with a blender
2 cloves garlic, chopped
2 tbsp Malaysian curry powder, mixed with 3 tbsp water to form a paste
2-3 tsp chilli powder/chilli flakes (add this to the curry powder)
250g chicken, roughly chopped/minced
1 sprig curry leaves
1/2 tbsp fish sauce
1 tsp soy sauce
1/2 tbsp sugar (or to taste)
1 tbsp ketchup
1/2 cup water
Salt, to taste

Pastry:

2  2/3 cup (400g) plain flour
1/2 tsp salt
3/4 cup (180g) butter, cut into tiny cubes
1/2 cup cold water (approx)

Method

You will need to prepare the curry puff filling a day ahead.

Curry puff filling:

Place cubed potatoes in a microwave safe bowl with 3 tbsp hot water, and cover loosely with a lid. Microwave on high for 2-3 minutes until cooked, stirring once in between. When cooked, drain off the excess liquid and set aside.

Heat the vegetable oil in a wok. Add cinnamon stick, cloves, star anise, onions and garlic. Fry for 2-3 minutes until onions are translucent, then add curry powder and chilli paste mixrture. Fry for 2-3 minutes until the oil separates. Add chicken and fry until cooked. Add curry leaves, the cooked potatoes, fish sauce, soy sauce, sugar and ketchup. Toss to mix evenly. Add 1/2 cup water and mix again. Bring to a boil and let it simmer until potatoes are soft and has absorbed all the flavours. Add salt to taste. Fry until the curry is thick and almost dry. Dish out and let it cool before refrigerating.

Making the pastry and puffs:

Place flour and salt in a large bowl and mix well. Add cubed butter and rub into the flour until it resembles breadcrumbs. Alternatively, use a pastry cutter or food processor to do this. Drizzle water into the mixture and stir around with the round tipped knife until the dough starts to come together. Bring the dough together with your hands, adding a little more water if it's too dry and crumbly. Do not overknead the dough as it may cause the pastry to be "tough/chewy" when fried. Place the ball of dough on a floured surface and roll out into a disc. Use a round cutter and cut out small discs (makes about 15 pieces). Roll out each disc into a flat oval shape (about 1/8 inch thick). Place 2 tbsp of curry filling in the centre, fold in half and pinch the edges to enclose. Use thumb and forefinger to pinch the edges to form fluted edges.

Heat sufficient oil in a wok/pan for deep-frying. Fry the curry puffs in batches on medium-high heat for 5-7 minutes until golden brown. Move the curry puffs around in the oil so that they brown evenly all over. Remove and drain and kitchen paper. Caution: Filling is hot! Enjoy!

Note: Alternatively, you can bake these in the oven instead of deep-frying. Preheat oven to 200C (400F). Place curry puffs on a lined baking tray and brush the tops with egg wash (beaten egg + 1 tbsp water). Bake for 20 minutes or until lightly golden and crisp.



reade more... Résuméabuiyad

Mutter Paneer (Peas and Cottage Cheese)


Mutter paneer is a popular North Indian dish consisting of paneer (cottage cheese) and peas (mutter) cooked in a spiced tomato-based gravy, and it tastes fantastic especially when eaten with boiled basmati rice. I enjoy the paneer for its "bitey" texture that can be described as almost "meaty", and all of this combined together makes a delicious meal that can be quite addictive. I must admit I wasn't really a fan of paneer nor vegetarian food right up till middle of last year when I had some friends visiting from India and we frequented a few Indian restaurants. What an eye-opener it was for me. Indian vegetarian cuisine wasn't just all about peas and lentils, but very much about spices, colours, textures and exotic flavours.
 
I first tried mutter paneer at Curry at the Rocks, and became an instant fan. I put it on my to-cook list immediately, and was thrilled at how my recipe for this turned out. It tasted really authentic (which Mr G concurred with), as it had the perfect balance of flavours and just the right amount of spices. This is a versatile dish in that you can adjust the quantities of spices used according to personal preference. And if peas or paneer aren't your thing, you can omit them or substitute with fresh button mushrooms if you like.


Mutter Paneer (Peas and Cottage Cheese)

Ingredients

200g paneer cheese, cubed
1 tbsp ghee

3 tbsp vegetable oil
1 onion, finely chopped
1 1/2 tbsp chopped garlic
1 tbsp grated ginger
3 cloves
1 tsp cumin
1/4 tsp ground turmeric
1/2 tsp garam masala
1/2 tbsp chilli powder
400g canned diced tomatoes
1 cup water
1 cup peas
Pinch of asafoetida (optional)
1 tbsp dried fenugreek leaves (kasuri methi)
Salt, to taste
3 tbsp cream

Method
 
  1. Heat ghee in a small non-stick pan and fry the paneer cubes until lightly browned. Remove and set aside.
  2. Heat oil in a medium pot and add onions, garlic, ginger, cloves, cumin, turmeric, garam masala and chilli powder. Fry for 3-5 minutes until fragrant.
  3. Add diced tomatoes and water. Bring to a boil and simmer, covered, for 20 minutes. Add asafoetida and fenugreek leaves.
  4. Add the fried paneer and peas and bring to a boil again. Simmer for 10 minutes until peas are tender and gravy is slightly reduced. Add salt to taste. Stir in the cream and it's ready! Serve with boiled basmati rice.


reade more... Résuméabuiyad