Pages

.

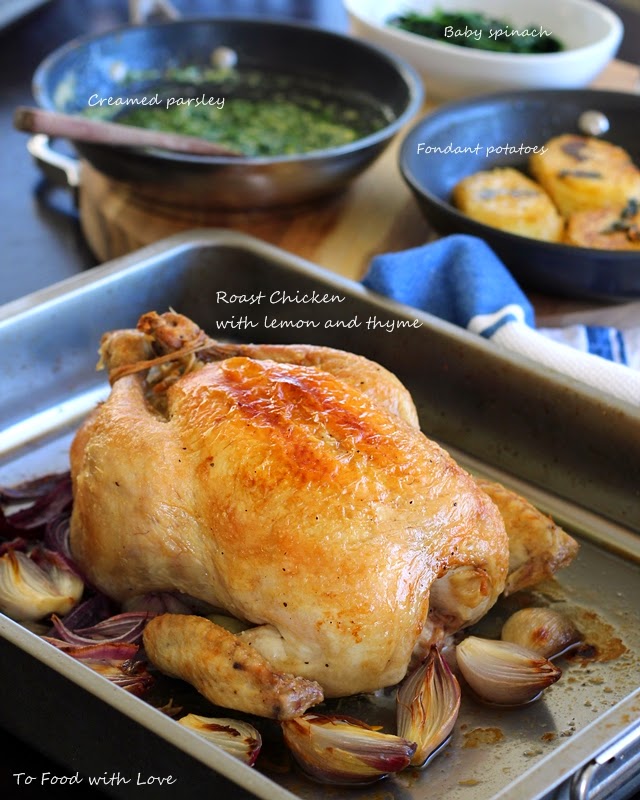
Roast Chicken with Creamy Parsley and Fondant Potatoes


I purchased Gary Mehigan's new book "Favourites" a couple of weeks ago during his book-signing at Costco. I love that he has put together his all-time favourite recipes in one book, because honestly, there are way too many recipes out there that I would love to try. I may be dreaming of cooking chilli crab one minute and baking kouign amann the next, and sometimes I just end up making more that I can fit leftovers in the fridge.

So far, I've attempted two recipes from the book. One is the XO sauce, which is utterly, utterly delicious. I was a little skeptical about making a big batch of it, but I'm so glad I did because it means I can eat more of it with more of everything! The other recipe that tempted my tastebuds was the Creamy Parsley and Nutmeg, which I found a little unusual yet intriguing with the combination of parsley and cream. A little like creamed spinach, but with a herby taste, I suppose? It turned out to be one of the most amazing things I've ever made with parsley. It's luxuriously rich and creamy, and the added sweetness from the shallots makes this so tasty that I couldn't stop eating it out of the pan (I was just checking for seasoning, really). In his book, Gary recommends serving it with a roast chook or rib of beef. I've been cooking a lot of red meat lately, specifically pork belly and pork shoulder (see my previous post on Korean Pulled Pork Burgers), so I settled on a recipe for roast chicken from Gary's other book (under Lantern Cookery Classics). The recipe is also available on the Penguin/Lantern website.

Creamy parsley and nutmeg
It's wonderful how the simplest recipe for roast chicken can yield the most satisfying results. A testament to how good it is, is when my 6-year old takes a bite and her face just lights up as she goes "Mmmmm..." before she reaches for another mouthful. It's really just chicken stuffed with thyme, garlic and lemon, but I guess it's the technique and method of cooking it that makes the difference. Also important is to make sure you use good quality, corn-fed, free-range chicken. I find that La Ionica (chemical and hormone free) chickens are really good too, which we always use when making our best ever Hainanese chicken rice.

Fondant potatoes
I also made the buttery, thyme-scented fondant potatoes which were lovely and luscious. With the butter left in the pan, I added some of it to the creamy parsley, and used the rest for sautéing some baby spinach with garlic and shallots.

To make the creamy parsley, you will need 4 bunches of parsley (continental flat-leaf, or mixed with curly parsley). Pick the leaves and boil them in water for 2-3 minutes until softened. Drain and squeeze out all the water, then chop finely. Heat a pan with some olive oil and saute some shallots and garlic, season with salt and pepper. Then pour in some thickened cream (about 2 cups) and simmer until reduced by half. Add in the parsley, followed by some grated nutmeg. Simmer briefly until most of the cream is absorbed. Add more seasoning if necessary. Serve immediately.


Roast chicken with fondant potato
Adapted from Lantern Cookery Classics: Gary Mehigan

Ingredients
1 × 1.6 kg free-range chicken
1 lemon, quartered
2 sprigs thyme
2 cloves garlic, peeled
table salt
1½ tablespoons olive oil
5 small golden shallots, peeled
splash of dry white wine
100ml (about 1/2 cup) chicken stock

Fondant potato
170 g unsalted butter, chopped
4 large desiree potatoes, cut into 7 cm × 5 cm × 1 cm-thick rectangles

Method


  1. Preheat a fan-forced oven to 180°C/350°F  (200°C/400°F conventional).
  2. To remove the wishbone from the chicken, lift the neck skin to reveal the breast. Scrape the point of a small sharp knife down the wishbone (it looks like an upside-down ‘V’ shape). Put your fingers behind the bone and tug to remove it. Stuff the cavity with the lemon, thyme and 1 clove of the garlic. Truss the chicken with kitchen twine.
  3. Heat a flameproof roasting pan over high heat. Season the chicken with salt and pour the olive oil into the pan. Brown the chicken lightly on all sides, starting with one leg, turning it over to brown the other leg, then the breast. Turn the chicken onto its back, then roast for 20 minutes.
  4. Baste the chicken with the pan juices. Add the shallots and remaining garlic and roast for a further 40 minutes or until the chicken is cooked. To test, pierce the thigh at the thickest part – the juices should run clear. Transfer the chicken to a large plate and rest for 10 minutes.
  5. Meanwhile, to make the fondant potato, melt the butter in a deep heavy-based frying pan over medium heat. As the butter begins to bubble, add the potato and thyme in layers (I made two layers). Reduce the heat to low, then cook for 10 minutes or until the potato is golden. Turn the potato over and cook for another 10 minutes or until golden. Add the water; the butter will foam and darken slightly. Baste the potato well and continue to cook for another 10 minutes or until tender. Remove from the heat, then leave to stand for 5 minutes. Season with salt. Set aside and keep warm.
  6. Place the roasting pan of cooking juices over low heat, then crush the roasted garlic and shallots into the pan with the back of a fork. Add the wine and stock and simmer over low heat for 2 minutes. Set aside.
  7. Cut chicken into quarters and serve with creamy parsley, gravy and fondant potatoes.


reade more... Résuméabuiyad

Pulled Pork Burger with Spicy Mayo and Korean Slaw

 
This started with a craving for a Korean-style slaw with a spicy gochujang dressing. Gochujang (as many of you might be familiar with) is a Korean red pepper paste that are sold in tubs and come in varying degrees of "heat". You can usually tell by the number of chillies on the label. I chose one with 3 chillies I think, as these things can pack quite a punch in terms of heat and intensity of flavour. So, I was wondering what would go with Korean slaw, and thought of bo ssam (Korean boiled pork belly with lettuce wraps). I found David Chang's bo ssam recipe using pork shoulder/butt and decided to turn that into a pulled pork burger with Korean slaw. And what's a burger without mayonnaise, especially a spicy gochujang mayonnaise? And to top it off (no pun intended), I baked these wonderful buttermilk buns (or brioche) which were moist, tender and didn't fall apart like most buns do when you're halfway through a burger.
 
 
Korean food doesn't just stop at Korean Fried Chicken and Korean hotpot. Give these a go at your next party. They don't require much preparation (the buns are relatively easy too) and will feed an army or two. Moreover, you can make the slaw one day ahead, which allows the cabbage to absorb the tangy, spicy and sweet flavours from the dressing. Oh, and that slow-roasted pork? Amazing.


Pulled Pork Recipe
Serves 12-16 | Prep 20mins | Cook 6 hours | Prep one day ahead
 
2kg (4-5 pounds) bone-in pork shoulder or pork butt, skin-on
1/2 cup caster sugar (granulated sugar)
1/4 cup plus 1 teaspoon coarse salt
1/4 cup light-brown sugar
 
Using a sharp knife, score the pork skin at 1cm intervals. Place pork in a large bowl or roasting pan. In a medium bowl, mix together granulated sugar and 1/4 cup salt. Rub sugar mixture all over pork and cover bowl with plastic wrap; transfer to refrigerator for at least 6 hours and up to overnight.
 
Preheat oven to 160C (300F).
 
Transfer pork to a large roasting pan, skin-side up, discarding any accumulated juices (or drain accumulated juices from roasting pan that pork is in). Brush off any remaining salt/sugar from the skin and pat dry with a paper towel. Transfer roasting pan to oven and cook, basting the meat every hour with rendered fat in roasting pan. After 2 hours, carefully remove crackling from the pork and place on a baking tray. Continue roasting the pork and crackling for another 3-4 hours until meat is tender and easily shredded with a fork.
 
Meanwhile, in a small bowl, mix together remaining 1 teaspoon of salt and brown sugar. Rub mixture all over pork.
 
Increase oven temperature to 250C (500F). Return pork to oven until sugar has melted into a crisp crust, 10 to 15 minutes. Remove and cover pan with a foil to keep warm. To serve, use two forks and pull the pork into shreds, mixing them with the rendered fat in the pan. Enjoy on a buttermilk (brioche) bun with Korean slaw and gochujang mayo (see below for recipe). For a "healthier" alternative, serve in a lettuce wrap using Cos/Romaine lettuce, with ginger-scallion sauce, ssamjang, kimchi and Korean slaw.
 
Korean Slaw
Serves 12-16 | Prep 20 mins | Make one day ahead
 
1/4 small savoy cabbage, finely shredded
1/4 small red cabbage, finely shredded
1 large carrot, peeled and julienned
1 small red onion, sliced thinly
2-3 stalks scallions, sliced thinly
 
Slaw dressing (mixed well in a bowl):
7 tablespoons cider vinegar
3 tablespoons gochujang
4 1/2 tablespoons sesame oil
2 tablespoons brown sugar
1 1/2 tablespoons honey
1 tablespoon soy sauce
1 tablespoon finely chopped garlic
2 tablespoon toasted sesame seeds
 
I like to prepare this one day ahead and refrigerate it overnight. This allows the cabbage to absorb all those flavours from dressing. Whisk together the ingredients for the dressing. Place the cabbage, carrots, onions and scallions in a large bowl and gradually add the dressing, tossing to ensure it's evenly mixed through. Cover with clingwrap and refrigerate overnight until ready to serve.
 
Gochujang mayonnaise
 
3/4 cup gochujang (Korean red pepper paste)
1 cup + 2 tablespoons Japanese/Korean mayonnaise
2 tablespoons ketchup
 
Combine and mix well in a bowl. Set aside until ready to serve with burgers.
 
Buttermilk buns
Serves 12-16 | Prep 20 mins | Cook 30 mins
100ml milk
28g active yeast (10g. dried)
90g sugar
2 free range eggs
840g strong bread flour
70g butter, softened at room temperature
400ml buttermilk
14g Malden sea salt
80ml vegetable oil
 
Glaze:
1 egg yolk + 1/2 tbsp milk
Sesame seeds (black/white)
Sea salt
 
Prepare this while the pork is cooking in the oven. In the bowl of a stand-mixer, add salt and sugar followed by flour and yeast. Mix using a dough hook on medium speed. Combine the milk, buttermilk, eggs and oil then add to the bowl, still on medium speed. Once a dough forms, add the butter in small knobs and knead until gluten is formed (about 10 minutes). Sprinkle a bit of flour if it's still too sticky. Prove in a bowl covered by cling film or a damp cloth in a warm place. Once it doubles in size, bring back down making sure as much of the air is removed from the dough, then form round buns and prove again. When ready, glaze with egg yolk and sprinkle with sesame seeds and sea salt. Bake at 160C (300F) for 25-30 minutes until crust is richly brown and glossy. When done, remove from the oven and leave to cool before cutting.
 
Assemble the burgers!
Slice the buns in half, spread with butter and toast them buttered side down on a hot grill pan.
Spread some gochujang mayonnaise on the bottom half of the bun, followed by some pulled pork, bits of crackling. Top with a handful of Korean slaw and cover with the other half of the bun. Add more mayo if desired. Serve immediately and enjoy!
 
Nice Buns!


More spicy mayo for more oomph!


reade more... Résuméabuiyad

Cinnamon Rolls with Cream Cheese Frosting


Breads are actually pretty easy to make. You mostly let the machine do the kneading, then leave the dough to rise while you go about doing your chores, updating your Facebook status and checking out what's happening on Twitter, enjoy a cuppa etc. Then, it's time to roll out the dough and shape them into whatever you like, which doesn't really matter because after you let them rise again, they somehow bounce back into shape. I hardly make breads because I'd have to make a big batch, and they are best eaten on the same day.
 
These cinnamon rolls however, can be kept overnight refrigerated, about two days. All it takes is a few seconds in the microwave, and you've got fresh, soft and tasty cinnamon rolls all over again. I was never a big fan of cinnamon rolls as I find them a little too sweet and sticky for my liking. These, on the other hand, are not sticky nor overly sweet. It's the combination of that cream cheese frosting and the almost-savoury cinnamon filling that make this so addictive, and yet not too rich that you'd stop at one.


The kids came back from school one day saying that they had super-awesome cinnamon rolls in school, and that gave me the perfect excuse to make these. As they preferred their rolls plain, I skipped the frosting on half the batch. I must say, I was pleased with how they turned out. If you leave the frosting to set on the rolls for a few minutes, it leaves a thin crunchy layer on top, like Krispy Kreme frosting. The rolls rose beautifully despite the fact that it was a cold winter's day, and it helped to place the dough under the cooker hood lights for some heat.

The kids enjoyed the rolls although they still preferred the one from school, because those were sweet and sticky! Looks like I'll be making more cinnamon rolls this weekend, and I have just the perfect recipe in mind!


Cinnamon Rolls with Cream Cheese Frosting

Ingredients

3/4 cup milk, warm (slightly above body temperature)
2 tbsp sugar
2 tsp dry yeast
1 egg, lightly beaten
1/2 tsp salt
2 1/4 cup plain flour, plus extra
1/4 cup potato flour
1/3 cup unsalted butter, softened

Filling:
1/2 cup brown sugar, firmly packed
1 tbsp ground cinnamon
1 tbsp plain flour
1/4 cup butter, softened

Frosting:
3 tbsp cream cheese
3 tbsp butter, softened
2/3 cup icing sugar
1 tsp milk (approx.)
1/2 tsp vanilla extract
1/8 tsp salt

Method

Measure out the milk in a measuring cup and heat up in the microwave for 30 seconds until warm. Mix through 2 tbsp sugar and the yeast. Set aside for 15 minutes until it turns frothy and nearly doubled in height.

In the bowl of an electric mixer, pour in the yeast mixture followed by the egg, salt, plain and potato flours. Attach a dough hook and mix on low speed for 2 minutes until it's mixed through and almost coming together. Add the softened butter and mix on medium speed for about 10 minutes until the dough is elastic and smooth. Add a few extra tablespoons of plain flour during kneading if the dough looks sticky.

Turn out the dough into a large lightly greased bowl. Cover with a cloth or clingwrap and set aside in a warm place (like underneath the warm lights of your cooker hood). Let it rise for about 1-2 hours until doubled in size.

Meanwhile, mix the brown sugar, cinnamon and plain flour for the filling.

Lightly grease a large baking pan (or two small ones).

When the dough is ready, punch it down. Roll it out onto a lightly floured surface until about 1/4 inch thick, large rectangle. The short side of the rectangle should be parallel to you.

Use your fingers to spread the softened butter all over the dough, to within 1/2 inch of the border. Sprinkle and spread the filling mixture all over the butter. Then starting from the long side furthest from you, roll it up tightly and seal the edge with a little water.

Use a serrated knife to cut into 16 slices (about 1 inch thick). Arrange in the baking pans, spacing them out about 3/4 inch apart. Cover with clingwrap and set aside for an hour or so until it has doubled in size. Remove clingwrap.

Preheat oven to 180C (350F). Bake the rolls in the oven for 25 minutes or until lightly browned.

Meanwhile, beat the frosting ingredients together, adding the milk last to thin it slightly to a spreadable consistency.

Remove rolls from the oven, and spread some of the frosting over each one. Let it sit for 5 minutes, then drizzle more frosting on top. Serve warm. Leftovers can be refrigerated, and heated up the next day in the microwave for 15-20 seconds.


reade more... Résuméabuiyad

Pad Thai with Prawn and Pork


It's hard to find a good pad thai in Sydney with the exception of Thai La Ong where I had the most delicious pad thai with sliced pork. I've only been there once quite a few years ago, but I vividly remember the pad thai which was moist, saucy, and bursting with flavours of tamarind and the charry smokiness from the wok. Nothing like those pale-looking, bland and boring pad thais some other restaurants serve. That was my benchmark for pad thai, and today, I've got the perfect recipe that I hope you will enjoy. The only thing was that I couldn't find thin pad thai rice sticks at the supermarket. So I had to make do with the broader version which was about 1 cm wide. When the craving hits, you just have to make do with what's available! Continue reading to find the recipe.


Pad Thai
Serves 1 | Prep time: 30 mins | Cook time: 10 mins

Ingredients

60g thin pad thai rice sticks
Vegetable oil
1/4 large red onion, sliced
1 eggs
2 tsp chopped preserved radish/turnip
5 prawns, shelled with tail on
80g pork belly, skin-off, thinly sliced and marinated with 1/2 tsp fish sauce, 1/2 tsp sugar, 1/4 tsp cornflour
1/4 cup diced firm tofu

Sauce:
1 tbsp (15g) palm sugar, chopped
1 1/2 tbsp tomato sauce
1/4 cup tamarind paste / puree
1/4 cup water
1/4 tsp salt

Handful of garlic chives, cut into 2 inch lengths
1 cup bean sprouts, rinsed and tailed

Garnish:
Garlic chives (see above)
1 tsp dried roasted red chilli powder/flakes
1 tbsp crushed roasted peanuts
Lemon/lime wedges

Method

Preparation:
  1. Marinate the pork belly slices.
  2. Soak the rice sticks in water (not hot) for 30-60 minutes until soft and pliable. Drain and set aside.
  3. Place sauce ingredients in a saucepan and bring to a simmer until sugar is dissolved. Turn off heat.
Cooking:

  1. Heat 1 tbsp oil in a large wok. Add 2 tbsp of red onions and fry for 1 minute. Crack 1 egg into a bowl and lightly beat. Pour over the onions and scramble the eggs. Transfer to a plate and set aside.
  2. Add 2 tbsp oil into the work and add the remainder red onions, followed by 2 tsp preserved radish. Then add pork and prawns and fry until cooked. Add the tofu.
  3. Toss in the noodles and fry briskly on high heat. Add the eggs from Step 1. Pour the sauce around the edge of the wok and toss with the noodles for 1 minute until the sauce is almost absorbed. However, there should be some liquid left to keep the noodles moist. Toss in half of the bean sprouts and garlic chives for 20 seconds. Turn off heat and transfer noodles to a plate.
  4. Garnish with bean sprouts, chives, chilli powder/flakes, crushed peanuts and lemon wedges. Serve immediately and enjoy the best pad thai! 


reade more... Résuméabuiyad

Chicken Cacciatore with Pappardelle

 
Chicken Cacciatore is a simple and delicious Italian-style chicken stew made with tomatoes and white wine. "Cacciatore" means "hunter" in Italian, so this is also known as hunter's stew. I first made this a year ago when my friend Tracey shared her recipe with me. I think she visited some cooking school on her Italian holiday and kept raving to me about chicken cacciatore. Get hold of fresh pappardelle if you can (here, I've used cracked black pepper and basil pappardelle), but otherwise, any of your favourite pasta will work too. You can omit the red peppers if you like, but I find that it lends a lovely sweetness and flavour to the dish. This is ideal for those big family dinners, where you can cook up a big batch, let it simmer on the stove while you sit, relax and have a sip or two of wine. That's stress-free cooking for you. Read on to get the recipe.


Chicken Cacciatore
Serves 4 | Prep time: 15 mins | Cook time: 50 mins

Ingredients

1.2kg (2 lb) chicken thigh cutlets, skin on*
2 tbsp extra virgin olive oil
1 onion, diced
4 cloves garlic, minced
100g pancetta, diced
2 bay leaves
1 small red pepper, sliced (optional)
2 sprigs thyme (optional)
1 tbsp chopped fresh rosemary
1 cup dry white wine
1 can (400g / 14oz) diced tomatoes
Salt and freshly ground black pepper
2-3 tsp chilli flakes (optional)
2 tbsp butter**

600g fresh pappardelle

Method

  1. Heat olive oil in a large pan and place chicken skin-side down in the pan. Shake the pan occasionally to prevent chicken from sticking to the pan. Brown the chicken 5 minutes each side. Remove chicken from pan and transfer to a plate. Set aside.
  2. Add the onion and garlic to the remaining oil in the pan and sauté for 5 minutes until lightly browned. Add the pancetta, red pepper, bay leaves, thyme and rosemary. Saute for for 2 minutes.
  3. Pour in the wine, bring to a boil and simmer until it's reduced to half. Return the chicken to the pan and add tomatoes and chilli flakes (if desired). Season with salt and pepper. Bring to a boil, cover and simmer on medium heat for 30 minutes, turning the chicken once halfway through. Stir in the butter towards the end and simmer for 2 minutes. Before serving, remove the bay leaves and thyme stalks.
  4. Meanwhile, cook the pasta in salted boiling water till al dente. Drain and place on serving plates. Ladle the chicken and sauce over the pasta and serve immediately.

Note:
* Chicken thigh cutlet comes with one bone still attached
** I've added in butter to help thicken the sauce a little


Served with black pepper and basil pappardelle


reade more... Résuméabuiyad

Mee Pok (Flat Egg Noodles) with Beef and Bittergourd


In all my years of eating and cooking, I have only recently embraced bittergourd into my cooking repertoire. I was visiting my mum and she was wondering what to do with the leftover roast pork she had in the fridge. She suggested doing a stir-fried bittergourd with roast pork dish, which I've heard of but never tried before. I can't remember if she ever cooked that during my childhood, but back then, I shunned anything that had bittergourd in it. I was a picky eater when I was young. Dare I admit that I never ate my veggies until I was in my late teens. Okay, my kids don't have to know this. Really.

Anyway, back to the bittergourd. I decided to use beef instead of roast pork in this dish, cooked with salted black beans. To make it a one-dish meal, I tossed it with some flat egg noodles (we call this Mee Pok in Singapore, though I'm not sure why) and added a splash of black vinegar, and it turned out to be a most slurp-worthy and delicious bowl of noodles.

Mee Pok (Flat Egg Noodles) with Beef and Bittergourd
(serves 2-3)

Ingredients

1 medium-sized bittergourd
Vegetable oil for frying
200g beef, thinly sliced
1 tbsp black beans, minced to a paste
2 tsp salted soy beans, minced to a paste
1 tbsp chopped garlic
1 tbsp chopped red chillies (optional)
1 tbsp Chinkiang black vinegar (or to taste)
Salt and pepper to taste
Chopped scallions/spring onions
Sriracha or chilli sauce (optional)

300g flat egg noodles ("mee pok"), cooked in boiling water until al dente

Seasoning (combine in a bowl):
1 1/2 tbsp oyster sauce
1 tbsp light soy sauce
2 tsp Cheong Chan thick caramel
1 tbsp chinese cooking wine
1 tsp sesame oil
1/2 tbsp sugar
1/2 tsp chicken stock powder
4 tbsp water

Beef marinade:
1/2 tbsp light soy sauce
Dash of black pepper
Pinch of salt and sugar
1 tsp cornflour
1/4 tsp baking soda
1 tsp water

Method

Cut bittergourd lengthwise into quarters. Remove the seeds and scrape off the spongy white part (as this is the bitter part). Slice into 6mm-thick pieces. Sprinkle with salt, set aside for 1/2 hour. Then squeeze out all the water. Rinse the bittergourd and drain well. Blanch in boiling water for 5 minutes until just tender but not too soft. Drain and rinse under cold running water. Set aside.

Combine beef with marinade. Set aside for 20 minutes.

Heat up 1 tbsp oil in a wok. Fry the beef on high heat for 3 minutes until almost cooked. Dish out and set aside.

Heat up 1 tbsp oil in the wok. Fry the minced black beans and soy beans, followed by the garlic and chillies. Add the bittergourd and fry for 1 minute. Push these to the side of the wok and add seasoning ingredients and bring to a boil on high heat. Add the beef and fry briskly to coat in the sauce. Toss the noodles in the wok and add a splash of black vinegar, more or less to taste. Add a dash of pepper, and salt to taste.  Dish out into individual serving plates and garnish with chopped scallions.  Serve immediately with  chilli sauced if desired.


reade more... Résuméabuiyad

Portuguese Chicken with Piri-piri Sauce


Piri-piri is a Swahili word for "pepper pepper", and is also known as African Bird's Eye chilli. It is the predominant ingredient in making piri-piri sauce - a tangy, garlicky, fiery hot chilli sauce that is popular in South Africa cuisine. If you didn't know already, piri-piri chicken (also known as Portuguese chicken) originated in Mozambique (some say Angola), which were former Portuguese colonies. Hence, the influence of spicy Portuguese cooking found its way into South African cuisine.

It's probably more accurate to refer to this dish as piri-piri chicken, rather than Portuguese Chicken. After all, it did not originate from Portugal. It's a bit like Hainanese Chicken Rice, which did not originate from Hainan Island in China, but is one of the national dishes of Singapore (next to Singapore Chilli Crab, I suppose?). Anyway, piri-piri sauce is a great way to dress up your next roast chicken, and tastes fantastic especially if you love chillies, lemon and garlic. Serve it with a salad and some hot chips/fries.


Portuguese Roast Chicken with Piri-piri Sauce
Adapted from BBC Food

Ingredients

1 whole chicken (about 1.2kg), butterflied (alternatively, use whole chicken legs)
Salt and freshly ground black pepper
For the piri-piri sauce:
6-12 fresh red chillies, depending on how hot you want it
1 tbsp minced garlic
1/2 tsp salt, or to taste
1 bay leaf
½ tsp oregano (optional)
½ tbsp paprika
100ml/3½fl oz olive oil
1 1/2 tbsp red wine vinegar
2 tbsp lemon juice
1 tbsp brown sugar

Method

To make the piri-piri sauce, boil the chillies in a pot of water for 3-5 minutes. Drain and roughly chop the chillies. Place the chillies, garlic, salt, bay leaf, oregano, paprika, olive oil and vinegar in a saucepan, and simmer for about 5 minutes. Stir in lemon juice and sugar to taste.

Allow the mixture to cool, then blend it to a purée in a jug blender or food processor. Store in a lidded container at room temperature.

Rub some salt and black pepper all over the butterflied chicken. Place the chicken in a sealable plastic bag. Add 2 tbsp of the piri-piri sauce, spreading it evenly over the chicken. Seal and marinate in the refrigerator for 4 hours or overnight.

Preheat the oven to 200C (400)F. Place the chicken in a roasting tray and roast in the oven for 45 minutes or until cooked. Baste the chicken with pan juices halfway through roasting.

Serve with extra piri-piri sauce, chips and salad. I made a simple pear and rocket salad with a lemon and olive oil dressing to go with it. Yum!
reade more... Résuméabuiyad