Pages

.

Easy No-Beat Red Velvet Cupcakes


With Valentine's Day just around the corner, one of the most popular cakes would be the Red Velvet - rich, red and luxurious and all that signifies romance. Bake some red velvet cupcakes for your loved ones this Valentine's Day. I've got the perfect recipe that's easy and super delicious - just whisk, mix and bake. Some of you might take a look at the recipe and think "Hmm....no butter in a cake?". This recipe uses oil instead, which makes it ultra soft and moist. The previous version of red velvet cake that I made used butter, and although it was delicious, it was relatively richer and denser, compared to this one which was light, moist, soft and fluffy. If you have to make red velvet cake, try this recipe first. It is so melt-in-your mouth heavenly good you'd fall in love with it.


Easy No-Beat Red Velvet Cupcakes
Adapted from Divascancook.com

Ingredients
2 cups all-purpose flour
1 teaspoon of baking soda
1 teaspoon of baking powder
1 teaspoon of salt
2 Tablespoons unsweetened, cocoa powder
1 1/2 cups sugar
1 cup vegetable oil or canola
2 eggs
1 cup buttermilk
2 teaspoon of vanilla extract
2 tbsp liquid red food colouring
1 teaspoon of white distilled vinegar
½ cup of prepared plain hot coffee

Instructions
  1. Preheat oven to 170C / 325F. Line muffin pans with paper cases.
  2. In a medium bowl, whisk together flour, baking soda, baking powder, cocoa powder and salt. Set aside.
  3. In a large bowl, combine the sugar and vegetable oil.
  4. Mix in the eggs, buttermilk, vanilla and red food coloring until combined.
  5. Stir in the coffee and white vinegar.
  6. Combine the wet ingredients with the dry ingredients a little at time, mixing after each addition, just until combined.
  7. Pour the batter evenly into each pan.
  8. Bake in the middle rack for 20-30 minutes, or until a toothpick inserted in center comes out clean.
  9. Transfer to a wire rack to cool completely.
  10. Frost the cake with cream cheese frosting.

For cream chesse frosting, please refer to recipe here.
reade more... Résuméabuiyad

Chinese Roast Pork (Siu Yuk)


There can never be too many recipes for chinese roast pork (or "siu yuk" as commonly known in Cantonese). Over the years, I have attempted various recipes and methods for achieving the perfect crackling - crispy and brittle enough that it doesn't break your teeth when you bite into it. It has always been a hit and miss for me. Either the skin doesn't fully crackle all over (leaving some parts soft and chewy), or the meat's dried out, or the crackling is burnt in some parts. But now, I have successfully made the almost-perfect roast pork, twice in a row. Woo-hoo! I must be doing something right there?


There's nothing particularly difficult about making roast pork (except the part where you have to prick a zillion holes in the skin). You just need the right ingredients, the right technique and the right tools. Someone gave us a pork-skin-pricking tool for Christmas two years ago, which you see below. Roast pork fanatics who make their own at home might have this tool, which is available in Malaysia and Singapore. I don't know what it's called, but it's made of wood with a bunch of super sharp needles at the end. If you don't have one, just use a sharp pointed knife to prick the skin, or simply score it (with a knife, of course) at 1/4 inch intervals. However, this special tool will yield the perfect crackling every time. If you have a metal meat tenderizer, that might actually work too!


This recipe has worked really well for me and my oven. Yes, my oven can be temperamental sometimes, especially when the heat doesn't distribute evenly. This time, I used fan-forced in first 50 minutes to achieve an evenly roasted golden crackling, and it worked! I then turned down the heat to let the pork continue cooking until tender. I also added a tray of water below the roasting rack to keep the meat from drying out in the oven. A brush of vinegar on the skin helps to attain a crispier crackling.

I found that it was not necessary to pour boiling water over the skin (to open up the pores). This step yielded a "harder" and crunchier skin. So my recipe only requires covering the raw pricked skin with plenty of salt, leave it to dry out in the fridge, and then brush off all the excess salt before roasting. The result was a much more brittle and crispy crackling. But then again, I bought the pork from a different shop, so maybe one pig was more thick-skinned than the other. I don't know, but it's still crackling, and crackling rocks!


Chinese Roast Pork (Siu Yuk)
Serves 8 | Prep 20 mins | Wait time 120 mins | Cook time 120 mins

Ingredients

1.3 kg (2.8 lbs) pork belly, skin on
1 tablespoon sea salt
1 tablespoon vinegar, for brushing

Marinade (mix well in a small bowl):
2 tsp five-spice powder
1 tablespoon sea salt (cooking salt)
1/4 tsp white pepper
1 tsp sugar
2 cubes red fermented beancurd
1 tsp vegetable oil

Method

  1. Rinse the pork under the tap and drip dry. Then, pat dry all over with a few paper towels.
  2. Place on a chopping board, and poke holes all over the skin, as many as you possibly can. Use the tip of a sharp knife, or ideally, "The Pork-Skin-Pricking-Tool".
  3. Turn the pork over skin side down. Rub the marinade all over the meat, including the sides of the pork.  Avoid getting any on the skin.
  4. Carefully turn the pork over onto a clean plate, skin side up. Check that the skin is dry, if not pat well with paper towel.  Rub 1 tablespoon salt all over the skin until evenly covered.  This will draw out the moisture.
  5. Place the pork in the fridge, uncovered, for 2-4 hours.
  6. When ready to roast the pork, preheat oven to 230C fan-forced. 
  7. Remove pork from the fridge. Use a paper towel to wipe off all the salt from the skin. Pat the skin dry. Place pork skin side up on a metal rack over a roasting tin. Fill the roasting tin with 1 inch of water. Place the roasting tin on the middle rack and roast for 30 minutes. Once the skin starts to crackle (about 30 minutes later), brush some vinegar over the skin and place the pork back in the oven. Continue to roast for 20 minutes until skin has fully crackled and is lightly golden. Watch it constantly to make sure the crackling doesn't burn!
  8. Once crackling is nicely coloured, turn the oven temperature down to 180C (switch the oven to conventional - I turned off the fan-forced mode at this stage). Continue to roast for a 60-80 minute so that the meat is tender.
  9. Remove from oven and let pork rest and cool down for 30 minutes before chopping into bite-sized pieces.  You will need a sharp cleaver for this. Enjoy while meat is warm and crackling is super crispy.
Note: This will be perfectly complemented by a sweet and sour chilli dipping sauce. Recipe below:

Vinegar Chilli Sauce

1 long red chilli, chopped
1/4 cup rice wine vinegar
1/2 tbsp sugar (or to taste)
Pinch of salt

To prepare the sauce, use a mortar and pestle to pound the chilli until fine, then add the rest of the ingredients and mix well. Add more sugar/salt if necessary. Transfer to a small bowl and use as a dipping sauce.
    reade more... Résuméabuiyad

    Oxtail braised in red wine with sweet and sour carrots (sans turnips)


    Here is another recipe from the "Gary Mehigan Favourites" cookbook. I thought I'd try it out as it was at the "top of his favourites list", although I had to make a few substitutions, particularly with the Barolo which costs a bomb (even more so as two bottles are needed for this). I used Cabernet Sauvignon instead. The recipe also called for baby turnips which I couldn't find (perhaps not in season?) and so I made do with just the baby carrots. They were delicious, cooked in butter and verjuice.  Quite a lot of preparation goes into cooking this as it also requires beef jus and beef stock. The oxtail turned out pretty well and could have done with another half hour in the oven so that they were meltingly tender all the way through. Tasty nonetheless, very savoury and complements the sweet and sour carrots which I love!


    reade more... Résuméabuiyad

    Not quite Bistecca Fiorentina


    Based on the recipe "Bistecca Fiorentina with shallots, garlic and mushrooms" from Gary Mehigan Favourites.  The only difference is, I couldn't get hold of aged T-bone steak, which is of course the main ingredient. Still, it tasted superb especially with the caramelized shallots, creamy roasted garlic and tasty mushrooms, all covered in a sweet tangy balsamic vinegar sauce.
    reade more... Résuméabuiyad

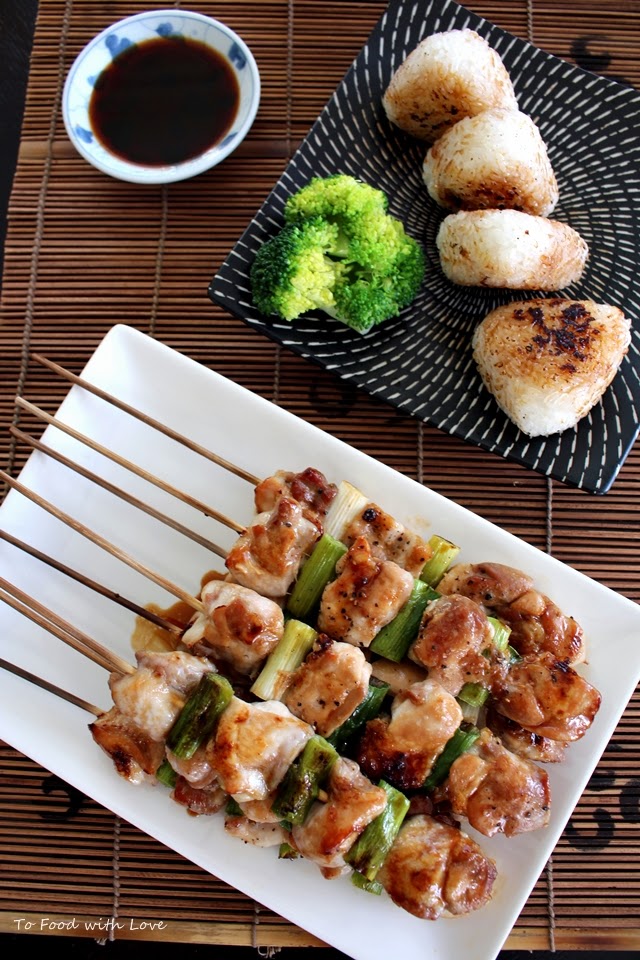
    Yakitori with Yaki Onigiri (Grilled chicken with grilled rice ball)

     
    Grilling chicken tends to dry out the meat easily, so these chicken skewers are best made with drumstick or thigh fillets, and never breast fillets.  If you want to add some chicken skin on the skewers, that's even better (but entirely optional). Yakitori ("grilled chicken") is typically Japanese grilled chicken on bamboo skewers, and could either be plainly seasoned with salt ("shio") or basted with "tare" sauce, which is what I've done here. The kids love it, and it's just something about food served on a stick that makes it so appealing.


    Yakitori (Grilled chicken skewers)
     
    Ingredients
     
    500g (1 pound) chicken thigh fillets, cut into 1 inch cubes
    Vegetable oil
    Salt and black pepper
    4-5 scallions, light green / white part only, cut into 1 inch stems
     
    Yakitori sauce:
    1/3 cup Kikkoman soy sauce
    1/3 cup mirin
    3 tbsp cooking sake
    2 tsp white sugar
    2 tsp brown sugar
     
    Equipment:
    10-12 bamboo sticks
    Barbecue grill or oven grill
    Basting brush
     
    Method
     
    Soak the bamboo sticks for at least 4 hours before using.
     
    Prepare the sauce by combining it in a saucepan, and then boil it over medium heat until it's reduced by less than half.  Leave to cool, and it should thicken slightly to a syrupy consistency.
     
    Skewer the chicken on the bamboo sticks alternating with a piece of scallion. Brush with vegetable oil and season lightly with salt and pepper.
     
    If using an oven, turn on the grill to high.  Place skewered chicken on a baking tray lined with foil, and grill for about 8 minutes each side (turning once) until lightly browned. Baste the chicken halfway through with some of the yakitori sauce. Continue to grill for 2-3 minutes until chicken is lightly charred. If the bamboo sticks start to brown/burn, you can place a piece of aluminium foil over the bamboo sticks to prevent it from burning. Alternatively, wrap the ends of each stick with foil.
     
    Serve the chicken skewers with white short-grain rice or yaki onigiri (Japanese grilled rice balls). 
     
    To make grilled onigiri, cook some sushi or short-grain rice (in a rice cooker). Shape the rice into triangular cakes and lightly compress them so that they don't fall apart. Grill the rice balls in a lightly greased non-stick pan for about 10 minutes until all sides are lightly browned.  Lower the heat and brush some yakitori sauce over the rice balls. Return the rice balls to the pan and briefly grill them again (only for a few seconds as they burn easily) on each side until lightly charred. 


    reade more... Résuméabuiyad

    Churros with maple glaze


    These are choux-pastry type churros, as opposed to the more traditional (I think?!) churros which uses flour and boiling water in making the dough. I tried the latter method a long time ago, and it didn't turn out as I had hoped. So I decided to stick to these ones instead, with a little twist by covering it in a maple syrup glaze. I also made a chocolate sauce (by melting some chocolate in hot milk) for the kids to dunk their churros into. Churros are also referred to as Spanish doughnuts, and are relatively easier and quicker to make compared to regular yeast doughnuts, simply because there's no need to proof the dough.They are also wonderfully light, fluffy and buttery, with a sweet and crunchy exterior that is accentuated by the ridges characteristic of this popular street food.


    Ingredients:

    200ml water
    80g butter 
    1 1/2 tbsp caster sugar 
    1/2 tsp salt 
    120g plain flour 
    1/2 tsp vanilla extract
    3 large eggs 
    Oil for deep-frying
    1/2 cup icing/caster sugar mixed with 1/2 tsp ground cinnamon, for dusting 

    Maple glaze:

    1 cup icing sugar, sifted
    3-4 tbsp maple syrup
    1/2 tsp sea salt
    1-2 tbsp water, milk or orange juice

    Method:

    Combine water, butter, sugar, salt, vanilla and water in saucepan and bring to boil. Add flour, stir quickly with wooden spoon to combine. Cook for 3 mins over medium heat, stirring constantly until the mixture forms a ball and comes away from the side of the pan. Take it off the heat and leave to cool for 5 minutes.  Add the vanilla extract. Then add eggs one at a time and stir briskly until well combined, thick and glossy. Transfer to a piping bag fitted with a 1cm-diameter fluted nozzle.


    Heat oil in large deep frying pan. Using a knife to cut the dough, pipe six 10cm lengths into the oil. Cook, turning with tongs halfway through cooking, for 2-3 minutes or until golden. Use a slotted spoon to transfer to a plate lined with paper towel. Dust churros with the cinnamon sugar mixture.


    Combine ingredients for the maple glaze and mix well until smooth. Drizzle over churros and serve warm 
    or at room temperature.


    reade more... Résuméabuiyad

    Beef Sliders on Brioche with Sticky BBQ sauce and Thousand Island Dressing


    Ever since I started baking brioche buns (see my Pulled Pork burger with Korean Slaw) and using them for mini beef burgers (a.k.a. sliders), there was no turning back. Given a choice, brioche wins over plain hamburger buns (particularly those that are sold by the dozen at the supermarket). Not all brioche buns are created equal. I have ordered brioche burgers before when dining out, and have come across really thick, heavy, dense and sweet buns that makes the mammoth of the burger a feat to eat (and enjoy). The recipe that I've used for these brioche buns is adapted from Taste.com.au magazine (August 2014 edition). Rich, melt-in-your-mouth and buttery with a hint of sweetness, these brioche buns make supremely delicious burgers. I've also tried buttermilk brioche buns and they are equally good, with the slightest tang from the buttermilk.


    These beef sliders are saucy, juicy and packed full of flavours. To make them even more awesome, I made a sweet and tangy barbecue sauce along with a "Thousand Island" dressing (inspired by In-N-Out Animal style). This special sauce with an all beef-patty, lettuce, cheese on a toasted sesame seed brioche bun was the perfect albeit-messy-to-eat-with-sauce-smothered-everywhere-but-oh-so-tasty burger. Read on to get the recipes.


    Beef sliders

    800g premium beef mince (Angus or Wagyu)
    1 medium brown onion, diced
    3 cloves garlic, chopped
    2 tsp worchestershire sauce
    1 tbsp dijon mustard
    1 1/2 tsp salt
    Freshly ground black pepper
    Vegetable oil for frying

    Barbecue sauce (adapted from Gordon Ramsay):
    1 large onion, finely diced
    4 cloves garlic, finely chopped
    3-4 tbsp brown sugar
    3/4 cup ketchup
    1 1/2 tbsp cider vinegar
    1 tbsp worchestershire sauce
    Salt and black pepper

    "Thousand Island" sauce:
    3/4 cup mayonnaise
    3-4 tbsp ketchup
    2 tsp worchestershire sauce
    2-3 tsp tabasco sauce
    Salt and black pepper

    To serve:
    Brioche buns (scroll down for recipe)
    Sliced tomatoes
    Lettuce leaves
    Cheddar cheese slices
    Barbecue sauce
    Thousand Island sauce

    Method

    1. For the barbecue sauce, heat oil in a frying pan, add onion and garlic with some seasoning and the sugar, and fry for 5 minutes until softened. Cook for 10-15 minutes until onion is caramelising, then add vinegar and let it cook out for a few minutes. Add Worcestershire sauce and tomato sauce, mix well and continue to cook for about 8 minutes until sauce has reduced to a dropping consistency. Taste and adjust seasoning. Remove from heat and set aside.
    2. For the Thousand Island sauce, mix all ingredients in a bowl. Taste and adjust seasoning. Set aside.
    3. To prepare the beef patties, first sauté the onions and garlic in 2 tbsp olive oil until softened (about 5 minutes). Transfer to a medium mixing bowl and let it cool a little. Add worchershire sauce, mustard, salt and pepper. Mix well. Add the beef mince and gently mix to combine.
    4. Lightly shape into 12 patties. Make a small indent in the centre of each patty to prevent shrinkage while cooking.
    5. Heat oil in a pan on medium-high heat, and fry each patty for 2-4 minutes, turning occasionally until cooked. Place a cheese slice on the patty and let it melt. Transfer to a plate.
    6. To assemble the burgers, halve the brioche buns and toast them in the pan until lightly browned. Spread some Thousand Island and barbecue sauce on the bottom half, and top with lettuce, tomato, beef patty, Thousand Island and barbecue sauce, and cover with the other half of the bun. Serve immediately with fries and onion rings if desired.


    Brioche Buns
    Adapted from Taste.com.au
    makes 12

    Ingredients

    2 teaspoons (1 sachet/7g) dried yeast
    1/3 cup (80ml) warm milk
    2 tbsp caster sugar
    2 cups (300g) strong plain bread flour (+ 1/4 cup extra)
    1/4 teaspoon salt
    3 eggs, lightly whisked
    120g butter, softened and cut into 2cm pieces
    1 egg yolk lightly whisked with 2 tsp milk
    1 tbsp sesame seeds

    Method

    1. Combine the yeast, milk and 1 tablespoon of caster sugar in a small bowl. Set aside for 5 minutes or until frothy.
    2. Combine the flour, salt and remaining sugar in a large bowl and make a well in the centre. Pour yeast mixture and eggs into the well and stir until just combined. Turn on to a lightly floured surface. Knead for 5 minutes or until smooth. Alternatively, use a stand mixer with dough hook attachment.
    3. Add 1-2 pieces of butter to the dough and knead until well incorporated. Gradually continue to add butter cubes, 2-3 at a time, and knead until well incorporated. With the extra 1/4 cup flour, sprinkle one tablespoon of flour at a time and continue kneading the dough until it's smooth and elastic (about 10 minutes). The dough should pull away cleanly from the sides of your mixing bowl. Transfer the dough to a large lightly greased bowl and cover with plastic wrap. Set aside in a warm, draught-free place for 1.5 hours or until dough doubles in size.
    4. Preheat oven to 190°C. Grease a baking tray with butter. Use your fist to knock back the dough and knead for 2-3 minutes or until smooth. Divide into 12 even portions. Roll each dough into a smooth ball and place on the tray, spacing them out about 2 inches apart. Set aside in a warm, draught-free place for 1 hour to rise and double in size.
    5. Brush each brioche with the egg yolk and milk mixture, and sprinkle with sesame seeds. Bake in preheated oven on the middle rack for 15 minutes or until golden brown and cooked through. Leave to cool slightly before slicing in half for your burgers.


    reade more... Résuméabuiyad