Pages

.

Galbi Jjim (Korean Braised Beef Short Ribs)


I've been eating too much Korean Fried Chicken lately it's not funny. I decided to try a healthy Korean dish this time which is a stew made with beef short ribs. It's cooked in a light soy-based broth that reminds me of bulgogi, but made into a stew instead. It contains honey and mirin, and so tends to be on the sweet side. It's a nice change from the salty braised pork belly stew that I'm so used to at home. Galbi in Korean translates to "shortrib" and "jjim" refers to dishes made by steaming or boiling.


Galbijjim (Korean Braised Beef Short Ribs)
Adapted from Korean Bapsang

Ingredients

3 pounds meaty beef short ribs
1/2 onion
3 -4 thin ginger slices
5 garlic cloves
3 white parts of scallions

Braising Liquid:
1/2 cup soy sauce
2 tablespoons sugar
2 tablespoons honey (I omitted this)
1/4 cup rice wine (or mirin)
2 tablespoons of sesame oil
1/2 medium Asian pear, grated (about 1/2 cup)
1/2 small onion grated
1 tablespoon minced garlic
1 teaspoon grated (or juiced) ginger
1/2 teaspoon black pepper

Vegetables:
10 ounces Korean radish, cut into large chunks (about 1-1/2-inch cubes)
3 – 4 dried shiitake mushrooms, soaked and quartered
2 carrots, cut into large chunks (about 1 inch long)

Optional garnish:
6 – 8 peeled fresh chestnuts
6 – 8 dried Korean dates/jujube
10 – 12 gingko nuts, or 1 tablespoon pine nuts


Method

Trim off any excess fat. Rinse the ribs and let them sit in cold water for about 30 minutes to draw out excess blood. Drain. In a large pot, bring 4 cups of water to a boil. Add the ribs, onion, ginger, garlic and scallions.

Bring it to a gentle boil, uncovered. Skim off the scum on the top. Reduce the heat to medium and cook for 30 minutes. Remove the ribs, reserving the stock.

Strain the stock and skim off the fat. (Refrigerating the stock will help the fat solidify for easier removal. If you have room in the freezer, the process will go faster.)

Mix together all the braising liquid ingredients. Return the ribs to the pot. Pour the braising liquid over the meat. Set it aside to marinate for about 30 minutes.

Meanwhile, prepare the vegetables.

Add 2-1/2 cups of the stock to the marinated ribs. Cover and bring it to a boil. Reduce the heat to medium low and simmer for 30 minutes. Stir in the vegetables, leaving out the optional garnish ingredients. Continue to simmer, covered, for about 20 minutes.

Stir in the optional garnish ingredients. Return to simmer, uncovered this time, for an additional 10 – 20 minutes*, or until the sauce is thicker and the meat is tender but not falling apart.

(*At this time, adjust the heat level and cooking time, depending on how tender you want your ribs to be and how much sauce you like to have. Use medium low heat and additional time for more tender meat with more sauce. Likewise, you can increase the heat to medium to reduce the sauce quicker. Also, leaving the pot uncovered during the last 10 – 20 minutes gives the ribs a nice sheen.)
reade more... Résuméabuiyad

Soboro Don (Japanese Ground Chicken Rice Bowl)


Loving this simple dish that's kid-friendly, yet perfect for a weeknight family meal if you're looking for something quick and easy to prepare. I love eggs, and especially scrambled eggs. This chicken mince rice bowl is served with an egg crumble, which is made by scrambling the eggs with a pair of chopsticks until it turns into crumbs (of course!). Leftovers also make great lunchboxes for kids the next day.


Soboro Don
Source: Adam's Big Pot

Ingredients

1 tbsp vegetable oil
500g chicken mince
¼ cup soy sauce
¼ cup sake
2 tbsp caster sugar
2 tbsp mirin
¼ cup water
2 cups snow peas, tailed
8 cups steamed short-grain rice,

To serve

1 sheet nori, finely sliced, to serve

EGG CRUMBLE

4 eggs
2 tbsp mirin
1 tsp caster sugar

Method

Heat the oil in a medium saucepan over medium heat and add the chicken mince. Fry the mince until it turns white (you don't need to brown it) and add the soy sauce, sake, sugar, mirin and water.

Bring to a simmer, stirring occasionally for about 10 minutes, or until the liquid has almost completely evaporated. Stir again to moisten the chicken and set aside.

To make the egg crumble, heat the eggs, mirin, sugar and salt together in a medium saucepan over medium heat, stirring frequently for about 10 minutes, or until the egg dries and is in small pieces. Blanch the snow peas in boiling salted water for about 1 minute, then refresh in cold water.

Cut the snow peas in half diagonally. Divide the rice between four bowls and press down to create a flat surface.

Arrange the chicken, sliced snow peas and egg crumble in sections over the top of the rice.

Serve with sliced nori.

TIP:  This recipe works equally well with pork, turkey or beef mince. For the snow peas you could substitute cooked green peas, or blanched green beans sliced into rounds.


reade more... Résuméabuiyad

Crispy Deep-Fried Chicken Curry Puffs


Curry puffs are a staple teatime snack in Malaysia and Singapore, along with other tasty favourites such as banana fritters (with chili soy sauce!), sweet potato donuts (and many other deep-fried snacks!). Maybe it's just me, but whenever I'm in Malaysia, I'm constantly eating round the clock - breakfast, mid-morning snack, brunch, lunch, dessert, afternoon tea, evening snack, dinner, snack again followed by supper. Fortunately, there's a wide variety of food to choose from across different cuisines, plus there are different food stalls that operate from early morning till past midnight, and some even over 24 hours. Curry puffs are also known as epok-epok or karipap in Malaysia. I've made various types which you can find here, here and here. The recipe below is another version that uses oil and margarine, which gives it a firmer yet crispy texture, and equally delicious.

According to my mum, the "makcik" (auntie in Malay) selling curry puff in Malaysia told her that in order to get a flaky pastry, you need to "canai" the dough (meaning to flatten out and knead the dough) for about 5 minutes or long enough to incorporate air into the dough. I tried it and it turned out well, though next time, I'll need to test and see if it makes any difference if I didn't "canai" the dough.


Crispy deep-fried curry puffs

Ingredients

Filling:
Click here for recipe.

Pastry:
220g plain flour
25g rice flour
25g tapioca starch
60ml (1/4 cup) vegetable oil
30ml (2 tbsp) margarine
110ml cold water
1/4 tsp salt

Method

Prepare the curry puff filling first (click here for recipe).

After filling is cooked and cooled, prepare the pastry. Combine all the flours in a mixing bowl. Place margarine in a small saucepan and heat until melted and bubbling. Add vegetable oil and heat again until hot. Drizzle the hot oils into the flour and use a spatula to mix through until crumbly and soft. Mix 1/4 teaspoon salt to the cold water and drizzle over the flour mixture. Mix together with hands and start kneading until it forms a soft dough. Place on a flat surface like a wooden board, and knead well Stretch out and flatten the dough and fold over repeatedly, incorporating air into the dough. Do this for about 5 minutes.

Roll out little balls of dough and flatten into a disc. Place the cooked curry filling in the centre of the disc and fold over into a half moon, and pleat the edges with your fingers. If using a curry puff mould, make sure to seal the edges with tapioca starch solution so that the seal doesn't open up when frying.

Heat oil in a wok, pan or deep-fryer, enough for deep frying. When oil is hot (on high heat), add the curry puffs one at a time, fry for a minute and then turn the heat down to medium. Fry in batches, for about 5-7 minutes until golden brown. Then remove and drain on a wire rack or some absorbent kitchen paper. Serve, enjoy!


reade more... Résuméabuiyad

Mascarpone Cheesecake with Nutella Sauce


I go through phases once in a while.  When I try a food that I really like and think that I could replicate it at home, I would do tonnes of research on the internet (I can't imagine how that would be possible 20 years ago, thanks Dr Google) and try out different recipes and variations until my mission was complete. To think of those times I had to eat char kuay teow 3 weekends in a row, the different versions of Korean fried chicken I had to go through, and all those swiss rolls and chiffon cakes (the good, the bad and the downright ugly) - I don't know why I do it, but perhaps it's determination, or maybe I just don't know when to stop. This time, I went through a cheesecake phase. Ever since I tried the New York cheesecake from Lorraine's Patisserie, I totally fell in love with its light, fluffy and cloud-like texture. Never mind that the cake was so delicate that it kept falling apart when I tried to slice it. It was like eating cheese-clouds and gingery spiced biscuit crust - simply heavenly!


I found this recipe for mascarpone cheesecake by Giada that had an almond crust. For recipe-testing purposes, I skipped the crust and made the cheese filling only, just to see how the texture turned out. So, the mascarpone makes it more Italian than New York style, though Giada claims that mascarpone makes the lightest cheesecake. It turned out pretty light and creamy (though it tends to be a bit firm when it's straight out from the fridge). The kids loved it especially with the nutella sauce. The original recipe includes the crust, which I've omitted below. A crustless cheesecake is equally delicious and much simpler too! 


Mascarpone Cheesecake (Crustless)
Adapted from Foodnetwork

2 (8-ounce) packages cream cheese, room temperature
2 (8-ounce) containers mascarpone cheese, room temperature
1 1/4 cups sugar
2 tablespoons fresh lemon juice
1 teaspoon vanilla extract
4 large eggs, room temperature

Topping:
1/2 cup Nutella
1/4 cup milk or whipping cream

Method

Prepare a 9 inch springform pan by greasing and lining the base with baking paper. Wrap the outside of the pan with 3 layers of aluminium foil, making sure there are not holes/tears in the foil. Preheat oven to 180C.

Using an electric mixer, beat the cream cheese, mascarpone cheese, and sugar in a large bowl until smooth, occasionally scraping down the sides of the bowl with a rubber spatula. Beat in the lemon juice and vanilla. Add the eggs, 1 at a time, beating just until blended after each addition.

Pour the cheese mixture into the springform pan. Place the pan in a large roasting pan. Pour enough hot water into the roasting pan to come halfway up the sides of the springform pan. Bake until the center of the cheesecake moves slightly when the pan is gently shaken, about 1 hour 5 minutes (the cake will become firm when it is cold). Transfer the cake to a rack; cool for 1 hour. Refrigerate until the cheesecake is cold, at least 8 hours and up to 2 days.

For the topping: Combine the nutella and milk / cream in a small bowl. Heat in the microwave until warm, stirring every 20 seconds to blend, about 1 minute.

Cut the cake into wedges. Drizzle the chocolate sauce over the wedges and serve.


reade more... Résuméabuiyad

Masala Dosa (Far Flung wtih Gary Mehigan)


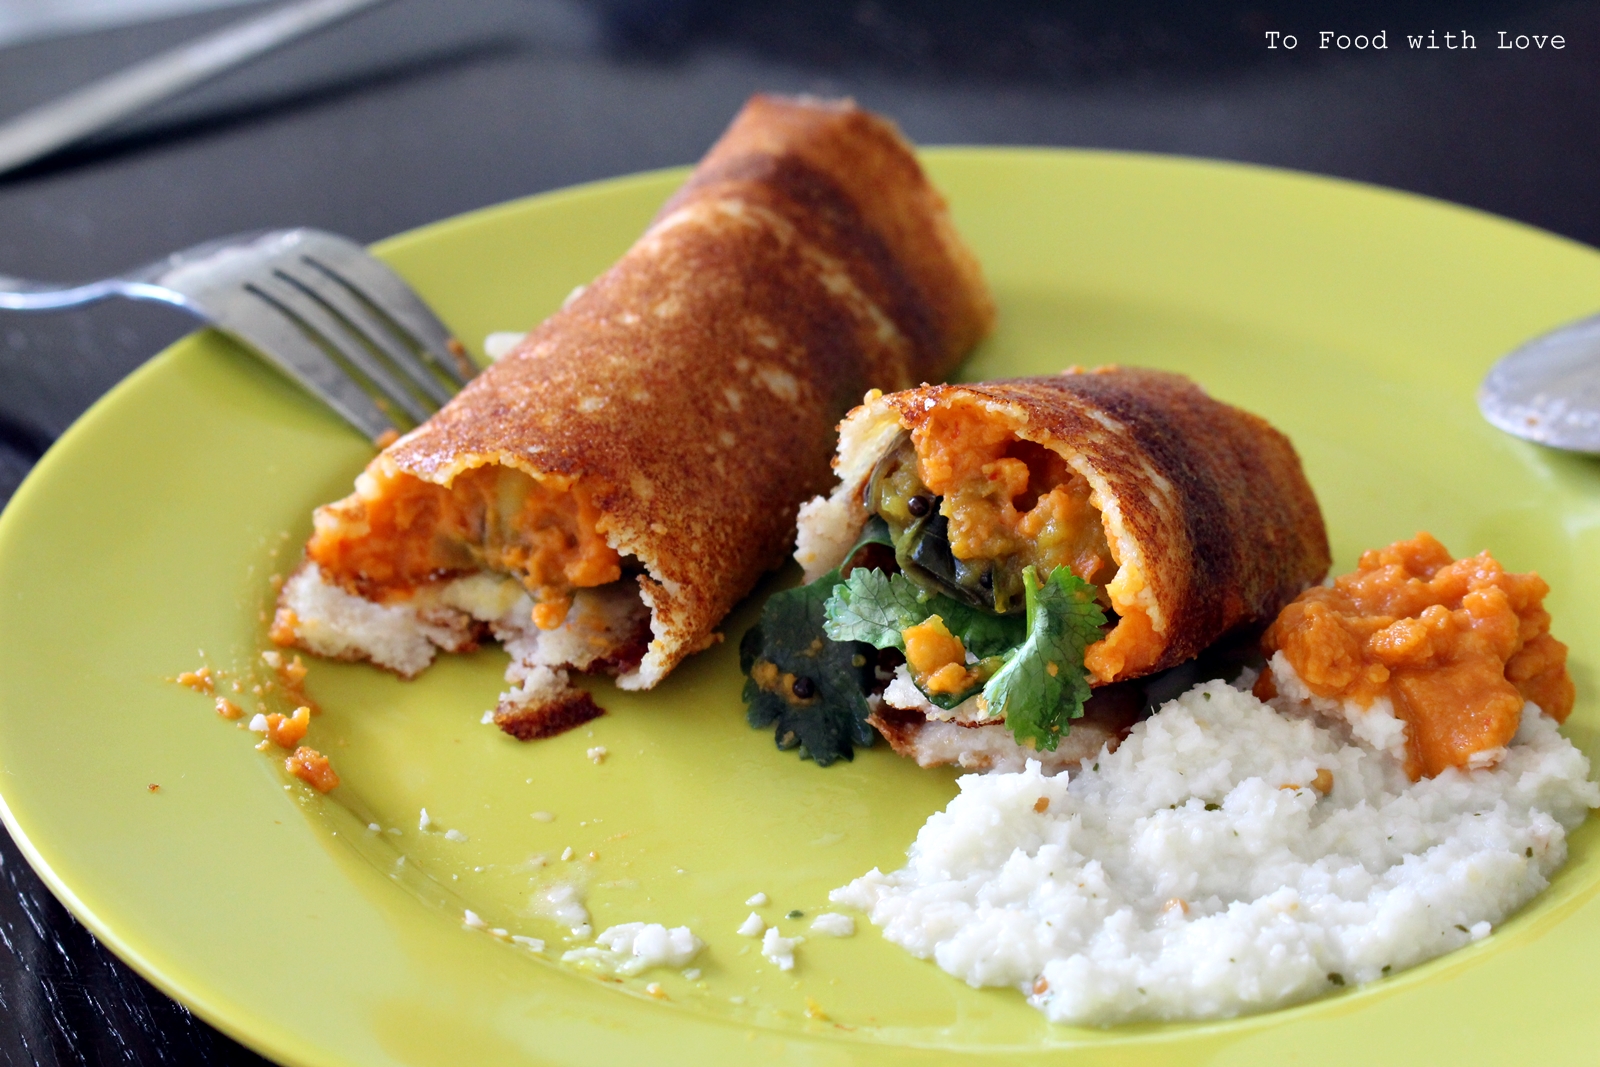
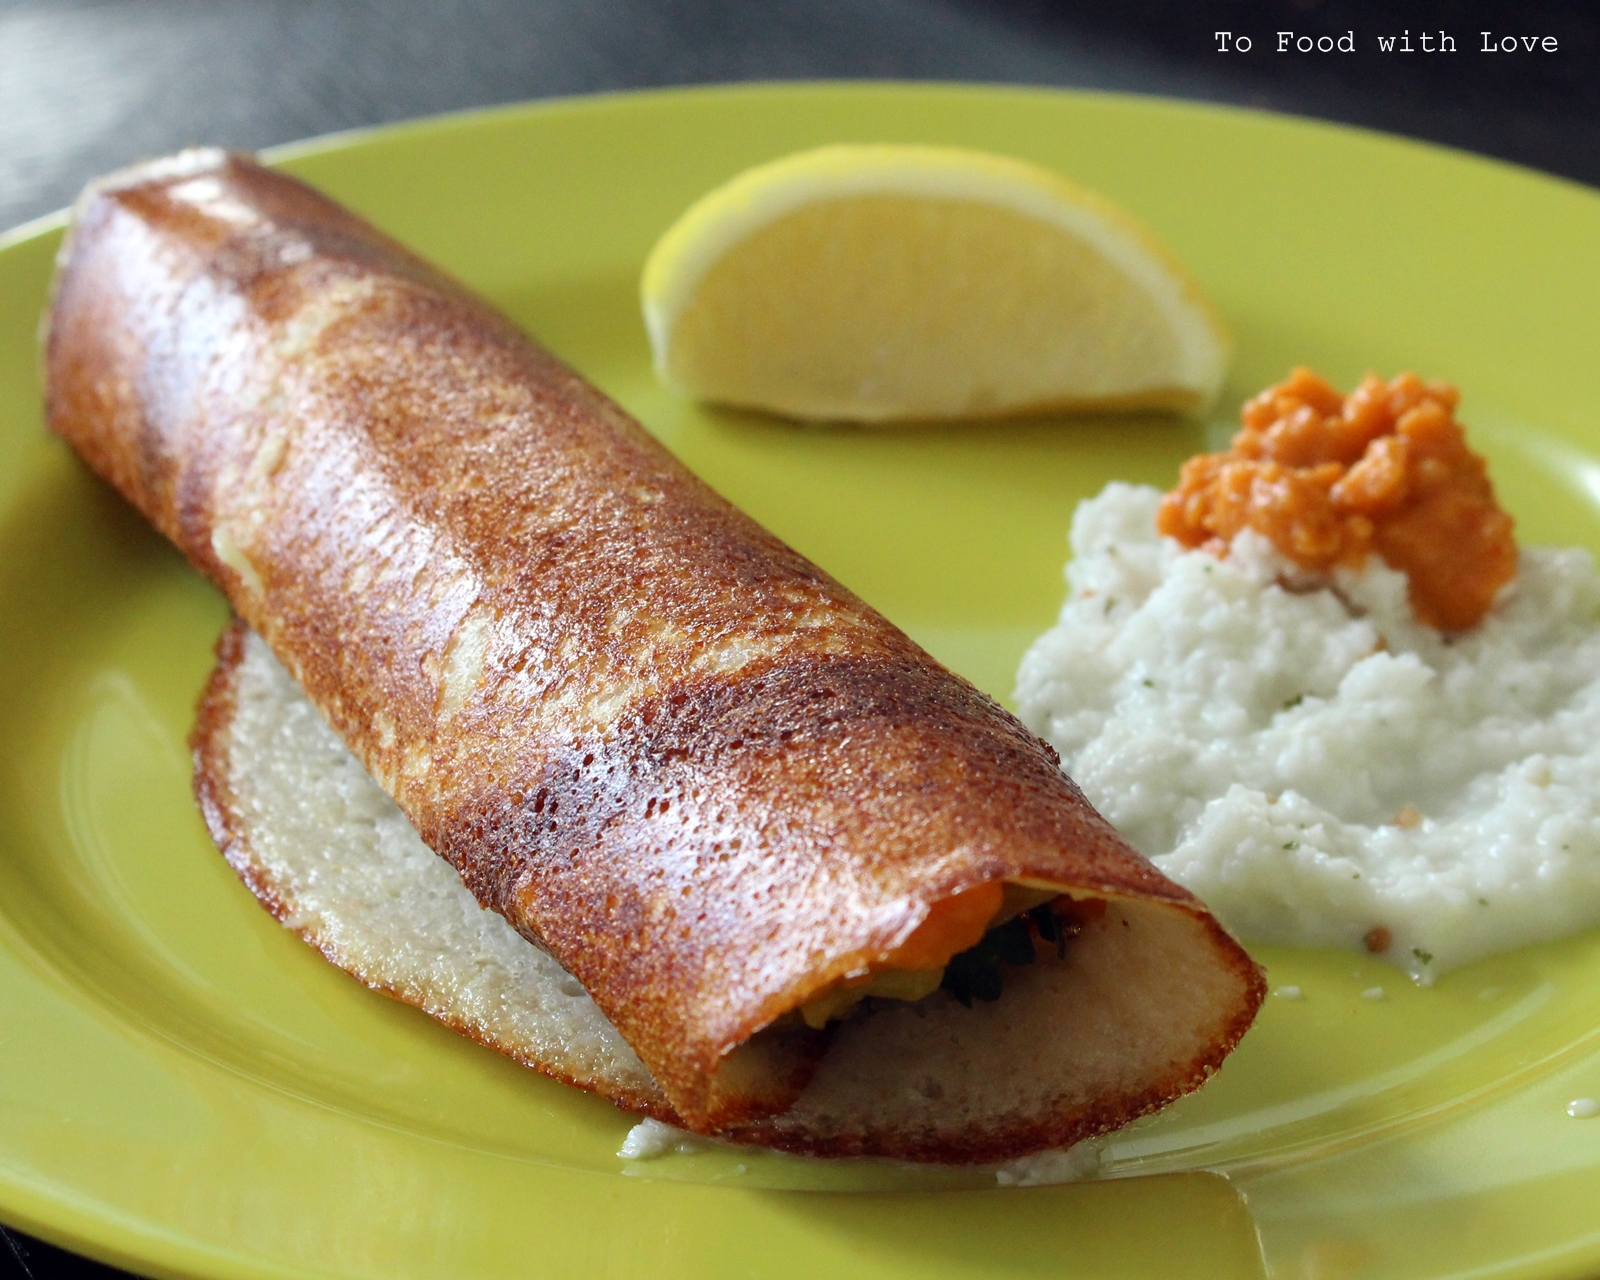
I have a weakness for all things caramelized, golden brown and crispy. Take for example, this Okonomiyaki Pancake-style Gyoza which was featured in Adam Liaw's Destination Flavour Japan two years ago. How could anyone resist those crispy charred-bottom dumplings doused in Kewpie mayonnaise? Well, certainly not I! Nor could I resist the temptation of the golden crispy dosa that Gary made in his latest cooking show "Far Flung with Gary Mehigan" which started airing on Channel Ten two weeks ago.


Dosa is one of my absolute favourite Indian foods, especially crispy paper dosa, which is a very thin and crispy dosa served with sambar and chutney. My trips back to Singapore are never complete without having paper dosa at least once at Little India.


And so begins my inaugural attempt at making masala dosa. The most important part of all this is the fermentation of the batter, which mainly made from rice and urad dal. Without adequate fermentation, you won't get the distinctive sourish taste of dosa. It's winter in Sydney and not the best time to find a warm spot to let the batter do its job. I did chuck it in a warm oven (turned off) for a little while, though it wasn't very effective. Nevertheless, the dosa turned out marvellouslly well (sans the sourness) and the texture was perfect - crispy on the outside and slightly chewy in the middle. I made the red chutney as well a coconut chutney to go along with it. It was deeeee-licious! If only I had a large hot plate, I could make a few dosas at a time as it takes about 5 minutes for each dosa to turn golden and crispy. I'm salivating at the thought of it now.

The potato bhaji is easy to prepare. I skipped the asafoetida as the bottle I had (from making Pav Bhaji 3 years ago!)  had expired and I didn't bother to buy another. I wasn't too sure if I got the red chutney right as it seemed a little dry (perhaps I used too much chana dal which I roasted/deep-fried until crisp) and so I had to add a fair bit of water to loosen the texture to a spreadable paste. In any case, it was the perfect accompaniment to the masala dosa. I made a quick coconut chutney using dessicated coconut, garlic, curry leaves and mustard seed. I'm salivating again. I think this calls for a dosa party at my house soon. Who's interested? :)


Dosa

1 cup raw short grain rice
1 cup cooked short grain rice
1 cup ural dal
1/4 cup channa dahl
1 tsp fenugreek seeds
Pinch salt
60ml oil or ghee for cooking

Place both the cooked and raw rice and dahls into a medium sized bowl and rinse a few times under running water. Add the fenugreek seeds and cover with water (about 2 inches high).

Cover with cling wrap or a cloth and leave to ferment at room temperature for 5 hours or overnight.

Drain most of the liquid but reserve to one side. Blend the rice and dahl into a batter, adding a little of the soaking liquid if required to loosen. The batter should be the consistency of double cream.

Cover and leave in a warm place to ferment for a further 8 hours or overnight until bubbly and light. Add salt and mix again. Set aside. Prepare the potato bhaji (see below).


Potato Bhaji

2 tbsp vegetable oil
1 tbsp mustard oil (optional)
1/2 tsp brown mustard seeds
1 tbsp chana dal
1/4 tsp asafoetida (optional)
1 large red onion finely sliced
2 green chillies, chopped
10 curry leaves
1/2 tsp salt
3 medium potatoes diced and boiled
1 tsp ground turmeric
1 tsp salt (or to taste)
1/2 cup of water
2 tblsp chopped coriander
1/2 lime wedge

Heat the oils in a medium sized pan and add the mustard seeds. They will begin to sizzle and pop, add the chana dal and toast until golden. Add the asafoetida, the sliced onions, green chilies, curry leaves and pinch of salt and cook until light golden.

Add the cooked diced potatoes, turmeric, a pinch of salt and 1/2 cup of water. Stir to combine, lower the heat and cook for a further 3-4 minutes to allow the heat to draw through the potatoes and for the flavours to combine. Set aside.


To make and assemble the dosa: Heat the dosa pan over a low heat (if it's too hot, the batter will set too quickly making it difficult to spread it around the pan) and pour a ladle of batter into the centre of the pan. Starting from the middle spread the batter out in concentric circles towards the outside to form a thin pancake. Don't try to retrace the lines.

Drizzle a little oil around and over the dosa and cook gently for 3-4 minutes until the bottom is golden and crisp. Spread some red chutney (see recipe below) over the dosa and place a spoonful or two of the potato bhaji into the centre, and carefully roll into a large tube. You need to do this while the dosa is still hot, otherwise it will be difficult to roll once it cools down. You can also fold it into a half-moon shape.

Serve the dosa warm with a little bowl of coconut chutney, fresh lime wedges and fresh chopped coriander. 

Red Chutney

1/2 cup roasted channa dahl
1 tbsp crush ajwain seeds
8 cloves garlic
5-6 long red chillies (I used dried chillies that have been blended and fried in oil)
1 tbsp lemon juice
1/2 tsp salt
Water

Combine in a spice grinder along with a little water and blend to a paste. 


Here's a variation of dosa with a lightly beaten egg spread over the top and cooked till set.
Something a bit more substantial!


reade more... Résuméabuiyad

Light and fluffy Ricotta Cheesecake (with homemade ricotta)


I made ricotta cheese. Did you not know you could do that, with only 3 ingredients in less than 10 minutes! And all with curds and whey, I felt like Little Miss Muffet now waiting for a spider to pounce at me. So why make ricotta? Apparently, homemade ricotta gives the cheesecake a fluffier texture, and it did turn out to be light, fluffy and creamy, with a subtle taste of ricotta. I used a gingernut biscuit base just to add some flavour and texture, although you can omit that to make a crustless version.


This is not a very sweet cake, unlike your typical New York cheesecake. It's probably closer to a Japanese cheesecake except for the fine graininess of the ricotta. If you like, you can serve it with some berry coulis to satisfy that sweet tooth. I find that the cake tastes best after it has "matured" for up to 3 days in the fridge. The flavours seem to have developed and the texture is somehow creamier too.

Ricotta in the making

Homemade Ricotta
Adapted from Smitten Kitchen
Makes 1 generous cup of ricotta

Ingredients

3 cups whole milk
1 cup heavy cream
1/2 tsp salt
3 tbsp lemon juice (or substitute with white vinegar)

Method

Pour the milk, cream and salt into a medium-sized nonreactive saucepan. Heat the milk to 190°F (or until it's just about to come to a simmer), stirring it occasionally to keep it from scorching on the bottom. Turn off the heat. Add the lemon juice or vinegar, then stir it once or twice, gently and slowly. Let the pot sit undisturbed for 5 minutes.

Line a colander / strainer with a layer of muslin or cheesecloth and place it over a large bowl (to catch the whey). Pour the curds and whey into the colander and let the curds strain for at least an hour. At an hour, you’ll have a tender, spreadable ricotta. At two hours, it will be spreadable but a bit firmer, almost like cream cheese. (It will firm as it cools, so do not judge its final texture by what you have in your cheesecloth.) Discard the whey. Eat the ricotta right away or transfer it to an airtight container and refrigerate until ready to use. (For purposes of making the cheesecake, I left the ricotta in the muslin cloth and placed it in an airtight container in the fridge overnight to drain the ricotta further).

Ricotta Cheesecake
Adapted from The Baked Road

Ingredients

Crust:
120g Arnotts Ginger Nut biscuits *
60g melted butter

Filling:
1 packet cream cheese (250 g / 8 oz), room temperature
250g (8 oz or 1 cup) ricotta cheese, room temperature
4 eggs, separated and at room temperature
3/4 cup sugar
1/4 cup sour cream or plain yogurt
1 tsp vanilla extract
2 tablespoons lemon juice
1 1/2 tablespoons cornstarch
1/2 teaspoon vinegar

* Note: You can substitute with 150g Arnotts Orange Slice (cream biscuits) and 15g melted butter. Or if you prefer chocolate, use 150g Oreo cookies and 15g melted butter.

  1. Preheat oven to 180C / 350 F. Grease and line the base of an 8 inch (3 inches tall) round springform pan. Wrap the pan all around with aluminium foil to prevent water from leaking in from the water bath. Boil some water for the water bath.
  2. In a food processor, crush biscuits to fine crumbs. Add butter and pulse to combine. Spread crumb mixture evenly over pan base, pressing firmly with a fork or base of a glass. 
  3. In a mixer using the paddle attachment, cream together the ricotta and cream cheese until smooth. Add in the egg yolks, one at a time. After mixing thoroughly, add the sour cream/yogurt, vanilla, 1/2 cup sugar and lemon juice. Sift in the cornstarch. Mix well.
  4. In another clean bowl, beat the egg whites and vinegar until large bubbles form. Slowly add in rest of the 1/4 cup sugar, and continue beating until soft peaks form.
  5. Fold in 1/3 of the meringue with the cheese mixture until fully incorporated. Add in the rest of the egg whites, folding gently without deflating the meringue but thoroughly. Pour the batter over the biscuit base. 
  6. Place a larger baking pan (one that the 8-inch pan can fit into comfortably) into the oven first (use the middle rack) and pour the boiling water (from step 1) into the larger baking pan until it comes halfway up the cakepan. The waterbath helps minimize the cracks on the surface of the cheesecake and prevents the cake from overcooking.
  7. Bake for 1 hour to 1 hour and 15 minutes. If the cheesecake is browning too fast, turn the heat down to 160C / 300 F, or place a piece of baking paper over the top of the cake to prevent further browning. The cake is cooked when there is still a slight wobble in the middle. Remove the cake from the waterbath and place the cakepan back in the oven to cool, with the oven door slightly ajar. I find that leaving the waterbath in the oven may result in condensation and moisture seeping into the cake.
  8. Refrigerate for a few hours or overnight. Cake tastes best after 1-2 days when the flavours have developed. Dust cake with icing sugar and cinnamon before serving. 


reade more... Résuméabuiyad

Ebi Fry Curry Don (Fried Shrimp with Curry on Rice)


I posted a recipe for Ebi Fry back in February last year (has it been that long??) and I mentioned something about serving the shrimp (or prawn, depending on which country you're from) with thick Japanese curry. Well, it sort of slipped my mind because I was busy trying out other recipes at the time. One year and a bit later, here's the post, and it's still one of my favourite comfort foods, especially now that we're in the middle of winter (Down Under). Crispy and golden panko-crumbed prawns, coated in a thick curry sauce and served with rice, how can anyone resist?


Ebi Fry Curry Don
Serves 4

You will need:
12 large Ebi Fry (fried shrimp) - click here for recipe
4 serves of cooked short-grained rice
4 serves of Japanese curry (see below for recipe)

Japanese curry recipe

I used S&B Golden Curry mix and added chicken, carrots and potatoes. I also added a little honey for a hint of sweetness.

Ingredients

2 tbsp vegetable oil or butter
2 medium onions, finely chopped
700g chicken thigh fillets, cubed
1/2 grated apple (optional)
3 cups water
2 medium potatoes, cut into 1.5 inch cubes
1 large carrot, cut into chunks
120g S&B Golden Curry mix (4 cubes of curry roux)
1 tbsp honey

Method

Heat up oil/butter in a medium pot and fry the onions until soft. Add the chicken and fry for 3 minutes. Add apple if used. Pour in the water and bring to a boil. Simmer for 40 minutes until cooked. Add carrots and potatoes and cook for a further 10-15 minutes until potatoes are just tender. Stir in the curry mix until dissolved, and bring the gravy to a simmer for 5 minutes until thickened. Stir in the honey. Turn off heat and keep warm until ready to serve.

Assembly:

Dish out rice onto 4 serving plates. Place 3 pieces of Ebi Fry on each plate and ladle some of the hot curry over the rice. Enjoy immediately!


reade more... Résuméabuiyad